
Prerequisite – Get Bundle Provisioned to your NetSuite Account
Before you perform the bundle installation process, you will need to first get the bundle provisioned to your NetSuite environment. You can go to the Sonar AI product page located at https://www.anchorgroup.tech/products/sonar and then click on any button on that page that takes you to request the bundle or get free access. This will take you to a form to submit for access. On this page it will ask for your NetSuite environment ID which can be found in the URL of your NetSuite environment you are logged into. 
Anchor Group will get notified you submit this form and will provision the bundle within 1-2 business days. You will receive an email with a notice that the bundle has been provisioned.
Bundle Install – One 30 Minute Session
When the bundle has been provisioned, you will be asked to schedule a 30 minute meeting to make sure it gets installed correctly and that your use cases get addressed.
Step 1: Search and Install Bundle
When logged in as a NetSuite administrator role in your NetSuite environment, navigate to Customization > SuiteBundler > Search & Install Bundles.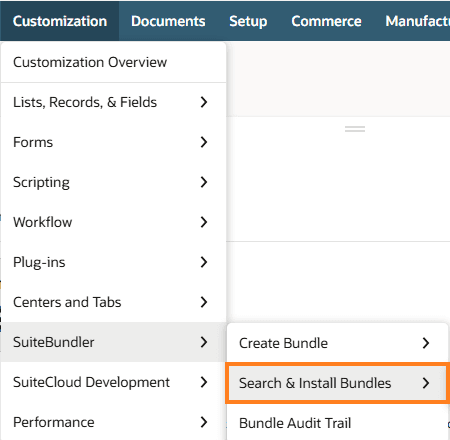
Step 2: Search and Install the Bundle
The easiest way to make sure you have the right bundle is to search by bundle ID rather than Sonar AI keyword. Type in the Keywords text box the bundle ID of 702855.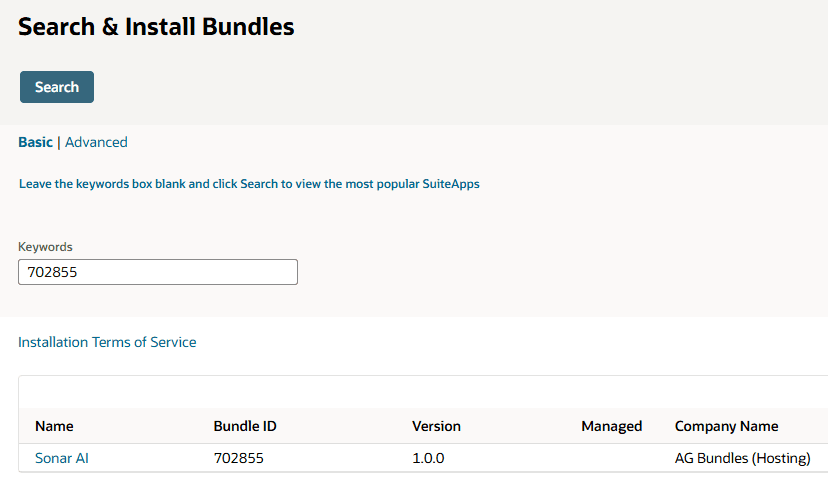
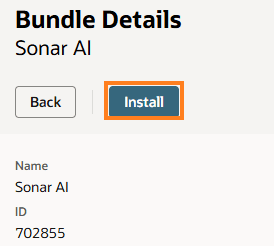
Click on the “Sonar AI” link and then click “Install”
You will be presented with one final page to see a final preview to confirm. Click “Install Bundle.”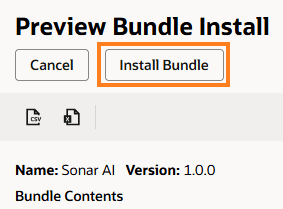
Troubleshooting Bundle Install Error: If you get an error at this stage, it could mean that the provisioning wasn’t done correctly or that you didn’t provide the correct NetSuite account ID. For instance, if you want it provisioned to your sandbox account, you would have needed to provide both the sandbox ID and production account ID. Reach out to Anchor Group if you run into an error at this stage.
Step 3: Verify Bundle Installation is Complete
You will be redirected to a bundle install list page for all the bundles in your NetSuite environment. You can scroll down or CTRL+F shortcut and look for “Sonar AI”. If it still shows as “Pending”, then refresh the page until the status shows as checked (meaning complete). This process takes about 60 seconds to complete.
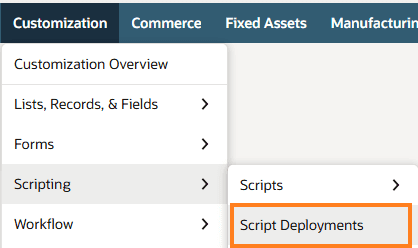
Step 4: Find App URL
Navigate to the script deployment with a NetSuite administrator role by going to Customization > Scripting > Script Deployments.
Search for the script deployment with ID of “customdeploy_sonar_ai” and click “View.![]()
Click on the relative URL which will open up the Sonar AI application. Make sure to bookmark and create a shortcut to this URL so that it is easier to access in the future.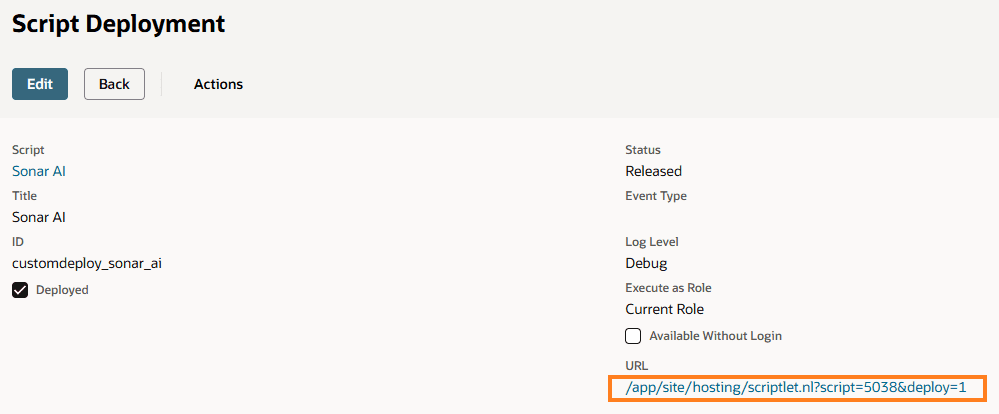
Step 5: Review and Accept the Term of Use
You need to make sure to review and approve the terms of use before using Sonar AI.
Step 6: Connect Claud using your API Keys
Follow the instructions here on the steps and guidance around configuration of API keys.
Tagged with Solutions