Working with NetSuite Commerce Categories
The commerce category is how you organize items on your website, and in your NetSuite ERP system.
- Date
- April 28, 2026
- Read
- 9 min

NetSuite Tutorial | Commerce Categories in SuiteCommerce
The commerce category is how you organize items on your website, and in your NetSuite ERP system. There are often categories with subcategories within them, and then there are also items that can be assigned to any of these categories. Natively, your header navigation goes to three levels of categories, which can automatically be populated when you add new varieties to your website.
Categories and Subcategories
So on the back end of the ERP, let's look at an example category and see what this looks like. We're going to navigate to Commerce > Content Management > Commerce Categories.

This will open up a page listing all of our current commerce categories.

As you can see, there are quite a few commerce categories here, and some are not assigned to the website catalog that we're demoing in this tutorial. But we will select the electronics category as an example. If we will click Edit on the Electronics category, now we can see that linked subcategories are assigned.

Then there are items within the category as well, and we can see that on the website.

So if you don't have items assigned to a commerce category that has associated subcategories, then this whole section will not appear. Instead, the website will just display the links to the commerce subcategories.
Category Thumbnail Images
In SuiteCommerce, you can natively display sub-category thumbnail images on the PLPs for their parent category.
If we go to sub-categories and then click on laptops and tablets, you'll notice that no image is assigned here.

So we're going to change that. Let's go ahead and add a 500PX by 500PX image. So let's go ahead and add it in here and see how it looks. Click Edit on this commerce sub-category and select the image you want to use from the dropdown menu in the thumbnail image field, and click Save.
Note: You need to upload an image to the file cabinet first. Use the same location as you would an item image. (Documents > Files > File Cabinet and then Website Hosting Files > Live Hosting Files)
Let's go ahead and do a CTRL+Shift+R and navigate to the Electronics category PLP on our website. So now you can see that this laptops and tablets subcategory has an image.

As you add additional thumbnails, they'll appear above these category links, filling space with visual elements to create more user-friendly navigation. Rather than just having text links to navigate into the subcategories, you can catch customers' attention with these images, and they can easily click on the image "tiles" to navigate to the next page.
Commerce Category Page Banners
Notice that the category has two image options, one is a page banner image, which displays on the category's own PLP, and the other is a thumbnail image, which displays on the parent category PLP. For example, you could set a seasonal promo as your electronics category page banner, and it would display as a full-width banner on the Electronics PLP. Also on the Electronics PLP is the thumbnail image that we just added for the Laptops and Tablets subcategory.

We won't go through the process of adding the page banner image step-by-step in this written tutorial because it's the same process as for the thumbnail image. You will simply use the Page Banner field on the Commerce Category instead of the thumbnail image field, and your banner will display on the PLP for that commerce category.
For an in-depth walkthrough of adding images to commerce categories, check out our SuiteCommerce Category Images tutorial.
Basic Category Settings & Info
For each Commerce Category, you should always have a good descriptive Name, Description, and Page Title. So for the sake of this tutorial, we'll just drop some test text into these, as well as some of the other key fields in the main tab of the commerce category record.

- Name - This is how the category Name will display wherever it appears across your website or in site navigation
- Description - This is the description of your commerce category
- Page Title - The page title shows up in the web browser tab. If you don't add a custom page title, it uses the category name as the page title.
- URL Fragment - This is where you can customize the URL. If you've already set the URL and choose to go back and change it after it was already live on your site, be sure to create a redirect.
- Meta Description - This is what shows up when Google surfaces the category page among search results.
- Start/End Dates - These fields allow you to set when you want the commerce category to show or disappear from your site. This is useful if you have a sale category that you want to display on the website, maybe on a particular day or time; you can set that here or manage it from within site management tools.
- Display in Website - Similar to an item record, you can toggle whether to display this category on the website and in the site navigation.
Adding Items to Categories
Let's go ahead and click Edit and discuss adding items to this electronics category. As we discuss in our in-depth tutorial on item data management, you cannot select the commerce category to which the item should get assigned directly from the item record. You always have to come into the commerce category unless you're adding categories and items in bulk.
There is a way around this with one of our solutions that allows you to select individual commerce categories directly from the item record. If you're interested in learning about that solution, you can contact our team, and we can tell you a little more about how that solution works, but it is a separate add-on solution, not a native option in NetSuite
For the sake of this tutorial, we'll add a test item, the XLR precision circular saw, to the electronics category. You'll add it from the dropdown menu at the bottom of the list, but you can then drag and drop it right up here to be higher in the list.

Item Sorting
Even though we moved that particular item to the second slot on this category page, that doesn't necessarily mean it's going to appear second on that commerce category PLP. To learn how to manage the order that items display on your website, check out our tutorial on Item Sorting in SuiteCommerce.
Adding Items to Commerce Categories in Bulk
Let's say you're assigning a lot of items to many different commerce categories in bulk. Just as you can do a CSV import on the item records during your initial import, you also have to perform a CSV import on the commerce category records.
Want to learn more about importing Commerce Category data? Check out our tutorial on importing Commerce Categories and Inventory Items via CSV upload.
Category Navigation Configuration
Finally, let's look at navigation. So the Category links are dynamically added to the header navigation based on sequence location. So we need to go to Commerce > Websites > Configuration and select our website.
Now that we have our website configuration record open, we're going to go to Layout > Navigate, and this displays all the buttons that appear in our website header navigation.
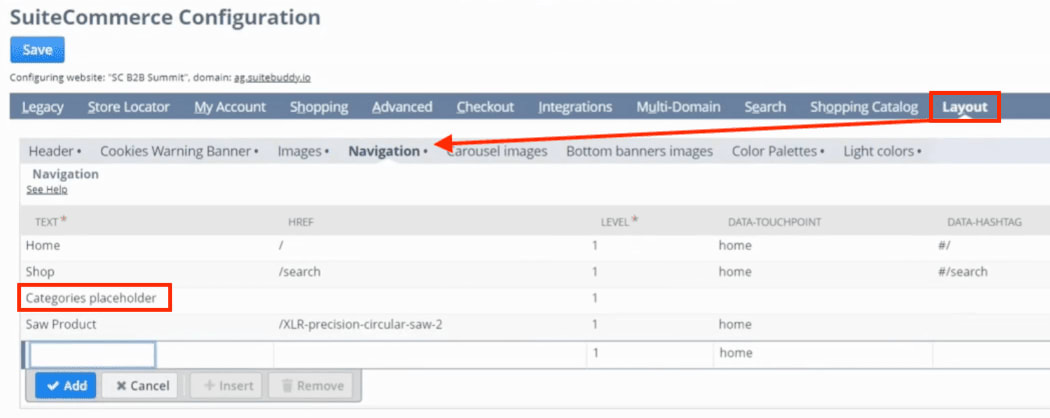
Whenever you create a commerce category, it adds it to the navigation bar dynamically, where the categories placeholder is in this list. We can make other buttons display before or after this category placeholder. For example, in the screenshot above, we have our saw product PDP added as a navigation button.
The configuration sees the shop and the saw product, and everything in between it is the different commerce categories. That's where your Level 1 commerce categories (if they're set to display on the website) are dynamically populated in the navigation bar, with any subcategories listed below them in a dropdown menu.
Well, that's it for now. Hopefully, this post gives you something to work with while trying to understand NetSuite and what it can do for your business.
Related Articles
- Sorting Commerce Categories in a SuiteCommerce Webstore
- NetSuite Commerce Category Troubleshooting Methods
Get stuck in a step during this article?
We like to update our blogs and articles to make sure they help resolve any troubleshooting difficulties you are having. Sometimes there is a related feature to enable or a field to fill out that we miss during the instructions. If this article didn't resolve the issue, please use the chat and let us know so that we can update this article.
Oracle NetSuite Alliance Partner & Commerce Partner
If you have general questions about SuiteCommerce or more specific questions about how our team can support your business as you implement NetSuite or SuiteCommerce, feel free to contact us anytime. Anchor Group is a certified Oracle NetSuite Alliance Partner and Commerce Partner equipped to handle all kinds of NetSuite and SuiteCommerce projects, large or small.
We are a premium SuiteCommerce agency that creates powerful customer portals. Unlike our competitors, we have already solved your problems.
Tagged with Training