SCIS Roles, Permissions, Authorizations | SuiteCommerce InStore
This article will walk through configuring the roles and permissions for SuiteCommerce InStore (SCIS) users.
- Date
- December 19, 2025
- Read
- 6 min

SuiteCommerce InStore (SCIS) is NetSuite’s in store Point-of-Service product that connects to the backend of NetSuite. There are many configuration differences between SCIS and SuiteCommerce (SC) sites and little documentation on the SCIS product. This article will walk through configuring the roles and permissions for SCIS Users. Here is a quick definition of the difference between roles and permissions:
- Role: A role is a defined set of permissions assigned to a customer or employee record. Roles can be customized or standard from NetSuite.
- Permission: A list of activities the NetSuite user can accomplish with the user’s specific role.
This article is meant to teach SuiteCommerce Admins how to configure SCIS for their employee records. If you are a SuiteCommerce Admin wanting more training, check out our FREE SuiteCommerce Admin Training Course.
SuiteCommerce InStore (SCIS) Roles
When you install SCIS, four (4) roles are automatically installed into your environment, as seen below. It is recommended that you utilize the Administrator role along with these four roles. More information and the out-of-the-box SCIS roles are linked.

- SCIS Clerk - assigned to Sales Associates to access SCIS and search and process transactions.
- SCIS Support - IT employees who configure devices for SCIS. This role has no transaction permissions.
- SCIS Store Manager - monitors Cash Drawer Activity for the specific store location.
- SCIS Fallback Auditor: A user who reconciles SCIS fallback transactions can trigger Cash Sale transactions in NetSuite when SCIS cannot be accessed. This role can also complete Fallback reconciliation.
- Administrator—Admins have full access within NetSuite. This role presented the fewest challenges, as it has full permissions. We recommend utilizing it whenever possible.
Just like SuiteCommerce or SuiteCommerce Advanced, you can customize SCIS Roles to fit your specific business needs. For a deep dive, view this article and video on NetSuite Roles and Permissions.
- To view roles in NetSuite, follow this click path: Setup > Users / Roles > Manage Roles.
- Navigate to the desired role, in this case, “SCIS Clerk,” and hit ‘Edit.’
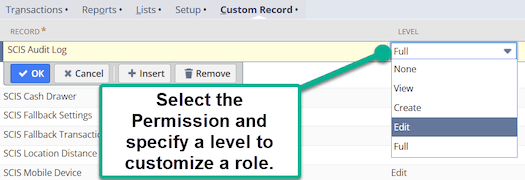
- The first tab has “Permissions”. Explore the subtabs, where you will find the functions for this specific role.
- If you want to customize your role, you can choose an additional permission and specify a level for this permission.
- Hit ‘OK’ and 'Save' when you are finished.
Helpful hint:
To check the all of the users who have a given role, follow this click path: Setup > Users / Roles> Manage Roles – select the desired role. Navigate to the ‘Users’ tab to see all users with this specific role.
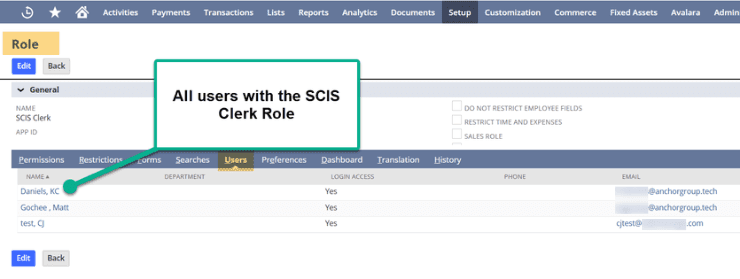
This view can be helpful when assigning users to a new role and to double-check to make sure all users have been given access to that specific role.
SuiteCommerce InStore (SCIS) Permissions
SCIS allows managers and admins to approve the roles with specific permissions to ensure they can complete the required day-to-day transactions.
- Navigate to Commerce > Instore > Permissions.
- Select the SCIS permission you would like to edit or view.
- Upon entering the SCIS permission record, notice the Authorized Roles. This field shows the roles that can perform the operation without authorization.
- To add another role to this specific permission, type the 'Role' in the rich text field.
- The Require Authorization Roles rich text field shows the roles that must be approved for this specific operation.
Helpful hint:
One relationship that exists for almost (if not all) roles is that the SCIS Store Manager authorizes the SCIS Clerk’s permissions.

SCIS Employee Access Codes for Authorization
SCIS creates Access Codes specific to each employee to authorize transaction overrides. For example, a customer may come to an SCIS Clerk and want to apply a gift certificate to their order. The SCIS store requires authorization to apply this discount, and the employee would be prompted to enter the specific SCIS Access Code.
If your company uses a custom employee form, you may need to add the SCIS Access Code to the custom form. If you need a reminder on how to complete this task, check out Moving Tabs in Custom Entry forms in NetSuite. It could help.
To change or update the employee’s customer code, follow this click path:
- Lists > Employees > Employees – ‘Edit’ on the specific employee record.
- Navigate to the Custom Tab.
- Add the employee’s SCIS Access Code so the employee can override specific settings.

An employee CSV import would be one way to enter this information efficiently. Here is the required field mapping:

Related Articles
- SCIS Employee Records and User Settings
- SCIS Standard Cash Drawer Operations | SuiteCommerce InStore
- Configure Tablet POS with SuiteCommerce InStore
Got stuck on a step in this article?
We like to update our blogs and articles to make sure they help resolve any troubleshooting difficulties you are having. Sometimes, there is a related feature to enable or a field to fill out that we miss during the instructions. If this article didn't resolve the issue, please use the chat and let us know so that we can update this article.
FREE SuiteCommerce Book
If you liked this article, you'll LOVE our book on SuiteCommerce. Order the free SuiteCommerce book today, and we'll even pay for shipping.

Oracle NetSuite Alliance Partner & Commerce Partner
If you have questions about how our team can support your business as you implement NetSuite or SuiteCommerce, feel free to contact us anytime. Anchor Group is a certified Oracle NetSuite Alliance Partner and Commerce Partner equipped to handle all kinds of NetSuite and SuiteCommerce projects, large or small.
We are a premium SuiteCommerce agency that creates powerful customer portals. Unlike our competitors, we have already solved your problems.
Tagged with Training