Crafting an Ideal Product Detail Page in SuiteCommerce
You want to make sure you are effectively communicating stock levels to your customers on a PDP, because customers will often change their behavior based on stock availability. For example, seeing a low-stock message can encourage a customer to buy a product immediately, rather than abandoning their cart. The customer may even choose to buy a larger quantity since they know they are running out of chances to purchase the product in the near future.
- Date
- January 15, 2026
- Read
- 27 min
The purpose of a product detail page (PDP) is to provide shoppers with detailed information about an individual product while offering a call to action for shoppers to add the item to their cart. The most important thing to remember while crafting a PDP is that this page exists for the sake of the customer who is viewing it and must be designed accordingly. Yes, individual product detail pages exist to help drive sales for your company, but your sales staff aren't (usually) the ones using your PDP pages; your customers are. So let's start with a quick review of how to optimize the content that you are putting on your PDP.
The Customer's Point of View
We have to shift our mindset away from how we think about our products internally and think about them from the customer's point of view. As business people, we spend our days focusing on the "how" behind our products and their features. As a result, we get can get really excited about "how" our products work, and we want to tell our customers all about our most recent breakthroughs in new features. Unfortunately, your customers usually don't share your enthusiasm. Customers care a whole lot more about "what" the product can do for them (benefits) rather than "how" the product works (features).
Connect the Dots Between Benefits & Features
It's really easy for us to fall into the trap of thinking that our customers care about our product features. In part, this is because our customers think they care about product features. But when you really dive in, they don't. They care about the benefit that comes from those features. For example, certain B2B customers may care about the technical interworkings of your products, but only to the extent that those product features benefit them, the customer.
Best Practice: Use market research to identify your customers' most likely motivations behind purchase decisions, and keep those motivations in mind while writing copy for PDP pages. (Examples: to save time, to improve a process, to be comfortable, to be distinctive, to have fun, to gain knowledge, to be healthy, to support a social cause, etc.)
... But Don't Go Overboard
It's about balance. Just as you don't want your PDP page to be full of technical jargon describing product features, you definitely don't want it to solely claim far-fetched emotional benefits and fail to provide the customer with necessary product information. When creating a PDP page, it is crucial that you understand which technical details, benefits, and use cases are relevant to your customer in the purchase decision. Again, market research is extremely helpful in determining what information your customers want to see on a PDP page.
Optimizing your PDP for SEO
The next step in your process is determining what phrases or keywords your customer will use when searching for your product. It can be tempting to use internal company terminology or technical industry jargon when describing your products on your PDP. After all, you talk about your product a lot, and you know how to describe it properly. Unfortunately, your customer often doesn't know how to accurately describe what they are looking for, or they use the vocabulary of a toddler in their Google search... sometimes it's both.
Use a Keyword Research Tool
In order to discover what keywords your customers are actually searching for, you will want to make use of a Keyword search tool. These tools will help you discover which terms your potential customers are actually searching for. There are a lot of great SEO tools out there, and they each have something that differentiates them, but there are a few basic things every good keyword research tool will tell you.
- Similar phrases that people search for
- How often each word or phrase is searched
- Some indicator of how easy/difficult it is to rank highly for a particular search term
By leveraging this information about keywords, you can quickly come up with a list of terms that you want to incorporate into your PDP. A good SEO term has two primary qualities:
- Your customers actually search for that word or phrase when looking for products like yours. This is extremely important. If nobody on the internet is searching for a term you want to use, or if they are regularly using the word in a context that is unrelated to your product, the phrase isn't helpful in driving traffic to your site.
- It's not also searched by every other person on the internet. Generic terms like "shoes" are searched far too often for you to use as traffic-driving SEO keywords. You'll likely be stuck back on page 10 of Google's search results for "shoes"... I don't know about you, but I've never clicked through to page 10 of Google and made a purchase.
Best Practice: Use a Keyword Research Tool like Semrush or Ahrefs to help identify high-quality keywords to incorporate into your PDP.
Again, none of us use a decent vocabulary when we google something. In the rare cases that we do use sophisticated words in search terms, it's usually "definition of...", which means that using accurate terms as if they are keywords usually doesn't work. You can and should still use those technical terms and phrases on your PDP, but you have to find a few high-performing SEO terms to add so that your customers can find your products more easily.

Incorporate SEO Keywords Correctly and in Multiple Places
Once you have identified a group of keywords you want to target, there's a lot you can do to rank highly for particular search terms. Though it's not an exhaustive list, here are a few SEO tricks we suggest to improve the ranking of your PDP:
- Avoid Keyword Stuffing: Use keywords only where it feels natural to do so, and be sure to avoid over-using any particular term. Instead, find a few different keywords or phrases that you can use interchangeably and mix them up throughout the body copy. This makes your text more readable and can even help you rank higher for multiple keywords.
- Use Keywords More Than Once: Just as you don't want to over-use particular keywords, you don't want to under-use them either. Simply sticking a term into your body copy once so you can check it off of your SEO keyword list isn't enough to rank highly for that term. Try using the same keyword once in the product description, once in a list of features, once in a description of benefits or use cases, etc.
- Use Keywords in Image Names: People often forget this, but naming your product images in a way that is SEO-friendly can help you rank higher on Google. Plus, it will clean up your internal documents as well. Nobody will ever remember what IMG_8127.jpeg is, so use straightforward keywords to name it.
- Use Keywords in Image Alt Tags: Describing the content of an image in an alt tag not only allows you to effectively reach visitors who use technology to help them read web pages. It also can be especially helpful in increasing your ranking for particular keywords.
- Use Keywords in Links: Instead of pasting a full URL for readers to click on, use keywords to describe the page it links to and add a hyperlink to the page instead.
Presenting Product Information
You went out and performed market research to learn what information is relevant to your customer; then, you did some keyword research to improve SEO. At this stage, you know what information to include on your product detail page (PDP). Now it's time for the fun part... presentation.
SuiteCommerce has many features that can help you optimize how product information is presented. With a few tricks, your SuiteCommerce PDP can blow the competition out of the water.
Product Name & Brand Name Link
Like much of the information on the PDP, the product name comes straight from the item record in NetSuite. When you are creating Items Records in NetSuite that will be listed as products on your SuiteCommerce site, you want to make sure the Item Names are optimized for SEO by incorporating keywords. The Product Name should be one of the most noticeable items on the page, and you will also want to double-check that the item product/item name includes an H1 tag.
Best Practice: Make sure the product name is SEO optimized, has an H1 tag, and is one of the most noticeable things on the PDP page, along with the product price and the checkout button.
Brand Name Link
Brands are extremely valuable assets when it comes to ecommerce. Without the ability to see the product in person, it can be difficult for customers to understand the product's quality (or lack thereof). If a customer sees a high-quality item on your site but gets the sense that it's an overpriced knock-off of the real deal, they choose not to buy that item and may leave your site entirely because they don't trust you. You also don't want your customer to think they are getting a great deal on a high-quality specialty item when what you are selling is an alternative designed to serve the needs of a low-income demographic. Nothing will chase customers away faster than failing to properly communicate the quality of the items you sell.
Brand names are a big help in this arena. Customers see a brand name they are familiar with; they immediately gain some understanding of the product quality. If they were previously unfamiliar with the product, providing the brand name gives that customer the information they need to go out and run some comparisons to gain a greater understanding of the product. By including a brand name on a PDP, you can significantly decrease the number of customers who feel misled about the quality of a product.

Best Practice: Include the brand name (ideally just below the product name) as a hyperlink to a filtered PLP page displaying the products on your site by that brand.
It's not enough to include the brand name. You also want to be sure that you make the brand name a hyperlink to a filtered PLP that displays all of the products you carry by that brand and ONLY that brand. This enables your customers to easily find and explore other offerings related to a product they are interested in, which is especially valuable if you sell individual pieces of larger sets (i.e. matching kitchen utensils/dishes, couch/recliner sets, etc.). Even if a customer is not looking for a matching set of something, providing a brand-filtered PLP helps increase a customer's understanding of a brand and product quality, as discussed above.
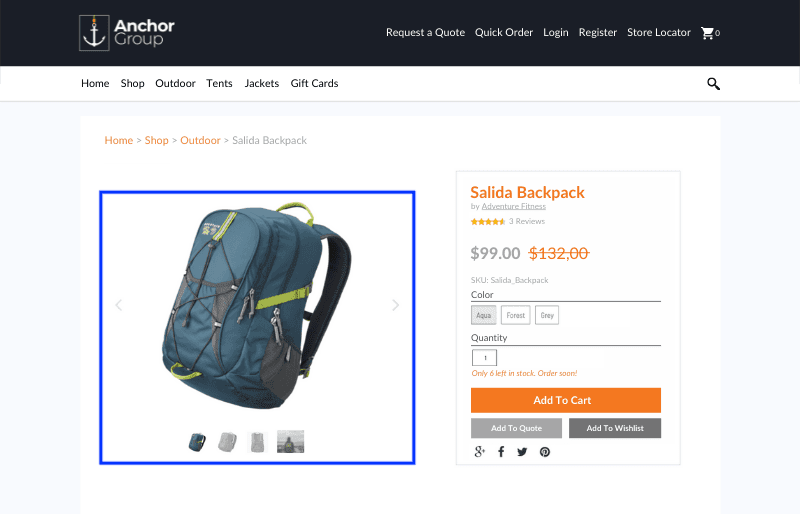
Images
The most important part of the PDP for most ecommerce businesses is the image section. If you thought high-quality images were important for the homepage and the PLP, know that they are even more essential for the PDP. SuiteCommerce makes it easy to display high-resolution images, which you should use a professional photographer to capture.
Tomeu Ozonas, who is a veteran professional photographer for over 20 years and CEO of PROretoque.com, states well the visual aspect of purchasing:
We buy with our eyes. We need to see a product before buying it. That is why the photograph of the product has become an essential element of an online shop. When the user have no direct access to the product, photographs are the best way to learn about the appearance and the characteristics of that product. - Product Photos in Ecommerce
It can be extremely difficult to accurately capture 3D objects using a 2D medium. A professional photographer should know how to take the necessary images, but there are a few basic photos you want to be sure to include on your PDP. This isn't an exhaustive list, and different kinds of products will need certain image types more than others, but here are some examples of the images you might like to include on your PDP:
- Images of each major surface of the product: Top/Bottom, Front/Back, Left/Right, Inside/Outside, etc.
- Angles and Corners: These will usually be captured in the images of the major surfaces mentioned above. It's pretty rare that a photographer will take a photo of an object straight on since angles and shadows are crucial to giving the viewer a good concept of depth in a 2D image. However, it's still important to ensure that major product angles are captured intentionally.
- Whole product/Key Area/Texture: Make sure to include at least one image that shows the whole product from a key angle with white space around it. If there is a key area of the product that needs extra attention, such as a panel of buttons, make sure to take a zoomed-in picture that captures it well. Finally, if materials are a key aspect of your product (e.g. types of wood, cloth, or leather on a furniture piece), then taking extreme close-up photos can help convey texture to the viewer. Zooming capabilities on images are helpful as well and can substitute for close-up views in certain cases.
- Examples of Variations: Whether a product is sold as a set of similar items (e.g. 3 piece mixing bowl set) or is one of many variations within a matrix item (e.g. One jacket style, XS in blue vs. XL in pink), including photos that convey different sizing, varying colors, or other product differences are important.
- In Use: Especially if your product is uncommon or unique, including an image of the product in use can help the customer quickly grasp the purpose of the product, as well as potential use cases. A picture is worth a thousand words. Showing rather than describing uses for the product will help keep your PDP clean and user-friendly.
- As Part of a Set: It can be beneficial to include an image of the product that shows it as a part of a larger set (e.g. a matching bed frame, nightstand, dresser, and desk). If you only carry one of the items, this type of image serves simply as an appealing product display. If you do carry other items within the set, you can use this image to let your customer know that. Just be sure to add text to the images in order to clearly indicate which products are included and which are sold separately.
Remember, don't just rely on one or two images. Use a healthy mix of images in order to accurately convey the size/color/quality/uses, etc., of your product:
Even one great photo isn’t enough; customers want to see the product from multiple angles, to really get a feel for it. The inability to handle the item is one of the biggest disadvantages an ecommerce platform has in comparison to a brick and mortar store; a generous selection of photos helps to alleviate the fear that the customer has, the fear of the unknown. Did you know that the stated reason for 35% of returns is that the customer thinks the image was misleading? - NetSuite Ecommerce by Jacob Terneus & Caleb Schmitz
Best Practice: Make sure you provide multiple high-quality photos on your PDP. It's best if these photos collectively enable a 360º view of the product.
Remember, using low-quality images or failing to show the product from various angles not only keeps the customer from gaining a good understanding of the product but also reflects poorly on the quality of the product, the brand, and the company as a whole. Being lazy with product images can quickly make your business look cheap and unreliable, or worse, even give off the appearance of a full-on scam site.
Price
This is one of the more straightforward areas of the PDP page, but there are still a few tricks that might come in handy.
As a rule, it's good to keep your price at a similar visual style or weight as your product name text; this can be achieved by using the same font, text, and/or color as the Product Title. However, unlike the product name, you don't want this tagged as an H1. While the price is very important to your customer when it comes to the purchase decision, it's much less important from an SEO standpoint. You definitely don't want Google processing the price as equally important to the product title when determining the PDP search result rankings.
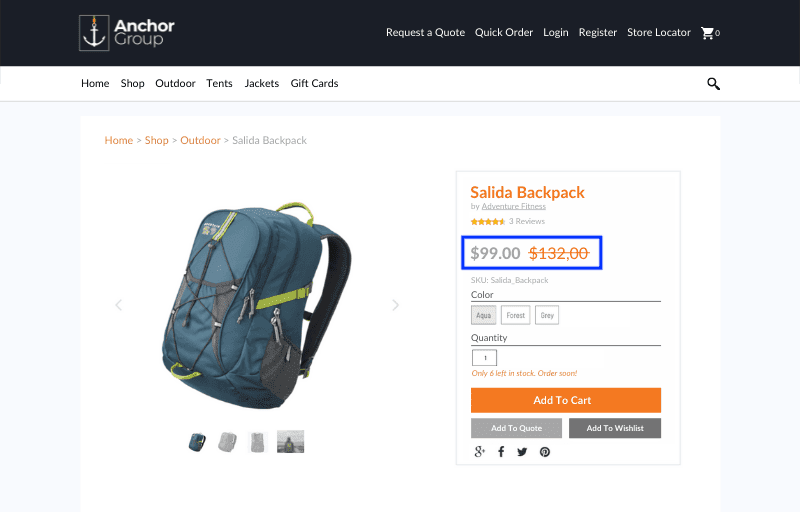
When you need to indicate customer discounts, be sure to make use of Strikethrough Pricing. Strikethrough Pricing comes in handy when a particular customer's price level is lower than the default price level you set in the Shopping Catalog tab. The higher default price is displayed with a strike through it, and the lower customer price is displayed next to it.
Best Practice: Make sure the Price is one of the most visible items on the page, along with the product name and the checkout button. Use strike-through pricing to convey customer discounts.
Product Reviews/Comment Sections
Product Reviews provide a similar benefit to brand names in that they help the customer understand the quality of a product. A cumulative star rating placed near the product and brand name is an extremely efficient way to indicate how satisfied past customers were with your product. Full customer reviews don't need to be immediately visible to the customer; in fact, you probably want to display them on a tab that the reader must manually select so that your PDP remains uncluttered.
Visitors to your site put much greater trust in the opinions of past customers than they do in your sales claims. High ratings in customer review sections can be quite valuable in driving up the conversion rate of your PDP. Low customer reviews, while detrimental to you in the immediate future, can also prove to be quite valuable over time.

Monitor Those Product Reviews.
Product reviews and comment sections are free market research. The comments you get here are especially valuable because your customers are letting their guard down. Customers almost always write product reviews as though they are speaking directly to other customers. This makes them feel a bit freer to speak their mind, and it can result in feedback that is much more detailed and actionable. With the added bonus of their device screen acting as a barrier, you can be sure you're getting some good honest product feedback from these customers. Sure, you might end up spending a lot of time sorting through emotionally charged and unkind messages looking for constructive feedback, but if you're successful and put that feedback to good use, you can make the necessary changes to your product.
Best Practice: A moderator should view and evaluate all of the reviews for a product by navigating to the Product Reviews Subtab on the SuiteCommerce Product Reviews tab of an Item Record. Remember, only reviews that have been set to "Approved" are displayed on the website, and be sure to make use of the Verified Purchase field as well.
As an added bonus, acting on the feedback you receive in product reviews will clean up the product reviews added to your site in the future. Improved product quality will slowly reduce the frequency of disgruntled messages and increase the number of those "BEST PRODUCT EVER." comments, which, though entirely lacking in argumentative substance, are somehow convincing enough to entice other customers to buy the products.
Organize Detailed Product Information with SuiteCommerce Tabs
Communicating product information to your customers in the right order is crucial. You've already caught the attention of your potential customer when you got them to click through to your PDP. Now you want to get them hooked and give them a reason to keep reading.
The purpose of the product detail page is to clinch the deal, to persuade the customer that this the item they want. [...] You can, with the custom fields bundle, display any field from the item record on the PDP. One particularly slick feature of SuiteCommerce is displaying details about the item in several tabs, which allows the customer to customize the amount of information and detail about the item that he sees. - NetSuite Ecommerce by Jacob Terneus & Caleb Schmitz
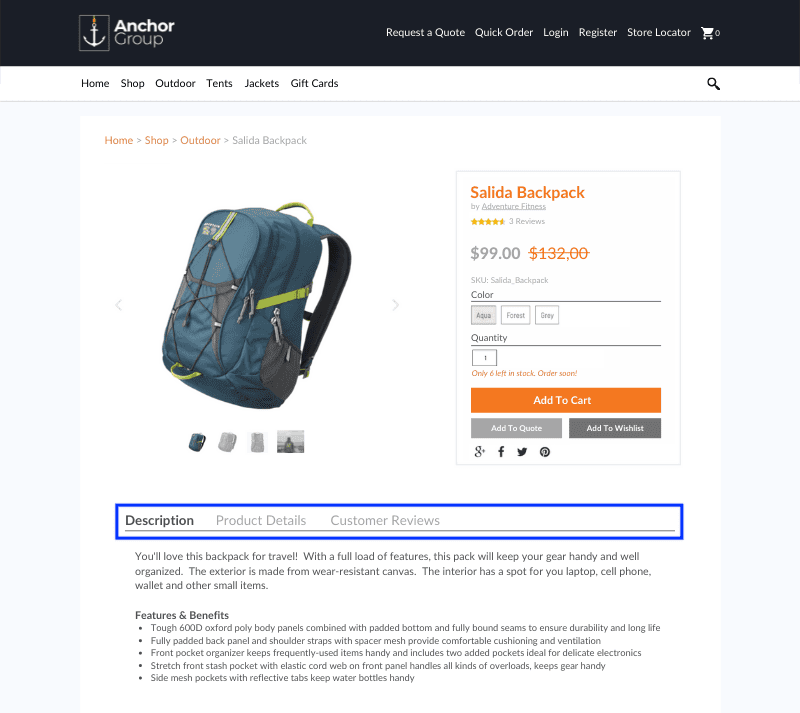
Best Practice: When designing a PDP page, make sure that benefits and/or use cases are immediately visible to the customer. Technical product features should be included on a secondary tab that the user can manually select.
Connecting the dots between features and benefits and giving examples of use cases will help you get your potential customer hooked, so you want to make sure they see those right away. On the other hand, descriptions of relevant technical details act as supporting data to validate your claims surrounding product benefits. A description of technical product features gives your customer a more thorough understanding of the product as a whole, instilling them with confidence that this product will add value. But, if you present this supporting data first, your readers can become disinterested, even overwhelmed by too much technical jargon, and leave the page before understanding how your product can benefit them.
Simplify Site Navigation with Matrix Items
Matrix Items in NetSuite are amazing because they enable you to highlight several variations of the same product (different colors, sizes, material types, etc.) on one PDP.
One PDP does not necessarily correspond to just one item. Multiple items can be grouped under a single matrix item, such as different rope lengths of a single type of climbing rope, or different waist and inseam lengths of a single style of pants. The customer can quickly compare options to determine the ideal item for that particular customer. You can even have multiple images for the matrix item, with a different image displaying for each item option selection. - NetSuite Ecommerce by Jacob Terneus & Caleb Schmitz
Best Practice: Add variations of products to a single PDP as matrix items, and provide multiple images to allow customers to easily compare product variations. You can create matrix items by utilizing the Matrix Item Assistant or by creating Matrix Items manually (Lists > Accounting > Items > New (Administrator)).
Matrix items are great for the front-end user experience, but that doesn't just happen on its own. Due diligence is necessary when setting up matrix items in the back end in order to get them to work properly.
Setting up matrix items well in backend NetSuite (the ERP part of the software) is a prerequisite to using matrix items on your PDP. Matrix items are especially important if you sell more than a few dozen products, because consolidating multiple child item into a single parent item will also keep your PLP [product listing page] from getting cluttered. - NetSuite Ecommerce by Jacob Terneus & Caleb Schmitz
Remember, you want to provide your customers with a smooth UX that helps them find products they are interested in, compare products to other alternatives on your site, and purchase what they want quickly and easily. If you are making use of matrix items, you need to make sure that finding, viewing, and selecting a variation of a product is intuitive and easy for the user.
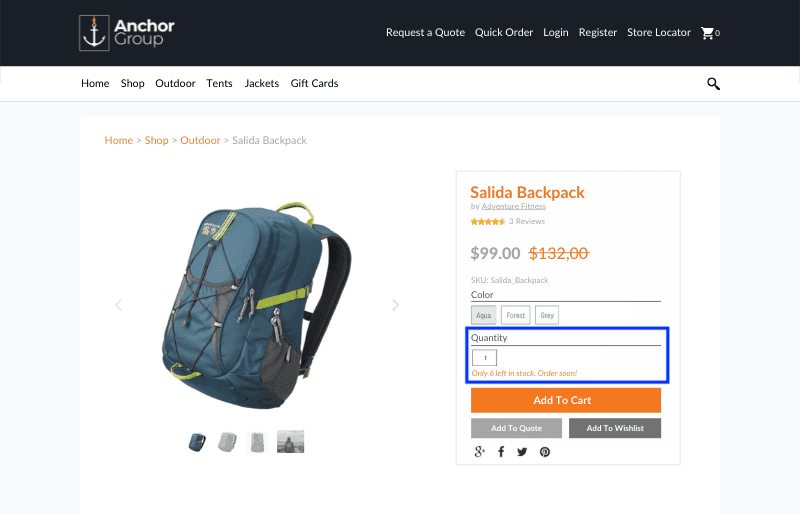
Stock Status
You want to make sure you are effectively communicating stock levels to your customers on a PDP because customers will often change their behavior based on stock availability. For example, seeing a low-stock message can encourage a customer to buy a product immediately rather than abandoning their cart. The customer may even choose to buy a larger quantity since they know they are running out of chances to purchase the product in the near future.
To display messages about stock availability on your PDP, you will need to make use of the Inventory Display extension. This extension enables you to configure stock status rules and custom messages on the extension level as well as the item level. An example of an extension-level configuration is establishing a standard Out of Stock message. An example of an item-level configuration is to establishing a low-stock threshold for a particular item and creating a custom message that displays when that threshold is reached.
Best Practice: Use the Inventory Display extension to display custom messages based on stock status (In Stock, Back Order, etc.), as well as to set parameters for low-stock or high-stock actions.
Configuring Extension-Level Properties
Note: The Inventory Display Extension must already be activated.
- In NetSuite, go to Commerce > Websites > Configuration.
- Find and select the website and domain where the Inventory Display extension is activated, then click Configure.
- Navigate to the Extensions tab.
- In the Inventory Display Subtab, complete the listed fields for each category (Regular Items, Special Order Items, Drop Ship Items, Low Stock Fields).
- Click Save.
Configuring Item-Level Properties
- In NetSuite, go to Lists > Accounting > Items.
- Find the item you are looking to configure Inventory Display for, and click Edit.
- Navigate to the SuiteCommerce Extensions tab.
- In the Inventory Display subtab, complete the listed fields for each category (In Stock).
- For Matrix Items, Click Update Matrix. For other Items, click Save.
Using stock status messages allows you to tell your customers all sorts of things about your inventory levels, from "Be patient, we've got more on the way" to "Last chance, buy it now.". Telling your customers about your inventory levels helps you increase customer satisfaction and can even help you move inventory at a more effective pace.
Select Item Quantity
We love when our customers place large orders. Well, we like the cash flow from those orders, but not what they do to our inventory levels. Small orders are much easier to handle unless they are for products that we intended to sell in bulk. Good Inventory and Supply Chain Management involves setting min/max limits on the amount of a particular product that a customer can buy at once.
You can set min/max limits on the quantity of a product that can be purchased at one time by Navigating to Lists > Accounting > Items (Administrator). Find the product that you wish to set the limit on and click Edit. On the Sales/Pricing Subtab, you will enter the appropriate values into the Maximum Quantity and Minimum Quantity fields. There is also a check box you can select in order to enforce minimum quantities internally (this option is not available for max quantities).
Setting total limits on product purchase quantities for the lifetime of a customer is a bit trickier, as it requires SuiteScript. Basically, you will need to add a custom value field to the item record and then create a User Event script that limits the item quantity based on the value in that custom field. Each time the customer adds an item to their cart, a custom record will be created to keep track of the total quantity sold to that customer. Once the limit is reached, the customer will be prevented from purchasing the product again.
Best Practice: Configure Item Records to set Min/Max limits on the quantity of a particular product that a customer can purchase at one time. Use SuiteScript to set a limit on the total quantity of a particular product that can be purchased throughout the customer's lifetime.
Design Tip: The Select Quantity menu should always be adjacent to the Add to Cart button so that the customer can easily select the quantity they want when adding the item(s) to their cart.
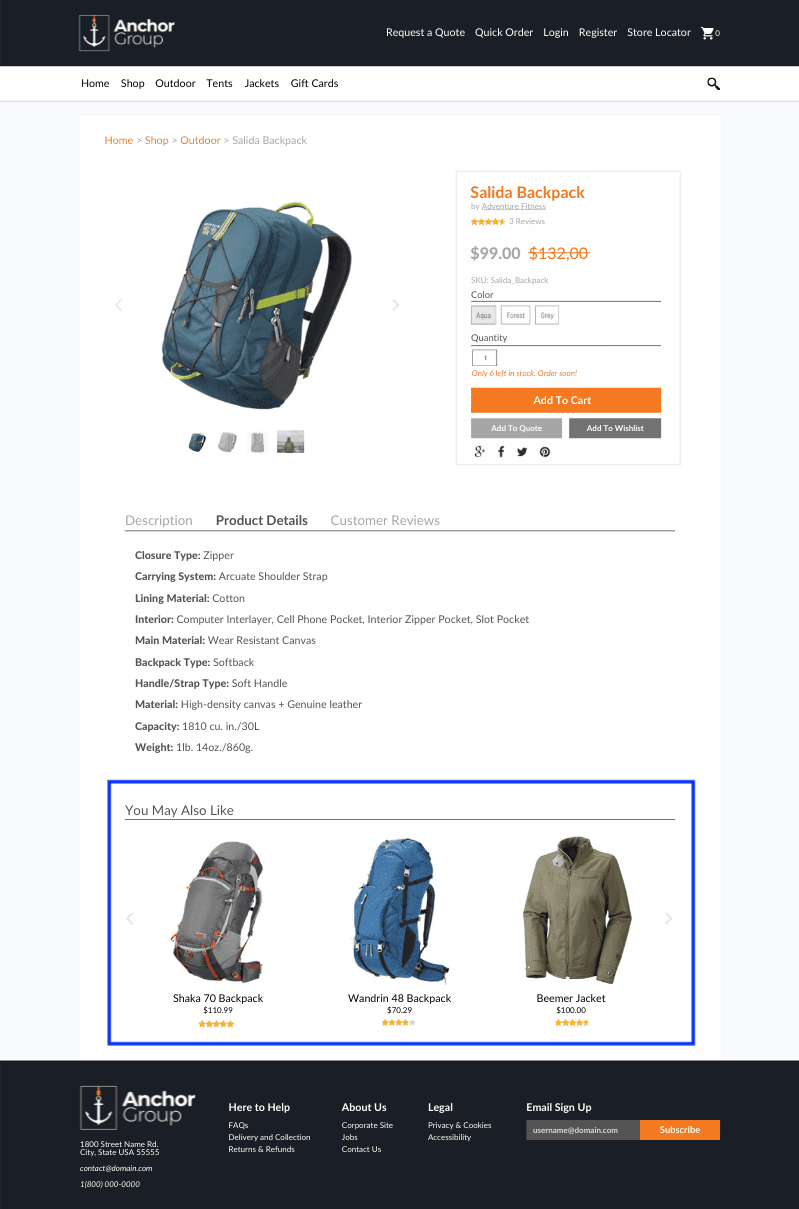
Recommended Products
Remember to include recommended products in a carousel at the bottom of your PDP. Help customers find what they are looking for by including similar items or upsell by including complementary products in the recommended products.
There are two ways you can connect related items together in NetSuite - by associating them individually or by creating groups.
To Associate Related Items Individually:
- Go to Lists > Accounting > Items.
- Find the item you want to add a related item to and click Edit.
- Navigate to the Web Store subtab, Related Items sublist.
- In the Related Item column, select an item to associate, and click Add (or Add Multiple if associating several individual items).
- Click Save.
Creating a Related Item Group:
This requires a few more steps:
- Go to Commerce > Marketing > Upsell > Related Items Categories > New.
- Enter a name for the related item group in the Category field.
- On the Basic subtab, select an item from the list. Each item's brief description appears in the Item Description field.
- Click Add.
- Repeat steps 4 and 5 for each item you wish to add to the group.
- Click Save.
- Next, follow the same steps given above for Associating Related Items Individually. The only difference is that in step 4, you will select the group you just created instead of selecting an individual item.
Best Practice: Use Related Items and Related Item Groups to recommend additional products to customers.
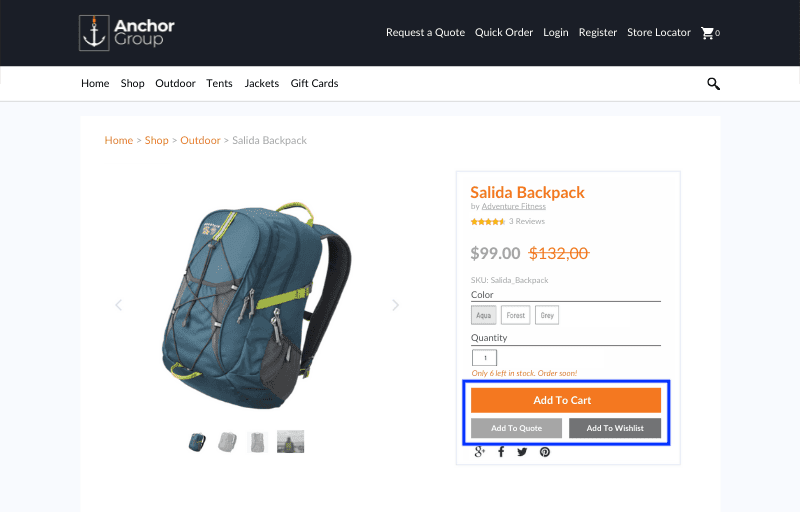
Add To Cart Button
The second most important part of the PDP, of course, is the action item, the path forward on the purchasing journey: that is, the “add to cart” button. SuiteCommerce can be set up so that as soon as an item is added to the cart it is saved to that customer record. That way the cart is saved even after the customer closes the page or logs out. Next time that customer logs in, he will be reminded by the items in his cart that he isn’t done shopping. - NetSuite Ecommerce by Jacob Terneus & Caleb Schmitz
There's not too much to add here without getting into the customer account and checkout features. Keep in mind that you can edit the Add to Cart button using CSS to make it look just right and catch your shoppers' attention. You can also add additional CTA buttons to your PDP in SuiteCommerce, such as "Add to Quote", "Add to Wishlist", or "Write a Review".
Best Practice: Make sure the Add to Cart Button is one of the most noticeable things on the PDP, along with the product name and price.
SuiteCommerce PDP Buttons Not Working? On the SuiteCommerce stores, the Product Display Page buttons “Add to Shopping Cart”, “Add to Wishlist” and “Add to Quote” are not functioning. Let's resolve it.
Next Steps
Now that you know how to craft an Ideal Product Detail Page in SuiteCommerce, it's time to get to work. Try the tips and best practices we discussed in this article, and let us know if you want our help implementing anything. As always, our team of consultants and developers is happy to help you optimize SuiteCommerce for your business.
Throughout the article, we also included several references to our NetSuite Ecommerce Book, if you found those references helpful and want to see what our book covers beyond PDP design, go ahead and request your free copy of the book.
Oracle NetSuite Alliance Partner & Commerce Partner
If you have general questions about SuiteCommerce or more specific questions about how our team can support your business as you implement NetSuite or SuiteCommerce, feel free to contact us anytime. Anchor Group is a certified Oracle NetSuite Alliance Partner and Commerce Partner equipped to handle all kinds of NetSuite and SuiteCommerce projects, large or small.
We are a premium SuiteCommerce agency that creates powerful customer portals. Unlike our competitors, we have already solved your problems.