Personalized Preferences in NetSuite | Tutorial
Personalize your NetSuite preferences to better fit your time-zone and location, country, currency, and language, and more.
- Date
- December 4, 2025
- Read
- 10 min

This article covers personalized (user-level) preferences in NetSuite. To learn about setting up company-wide preferences in NetSuite, check out our article Company Information and Preferences in NetSuite.
NetSuite Tutorial | Set Personalized Preferences
In this lesson, we will discuss setting your preferences for your NetSuite account. There are company-wide preferences that you set for your NetSuite Account, but you can also override some of those within your personal preferences. Often, users can override things like formatting dates. However, you may see some things in this tutorial that are not available to you, and that's because your company has set up its NetSuite system to make it so that you can't override those preferences.
Set Preferences Navigation
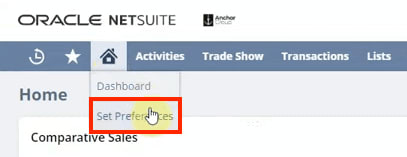
First of all, we're going to go to the Home button and go to Set Preferences.
This is where you will go when you're setting your preferences. You will notice there are several tabs on this page, and each one contains a number of preferences that can be customized. Most of these preference options are pretty intuitive to use. So in this lesson, we'll touch on just a few personal preferences to give you an idea of what's possible.
Setting the Number of Rows in a List
One of the more important things we often end up doing is setting the number of rows in list segments to more than the default. This setting can be adjusted from the Optimizing NetSuite section on the General tab.

Sometimes the number of rows in a list is set to only 50, but it's usually best to have at least 100, sometimes even 200 results surface in a list. Let's take a minute to look at what this does.
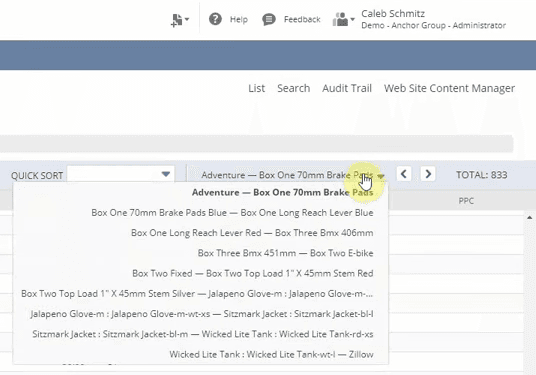
First, go into a list, let's say, Lists > Accounting > Items.

Here you can see that it allows you to scroll through more items before having to use the dropdown navigation or click through to the next page.

So instead of having whatever the company default is, which may be only 50, you can have 100 items to scroll through. And that can make it a little more user-friendly because many people find that they don't really like this dropdown to navigate between pages.
Time Zone Settings
Another applicable personal preference is that the company is set up and in its time zone. Still, you want to set it here if you live in a different time zone. The reason is that it'll put different timestamps and convert them on various logs. So, for example, let's say a sales order goes through Pacific Time, and down here, you can see that I'm in central. So at noon in the NetSuite system, for a sales order that goes in right now, it would show up as 1014, and that can be a little confusing if you are in a different time zone than your company is set up in. So go ahead and change it to your time zone because it makes it much easier to understand the data when you're reading through it and seeing one thing appear.
You can set things like your first day of the week, which is pretty good, too, especially if you're using the calendar. Still, generally, you will go with whatever the company initially set up.
These preferences can be adjusted from the Localization section under the General tab on the NetSuite Set Preferences page.

NetSuite Internal IDs
In the Defaults section of the General tab, you will almost always want this Show Internal IDs box checked.

This will show the internal ID for a particular field when you click into its field help. Here is an example of the field help for this checkbox field when it is turned on.

This is useful because you will need to reference NetSuite fields more and more as you continue working in the system. So being able to find the field IDs quickly can save you a lot of time and effort later on.
Adjusting Appearance and Colors
Most people like to set their appearance to something other than the default theme to match your company's color palette. You can adjust this setting from the Color section under the Appearance tab.

For example, let's say you have a purple logo. Then you may want to change your color preference to a purple setting. It's an excellent way to brand your NetSuite account specific to your business.

The rest of these appearance fields are self-explanatory, like fonts and accessibility, so we will go ahead and move beyond this. If you have other specific questions about the Appearance tab or the fields it contains, we recommend a quick search on SuiteAnswers to learn more. You can also view this example list of Appearance tab fields at the bottom of this article.
Transaction Tab
You may have access to this transaction tab, but if you don't see it, remember it's likely because of your permissions.

One of the fields that may be handy for you is if you want to alphabetize your items regardless of the type that might be one that you want to. Printing options can also be convenient when working with invoices and sales orders.
Activity Priority Preferences
Activities are used for things like your calendar, and they can also be used for your tasks and phone calls. One thing that we like to make sure is changed is this default priority for tasks. Most of the time, we have it set as medium or low and never at high. But let's say you only work with high-priority tasks because of the specific role. You may want to go into the Activities tab and, under the Tasks & Phone Calls section, set the Default Priority for Tasks to High.

Alert Preferences
In the Alert tab, you can define when you want the alerts sent to you, and then you can determine when you want them sent. You can set up to three of them throughout the day if you need to.

Restrict View
Finally, we're going to talk about this Restrict View tab. The Restricted view can be instrumental when working with several subsidiaries. For example, let's say you set up NetSuite within a parent company, and then you want to view companies inside of NetSuite by the subsidiary. You may be only involved with one of the subsidiaries, so you would set that preference on this tab, and it would restrict the view throughout NetSuite to just that specific Subsidiary.

The important thing to know is that you may have to reset this subsidiary view at the end of the day or when you re-log back into NetSuite.
Set Preference Tabs: Preference Fields List
Looking for a preference in NetSuite but unsure where to find it? Here is a list of preference fields that you may be able to find and adjust on each of the Set Preferences tabs in your NetSuite Account.
Example Preference Fields: General Tab

User Profile
- Nickname
- From Email Address
- Signature
- Add Signature to Messages
Localization
- Search Sorting
- Time Zone
- Calendar System
- First Day of Week
Formatting
- Date Format
- Long Date Format
- Time Format
- Number Format
- Negative Number Format
- Phone Number Format
- Auto Place Decimal
- CSV Column Delimiter
- CSV Decimal Delimiter
Defaults
- Download PDF Files
- Use Multicurrency Expense Reports
- Address Mapping Type
- Show Internal IDs
- Only Show Last Subaccount
- Only Show Last Subentity
- Only Show Last Subitem
Messages
- Submit Warnings
- Limit CC Field To Contacts & Employees
Optimizing NetSuite
- Delay Loading of Sublists
- Number of Rows in List Segments
- Maximum Entries in Dropdowns
- Type-Ahead on List Fields
- Require Exact Match on Item Type-Ahead
- Show Quick Add Row on Lists
- Prefer Native Select Fields Over NS Dropdowns in Internet Explorer
SuiteCloud Development Framework
- Show App ID Field
- Show ID Field on Sublists
Example Preference Fields: Appearance Tab

Colors
- Color Theme
Styles
- Screen Font
- Compensate for Large Fonts
- Density Setting For Internet Explorer
Chart Themes
- Chart Theme
- Chart Background
Centers & Dashboards
- Landing Page
- Show Portlet Hint
- Set Customer Dashboard as Default View on Customer Record
Entry Forms
- Limit Entry Forms to Two Columns
- Expand Tabs on Entry Forms
- Enable Rich Text Editing
- Default Rich Text Editor Font
- Default Rich Text Editor Font Size
Accessibility
- Display Default Theme With Optimal Color Contrast
Example Preference Fields: Transactions Tab
Basic
- Auto Fill Transactions
- Alphabetize Items Regardless of Type
Warnings
- Duplicate Number Warnings
- Inventory Level Warnings
- Customer Credit Limit Handling
- Vendor Credit Limit Warnings
Printing
- Print Using HTML
- Transaction Email Attachment Format
- Horizontal Print Offset
- Vertical Print Offset
Example Preference Fields: Analytics Tab

Reporting
- Report by Period
- Show Reports in Grid
- Customize Font on Financial Reports
- Print Company Logo
- Display Report Title on Screen
- Display Report Description
- Default Bank Account
- Calculate Forecasts as Weighted
Search
- Show List When Only One Result
- Quick Search Uses Keywords
- Popup Search Uses Keywords
- Include Inactives in Global & Quick Search
- Popup Auto Suggest
- Global Search Auto Suggest
- Global Search Sort By Name/ID
- Global Search Customer Prefix Includes Leads and Prospects
- Global Search Includes Transaction Numbers
- PDF Page Orientation
- PDF Font Size
Export
- CSV Export Character Encoding
KPI and Snapshot
- KPI Scorecard with Period-Specific Consolidation Rates
Example Preference Fields: Activities Tab

Calendar
- Edit Activities from Calendar
- Send Invitation Emails
- Restrict Invitees to Employees
- Default Event Access Setting for New Events
- Default Reminder Type
- Default Reminder Time
- Play Audio with Popup Event Reminders
Tasks & Phone Calls
- Default Priority For Tasks
- Default New Tasks Public
- Default New Phone Calls Public
Example Preference Fields: Alerts Tab

- Include Links in HTML Alerts
- Respect Quick Date Portlet Settings
- Send an On-Demand Alert From this Role
Example Preference Fields: Restrict View Tab

- Subsidiary
- Include Sub-subsidiaries
- Location
- Include Sub-locations
- Include Unassigned
- Class
- Include Sub-classes
- Include Unassigned
That's all for now. Hopefully, this post gives you something to work with while trying to understand NetSuite and what it can do for your business. If you have any questions and want some free consulting advice, feel free to contact our team at Anchor Group.
Get stuck in a step during this article?
We like to update our blogs and articles to make sure they help resolve any troubleshooting difficulties you are having. Sometimes there is a related feature to enable or a field to fill out that we miss during the instructions. If this article didn't resolve the issue, please use the chat and let us know so that we can update this article.
Note: This is not an exhaustive summary of the NetSuite preferences that could be available for you to override. Remember also that the preference options that you can set may differ depending on what company-wide preferences you have permission to override in your NetSuite Account. If you cannot find or adjust a preference you need to, contact your NetSuite administrator about your NetSuite account's preference override settings.
Tagged with Training