Company Information and Preferences in NetSuite
When you are first setting up your NetSuite account, we recommend filling in all of these basic company information fields as soon as possible.
- Date
- December 10, 2025
- Read
- 10 min

This article covers company-wide NetSuite preferences. To learn how you can change your NetSuite preferences on a user-level, check out our article on Personalized Preferences in NetSuite.
NetSuite Tutorial | Company Information
First of all, let's jump into company information.
Navigation: Set up > Company > Company Information
This is where you will manage all of the essential company information that you will be adding to your NetSuite account.
.
Basic Company Information
When entering your company information into NetSuite, there are a number of basic fields that you will need to be familiar with. When you are setting up your NetSuite account, we recommend filling in all of these company information fields as soon as possible.

These basic company information fields in NetSuite are located on the main tab:
- Company Name: This is a text field where you must establish the company name to display in your NetSuite account
- Legal Name: This is a text field where you specify the full legal name of your business
- Company Logo: This is a dropdown field of image files from your file cabinet in NetSuite where you8 can select your company logo. This logo can then be used on forms and pages.
Before you can select your company logo from this list, you will need to be sure it is already in the File Cabinet.
- Display Logo Internally: If I have this checkbox selected, the logo displays on the top left of all your pages within NetSuite. So it's an excellent way to brand your NetSuite environment.
- Web Site: This is the primary URL for your company website.
- County/State/Province: This is a dropdown field where you can select the County/State/Province where your business is located.
- Country: This is a dropdown field where you can select the country where your business is located.
- Return Email Address: This is a text field where you can enter the primary email address that you'll be using for your company.
- Fax: If your company has a fax number, you can enter it in this field.
- Currency: The primary currency for your business
- Tax numbers including a field for your Employer Identification Number (EIN) and SSN or TIN (Social Security Number, Tax ID Number)
- First Fiscal Month: This is a dropdown field where you can establish the first month in your fiscal year.
Since NetSuite is an accounting software, you want to be sure to get your fiscal year set up correctly right away to ensure accuracy.
- Time Zone: A dropdown where you can establish the primary time zone for your company.
- Account ID: Reference this field anytime you need your NetSuite Account ID (ex. for bundle provisioning).
Your account ID is specific to your NetSuite instance and will also show up in the URL when you are logged into NetSuite.
.
Time Zone Settings
You should also set your time zone to where your company is located and where you want your NetSuite information to be logged.
For instance, let's say you have a sales order go through just a couple of seconds ago in central time. I'm in central time, so I would see my clock down here at 07:03 PM, and inside of NetSuite, it would show 5:03 PM, which can be a little confusing for users in different time zones. So be aware of it when you're looking at logs.
However, individual NetSuite Users can fix this problem by establishing a time zone in their Personal Preferences, which will display all times in NetSuite to that user in their own time zone.
.
Addresses Tab
You'll want to get your company address set up, too, because this will show up on things like advanced PDFs and email templates where you might have an invoice and a company address set.

Company URLs Tab
The company URLs tab here has a lot of useful links to what people will be using when setting up your NetSuite environment.

Restlets
Restlets are a way to integrate NetSuite with other third-party applications. For instance, let's say you have Salesforce and want to integrate it with NetSuite. Well, you can use an integrator or make SOAP calls, but you can also make a custom integration using restlets. A good restlet is a great way to do NetSuite APIs.
Customer Center Login
The customer center login URL is what B2B companies will often use for other people to create orders or make payments. So the way this works is let's look at my demo website here, and I have a login or create an account via my website. So I'm going to log in here instead of on the website because let's assume that you don't have SuiteCommerce or a website because it's just not part of your business model. However, suppose you still want them to be able to log in to access information inside the NetSuite environment without seeing everything else in your NetSuite environment. In that case, you can set this up right here, this customer center login. So, anybody that's set up as a customer in your account and has the proper rules and permissions will be able to log in. So I'm going to go ahead and click this, and I'm going to log into this test.
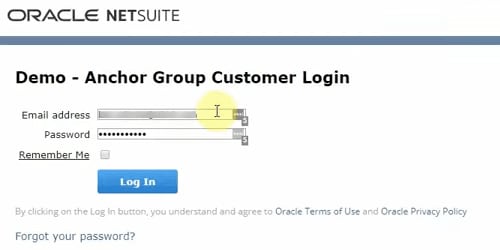
I'm now logged into this test customer account, and this is all the permissions that your customer would have right out of the box so they can enter an order or see orders to estimates they may have applied to their account, even make payments see quite a few things that are related just to their specific customer account.

Of course, now these permissions can be changed, but these are the ones that come right out of the box for this customer-center login.
.
Company General Preferences
I want to go into general preferences. We're going to go into Setup > Company and then down here to General Preferences.

This is where we will put everything specific to our company and how we want the preferences set up for NetSuite.

You can see in the screenshot above that there are date formats, long date formats, time formats, and all the different types of formatting within the system.
There are also ways to establish default values, so whenever I go into a specific new record, it can make some automatic defaults. For example, we can set the default customer type to a company rather than an individual. What this means is if I go and try and create a new customer, it'll default to the company rather than an individual. Or, I could set this default value for the customer type to an individual. That way, they could enter their first name and last name rather than a company name. You can establish defaults for several things, like the vendor and the partner, and there are many other defaults you can set specific for your company.
You can put some security measures inside your general preferences, like the password policy. You can change it from weak to medium or strong if your employees are making their passwords; you can ensure they're using a recommended method to reset them.
To learn more about managing NetSuite user passwords, check out our article on How to Give Someone Access to NetSuite.
.
Company vs. Personal Preferences
You can override your company preferences within your personal preferences, and we'll cover that in another lesson specific to Personal Preference in NetSuite.
Overriding Preferences Subtab
This Overriding Preferences subtab is where you can define which company-wide preferences users will be able to override in their personal preferences.

Using the checkboxes on each line, you can allow users in your NetSuite Account to override certain preferences you have established for your company account, including the following:
- Address Mapping Type
- CSV column delimiter
- CSV decimal delimiter
- Calculate Forecasts as Weighted
- Calendar System
- Customer Credit Limit Handling
- Date Format
- Delay Loading of Sublists
- Duplicate Number Warnings
- First Day of Week
- Global Search Includes Transaction Numbers
- Limit Recipient Field to Related Contacts
- Long Date Format
- Maximum Entries in Dropdowns'Negative Number Format
- Number Format
- Number of Rows in List Segments
- Phone Number Format
- Number of Rows in List Segments
- Phone Number Format
- Screen Font
- Search Sorting
- Show List When Only One Result
- Show Quick Add Row on Lists
- Show Reports in Grid
- Spelling Locale
- Time Format
- Time Zone
- Vendor Credit Limit Warnings
Centers Subtab
This is where you can manage NetSuite Centers for your NetSuite Account. This is a complex process that we don't have the space to dive into here. But we have addressed NetSuite Centers in a separate tutorial. To learn about managing Centers in NetSuite, or Creating custom centers, check out our article on Custom NetSuite Centers, Tabs, Categories, and Links.
Custom Preferences Subtab
Under the Custom Preferences subtab, you can establish additional preferences. The custom preferences you need to establish here will greatly depend on your company's unique needs, but we have included an example here.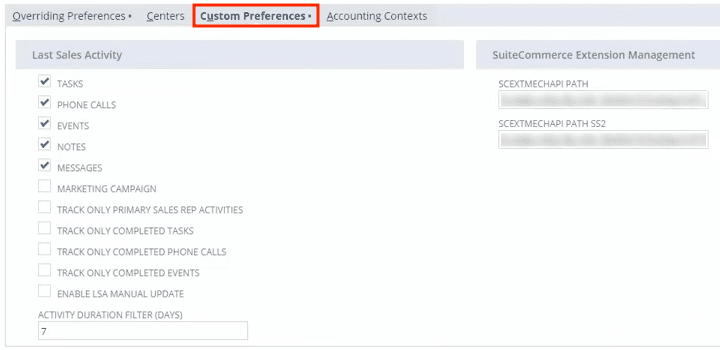
In the example screenshot below, you can see that we have set customer preferences related to Last Sales Activity turning on the options for Tasks, Phone Calls, Events, Notes, and Messages.
However, you will notice we have left some options off, such as Marketing Campaign, Track only Primary Sales Rep Activities, Track only Completed Tasks, Track only Completed Events, and Enable Manual Update.
You can also see that we have fields for SuiteCommerce Extension Management filled out, including our SCEXTMECHAPI Path and SCEXTMECHAPI Path SS2.
These example fields are meant to show you what is possible; if you have specific questions about what custom preferences you need to establish in your NetSuite Account, contact a NetSuite Consultant.
That's all for now. Hopefully, this post gives you something to work with while trying to understand NetSuite and what it can do for your business. If you have any questions and want some free consulting advice, feel free to contact our team at Anchor Group.
.
Get stuck in a step during this article?
We like to update our blogs and articles to make sure they help resolve any troubleshooting difficulties you are having. Sometimes there is a related feature to enable or a field to fill out that we miss during the instructions. If this article didn't resolve the issue, please use the chat and let us know so that we can update this article.
Tagged with Training