Configuring the Product Lead Time Bundle | NetSuite SuiteCommerce
This article conveys the wisdom learned when configuring the product lead time bundle for SuiteCommerce (SC) or SuiteCommerce Advanced (SCA) Sites.
- Date
- March 26, 2026
- Read
- 8 min

This article conveys the wisdom learned when configuring the product lead time bundle for SuiteCommerce (SC) or SuiteCommerce Advanced (SCA) Sites. This bundle surfaces in the store when a product has zero inventory or is back-ordered. The ‘Display in Webstore’ Button on the item record is still checked, allowing customers to know the wait time for an out-of-stock item.

Advanced Inventory Management (AIM)
The Advanced Inventory Management feature is needed for the Product Lead Time to surface in your webstore. There is a lot that could be said about this functionality, but here are the basics of this NetSuite feature:
What: AIM allows NetSuite to use item records to calculate lead time, safety stock, and seasonal demand for inventory levels. This allows for more accurate product forecasting, which can help a company to fulfill its orders more efficiently and effectively.
When this feature is helpful: This feature predicts (or forecasts) when the inventory will be replenished or when the current stock will deplete based on current demand. If the company has multiple stores or distribution centers to fulfill orders, desires to improve its supply chain forecasting, or wants the NetSuite calculated opinion, clicking this feature would be desired.
Where this would NOT be recommended: This feature would not be recommended if the customer has a demand planning team and does not want to base their forecasts on historical data in NetSuite.
Why is this needed for the Product Lead Time Bundle? This bundle utilizes the native functionality of AIM to surface this data to the webstore. Without AIM enabled, the bundle does not know what the Product Lead Time would be and therefore, it errors.
Enable NetSuite Features to Support the Product Lead Time Bundle
Step 1: Before beginning, follow this click path to enable the “Advanced Inventory Management” feature in NetSuite: Setup > Company > Enable Features > Items & Inventory > Inventory

Check the “Advanced Inventory Management” Checkbox in Enable Features
Step 2: Install and Activate the SC Product Lead Time Extension from the SuiteBundler.
- To achieve this, navigate to the Customization Tab > SuiteBundler > Search and Install Bundles.
- In the text box, type “SC Product Lead Time” and select search.
- Find the correct bundle and install it by clicking the blue “Install” button.
- For more information on installing and activating extensions, check out this article on Linking Commerce Applications to a Domain in NetSuite.
Note: This bundle does need to be provisioned by NetSuite. If the user receives an error that sounds like, “You do not have access to this bundle”, then please have the customer contact their NetSuite account representative to have this bundle provisioned.
Step 3: An important feature that must be enabled for this bundle to operate is the checkbox “Include Out of Stock Items in Website”, which must be checked in the Website Set Up Record.
- To navigate here, click the following click path:
- Commerce > Websites > Website List – Shopping Subtab; Check the “Include Out of Stock Items in Website”.

Note: This is an assumed setting that is not noted in the NetSuite documentation - if your product lead time bundle doesn't surface to the webstore, check this setting first to verify your bundle can surface.
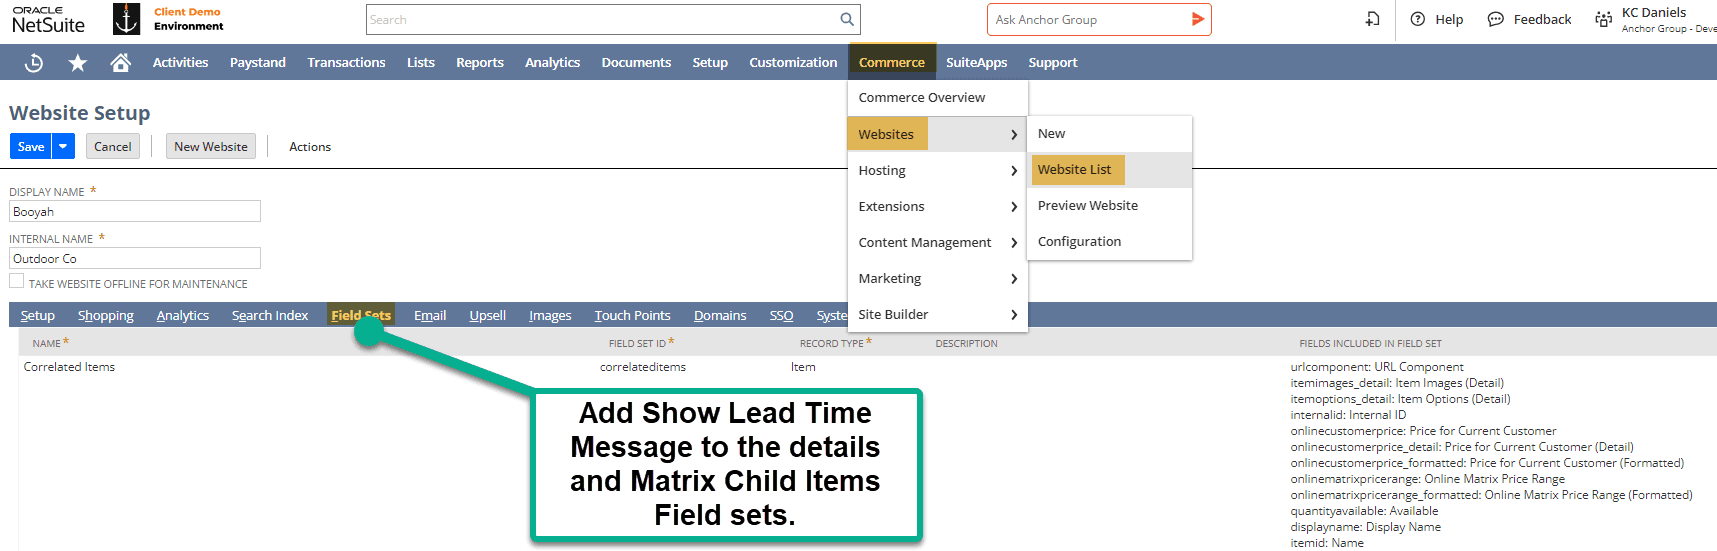
Add 'Show Message Lead Time' to the Field Sets
The 'Show Message Lead Time' needs to be added to the Field Sets in the Website Set Up Record. To navigate here, follow these steps coming from the first NetSuite Article above:
Step 1: Go to Commerce > Websites > Website List.
Step 2: Click Edit next to the website to which you are adding Product Lead Time.
Step 3: Go to the Field Sets subtab.
Step 4: Add the Show Lead Time Message (Custom) field to both the details and matrixchilditems fieldsets. For each fieldset, perform the following steps:
- Locate the Fields Included in Field Set column and click the Set button.
- Select Show Lead Time Message (Custom) from the Field Name list and click Add.
- In the Field Set window, click Submit.
- In the Field Set row, click OK.
Step 5: After adding the field to both field sets, click Save.
Field Sets In the Website Set Up Record
Configuring the Product Lead Time Extension
To configure the Product Lead Time bundle, navigate to the Configuration Record in NetSuite by following this click path: Commerce > Websites > Configuration – Extensions tab and Product Lead Time Subtab.

Extension Level Configuration in the Configuration Level
Set the following:
- Message Test - This is an HTML-supported field that sets the message to display on the PDP on your webstore.
- Show Lead Time As - This field controls how the wait time surfaces on the webstore. You have two native options: Day Countdown (“Back in stock in 24 days”) or Date (“Back in Stock on 8/15”).
- Date Format - Select the format in which the date displays if the Show Lead Time As field is set to Date.
- Maximum Number of Days - Determines the maximum number of days to display.
You can set the Maximum Number of Days at the extension and item level. You can override this setting for specific items by setting the Maximum Number of Days field on the Item record (SuiteCommerce Extensions tab > Product Lead Time subtab).

Note on How NetSuite Calculates the Product Lead Time: NetSuite determines the lead time of an item by calculating the date of the 3 most recent purchase orders subtracted by the receipt date of the purchase order into that location.
Enable Product Lead Time for an Item
In order to configure this extension to your items, you need to enable to product lead time for a specific item.
You do have the option to apply this extension to some items.
- If you want the item to have the Product Lead Time to surface, you may configure the product lead time following the process below.
- If you do not want the item to have the product lead time extension surfaced, simply do not check the “Show Lead Time Message” on the item record, as shown in Step One below.
Step 1: Navigate to your Item records by going to Lists > Accounting > Items; Scroll to the SuiteCommerce Extensions subtab. The Screenshot is the same as the above section:
Step 2: Here, you will see the Show Lead Time Message and the Maximum Number of Days fields. Here you can configure:
- Show Lead Time Message: This enables the product lead time to surface if the item is out of inventory.
- Maximum Number of Days: This determines how many days will surface for this specific item and is noted in the above section.
Step 3: Upon configuring these settings, hit Save on the Configuration Record. Next, perform a Cache Invalidation Request and hard refresh (Ctrl + Shift + R) on your site to see your changes.
Related Article: Native SuiteCommerce Store Locator Setup
Got stuck on a step in this article?
We like to update our blogs and articles to make sure they help resolve any troubleshooting difficulties you are having. Sometimes, there is a related feature to enable or a field to fill out that we miss during the instructions. If this article didn't resolve the issue, please use the chat and let us know so that we can update this article.
FREE SuiteCommerce Book
If you liked this article, you'll LOVE our book on SuiteCommerce. Order the free SuiteCommerce book today, and we'll even pay for shipping.
Oracle NetSuite Alliance Partner & Commerce Partner
If you have questions about how our team can support your business as you implement NetSuite or SuiteCommerce, feel free to contact us anytime. Anchor Group is a certified Oracle NetSuite Alliance Partner and Commerce Partner equipped to handle all kinds of NetSuite and SuiteCommerce projects. We offer services across the United States and beyond, so whether you are located in New Orleans, Cleveland, or somewhere in between, we've got you covered.
![]()
We are a premium SuiteCommerce agency that creates powerful customer portals. Unlike our competitors, we have already solved your problems.
Tagged with Training