Native SuiteCommerce Store Locator Setup
Within lies the comprehensive guide to setting up the native Store Locator on a SuiteCommerce site.
- Date
- January 29, 2026
- Read
- 6 min

Within lies the comprehensive guide to setting up the native Store Locator on a SuiteCommerce site.
SuiteCommerce Store Locator Quick Tips
Tip 1: Longitude/Latitude
Get a location’s latitude and longitude values by searching in Google Maps for the location using the location address. Then right-click your location and select the first option from the dropdown to copy the latitude and longitude values to your clipboard.
The location record must include a longitude and latitude value for it to appear on the store locator.
Tip 2: Google Maps API Key
For the store locator to work, you need to add your Google Maps API Key to the Store Locator tab in the website configuration.
Tip 3: Default Type Locator
You can set the store locator to show only warehouse locations, only store locations, or all locations. This setting is found in the SC configuration Store Locator Tabs “Default Type of Locations” field.
Possible values for “Default Type of Locations” are:
- 1 – will return only locations listed as Stores in NetSuite.
- 2 – will return only locations listed as Warehouses.
- 1,2 – will return only locations listed as Stores or Warehouses.
- Leave blank will return locations listed as stores, warehouses, or undefined.
The “Store” or “Warehouse” value referenced by the “Default Type of Locations” field is set on the Location Record in the “Location Type“ field.
Prerequisites to Setting Up the Store Locator
The below info is needed in order to complete the setup of this solution:
Google Maps API Key for Your Account
- The Google Maps API Key validates the connection to your Google account and prevents unauthorized use of Google Maps.
Locations that Should Appear in the Store Locator
- You may not want all your locations in NetSuite to appear in the store locator
- You will want to specify either all Warehouses, all Stores, or a more granular list of locations
- You can control this by not filling out the longitude and latitude values for those location records
- Location records are found at the following URL for all NetSuite accounts: nsAccount.com/app/common/otherlists/locationlist.nl
What Location Do You Want the Store Locator to Default to?
- I recommend your HQ/main location
- This will be used to determine where the map will default to prior to doing a location search
- This will be input later as latitude and longitude values in the Google > Center Position Latitude and Google> Center Position Longitude fields, respectively
Default vs Custom Icons
If you want custom icons to be used for the position and location markers, you will have to provide these to your NetSuite consulting team.
Store Locator Configuration Settings
Navigate to the website configuration record Store Locator tab under Commerce > Websites > Configuration
Step 1: Fill in Google Maps Fields
Fill out the Google Maps fields accordingly:
- Enter Your Google API Key in the Google > API Key field
- Enter the Default latitude and longitude values in the Google > Center Position Latitude and Google> Center Position Longitude fields, respectively. See Quick Tips above for getting longitude and latitude from an address.

Google Maps Configuration Page
Step 2: Set Store Locator Settings
Fill out the Store Locator Settings fields accordingly. Add custom store and position markers images to the file cabinet. Set them up under the following path: Web Site Hosting Files > Live Hosting Files > SSP Applications > NetSuite Inc. - SCS > SuiteCommerce Standard > Icons
Step 3: Establish the Default Type of Locations
Set the “Default Type of Locations” value based on your use case. This string specifies the type of stores to return (stores, warehouses, or both). The Store or Warehouse value is set on the Location Record in the “Location Type“ field. If no property is specified, the map and list display both location types. Possible values are:
- 1 – would return only locations listed as Stores in NetSuite.
- 2 – would return only locations listed as Warehouses.
- 1,2 – would return only locations listed as Stores or Warehouses.
- Leave blank would return locations listed as stores, warehouses, or undefined.
Set the “Is Enabled” field to True, along with the remaining configuration values to appropriate values for your specific situation.
'Save' the configuration.
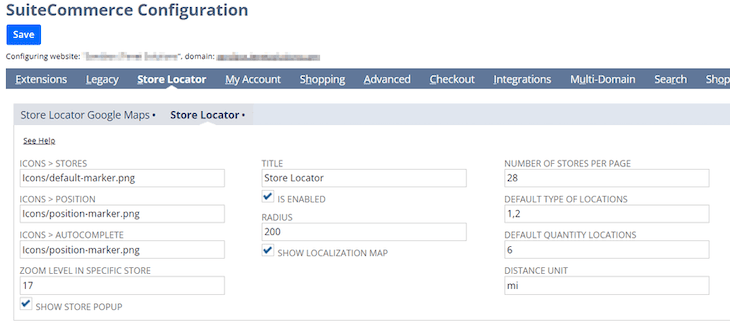
Store Locator Settings Configuration Page
Updating NetSuite Location Records
Navigate to the NetSuite location records: nsAccount.com/app/common/otherlists/locationlist.nl
Edit a location record. Copy the location address to Google Maps to get the latitude and longitude values. Paste these values into the location record. See Quick Tips above for getting longitude and latitude from an address.
Note: If you want to ensure that a certain a location does not show on the store locator, do not fill in the latitude and longitude values.
Update the Location Type field accordingly so that it will display in the store locator. You set the types of locations that will show in the store in Step 3 above. You may not want this field modified, so you should confirm this prior to updating.
Save the location record.
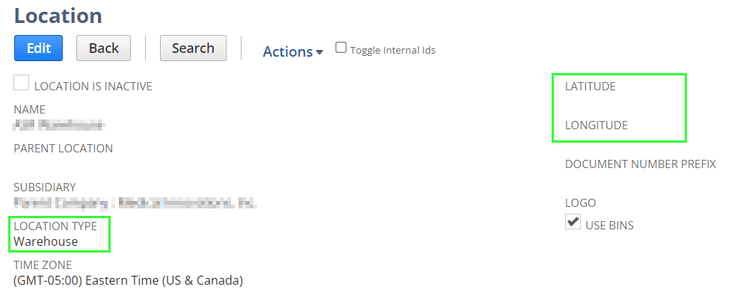
Example Location Record
Repeat this step to update the location records for all locations that should appear in the store locator in SuiteCommerce.
Finally, navigate to the store locator and confirm the correct locations are showing.
Got stuck on a step in this article?
We like to update our blogs and articles to make sure they help resolve any troubleshooting difficulties you are having. Sometimes, there is a related feature to enable or a field to fill out that we miss during the instructions. If this article didn't resolve the issue, please use the chat and let us know so that we can update this article.
Oracle NetSuite Alliance Partner & Commerce Partner
If you have general questions about SuiteCommerce or more specific questions about how our team can support your business as you implement NetSuite or SuiteCommerce, feel free to contact us anytime. Anchor Group is a certified Oracle NetSuite Alliance Partner and Commerce Partner equipped to handle all kinds of NetSuite and SuiteCommerce projects, large or small.
We are a premium SuiteCommerce agency that creates powerful customer portals. Unlike our competitors, we have already solved your problems.
Tagged with Training