IP Block and Email Verification Install Guide (SuiteCommerce/SCA)
Get a pre-built email verification and IP Blocking bundle that is used to help stop fraud bot attacks on your SuiteCommerce or SuiteCommerce Advanced store that are resulting in your payment processor to potentially shut down.
- Date
- April 6, 2026
- Read
- 10 min

The email verification bundle is a bundled subscription solution by Anchor Group. If you have not yet purchased, you will need to do so before finishing the installation. After you finish checking out, you will be redirected to a form that will have you provide your NetSuite account ID. Anchor Group will be notified and will provision the bundle (you can expect to be provisioned the bundle within 1 business day). You will be notified via email from an Anchor Group account executive when it has been provisioned. This bundle has a number of components between the IP block and email verification so we recommend that you purchase the roughly 4 hour implementation by Anchor Group to perform the implementation. You can ask your Anchor Group account manager who provisions the bundle about having a quick install performed by Anchor Group.
Note: IP Blocking can be utilized without the email verification process, but it is recommended to have email verification on at least during an active fraud attack to make IP Blocking automations most effective.
Step 1: Install two bundles from Anchor Group
As an administrator, Navigate to Customization > SuiteBundler > Search and Install Bundles. You can search for the bundle ID in the search bar and then install both of the following bundles.
- Safe Registration Bundle ID 539420
The first bundle contains the SuiteCommerce / SCA extension for the website.
- Safe Registration (Backend) Bundle ID 539418
The second bundle contains the ERP elements such as the new field, email template, and verification script.
Step 2: Create API secret for safe registration
- Go to Setup> Company > API secrets
- Click on “Create New”.
- Enter name “Safe Register Secret” and ID as “_encrypt_email_validation_secret” (The solution will not work if the internal ID for the API secret isn't done correctly.)
- Generate a 32-bit random password from any password generating website (Website Option)
- Enter that 32-bit password into the password and confirm password field.
- Go to restriction tab
- Check allow for all scripts
- Check allow for all domains.
- Save.
Step 3: Update Existing Customer Records
Mass Reduce Script Deployment Step | SuiteCommerce Email Verification
This is an extremely important step to avoid impacting existing customers from login.
There is a new field on the customer record called "email validated" which needs to be updated to be set as "true" for all real existing customers or they will be unable to login to the SuiteCommerce/SCA website.
Within the bundle, there is a map reduce script that checks the box for "email validated" for all existing customers in bulk.
- Search for the map reduce script "AG | MR | Set Email Validated Field".
- Navigate to the deployment of the script and edit the deployment record and click "save and execute" from the dropdown.
- Check the script logs or execution status as it may take more time depending upon the number of existing customers.
- Remove fraud customer accounts. It is very likely some of the customers you are facing a bot attack with were had the "email validated" checked during the processing of the script. Go to your customers that have access to the website to clean up existing lead/prospect/customer accounts that have access and have email validated. Uncheck the "give access" and "email validated" checkbox from the fraudulent accounts. This will give you a clean slate. If you want to do the unchecking in bulk, you can do it with a CSV import, but it will likely be just as easy to many edit the fraudulent records. If you don't know how to perform CSV updates, you can learn how to do so with this NetSuite training tutorial.
Any new or existing registered customer that has this field left unchecked while the email verification extension is active will not be able to login to their account.
If you manually create a new customer in the NetSuite user interface (not on the website), then this field is defaulted to true.
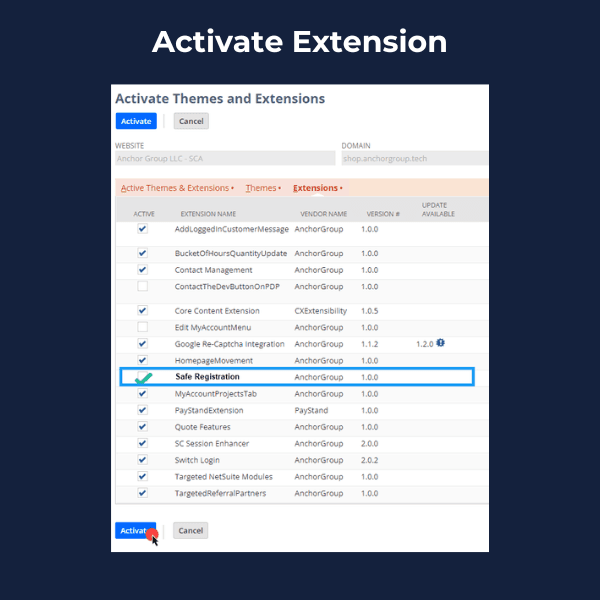
Step 4: Activate SuiteCommerce Extension
Navigate to the SuiteCommerce extension manager. Using an administrator role, this can be found by navigating to Commerce > Extensions > Extension Manager.
- Find your domain and click "edit"
- Click on the extensions tab
- Check the box next to "Safe Registration"
- Activate the extension (this can take 5-15 minutes to finish processing)
Step 5: Permission Management
Search the service file SafeRegistrationModule.Service.ss and enable permission to update the customer field to verify email. We have created a new role so this can trigger correctly as NetSuite has made some updates so this can’t be triggered by an administrator role anymore.
The new role is called “email verification” so ensure that it is selected on the permission of this service file. Enssure that “Execute as Role” is set as “Email Verification”.
Step 6: Find Email Template Internal ID
Navigate to the file cabinet. This can be found using an administrator role by navigating to Documents > Files > File Cabinet.
Search for the Bundle 539418 in file cabinet and find the email template internal id.

Copy the internal ID.
Step 7: SuiteCommerce Configuration
This step will be available to complete after the extension activation is complete.
Navigate to Commerce > Websites > Configuration and select your website/domain from the list. Click Configure.
- Navigate to configuration, select the domain, and configure the author employee's internal ID to use it as the email sender.
- Configure the email template internal ID and confirmation messages.
- Insert the email template internal ID you copied in the previous step.
- You will need to select an employee record internal ID, which is used as the "From Email Address" for the email verification. You can always find the internal ID within the URL of a NetSuite employee record. We recommend considering making an employee record in NetSuite for a general-purpose email.
- Configure the messages you would like customers to see on the website registration page.
Suggested messages to add:
- Please check your email for a validation link.
- Email verification success. Use your email and password to login now.
- Invalid email verification link
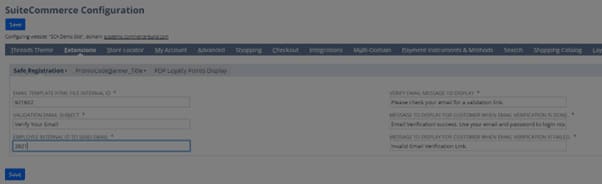
Save.
Troubleshooting Tip: Make sure that "Extensibility Layer Safe Mode" is disabled. This is located in SuiteCommerce configuration under Advanced > Extensions.
Step 8: Cache Invalidation Request and Browser Hard Refresh
Step 9: Test (Test Again)
It is very important to test for this bundle because it is intended to block fake accounts from being able to log into your website and place an order. If something in the installation did not go as expected, this means you may have accidentally blocked existing customers from being able to login or place an order.

If, during your testing, you notice anything, you can easily disable the extension in the extension manager and then reach out to Anchor Group for support.
Denial Criteria / IP Block:
Step 1: Install Bundle (if not already completed from safe registration set)
Step 2: Activate Denial Criteria Extension (if not already completed)
Step 3: Configure Denial Criteria Message in SuiteCommerce Configuration or full domains to block
Step 4: Add permissions to the files
- DenialCriteriaService.ss (Navigate via Global Search)
- Monitor Customer – Custom Record (Customization > Lists, Records, & Fields > Record Types > CTRL+F to fine “Monitor Customer”
- Script Deployments (Commerce > Denial Criteria > 4 different script deployments)
- AG | UE | Black List Customer
- AG | UE | Validate Customer Interactions (Also set sensitivity settings on the parameters tab)
- AG | UE | Validate Sales Order Limit (Also set sensitivity settings on the parameters tab)
- AG | SL | Blacklist Customer
Step 5: Configure the sensitivity settings of auto blacklisting scripts
This can be done in the previous step, as they are located on the script deployments
Step 6: Configure the saved search for recently created customers and add to the center category
Step 7: Cache Invalidation Request and Browser Hard Refresh
- Do this after every configuration change, including while troubleshooting and making minor adjustments.
Step 8: Perform end-to-end testing for email verification and IP Blocking
- Create a new customer record with a real email address and a unique new password
- Attempt to go to the login without verifying the email
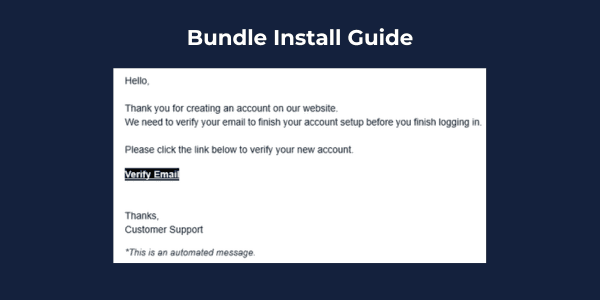
- Go to your email and ensure the email was received in your normal inbox and not your junk folder
- If the email arrived via the junk folder, you would want to ensure DKIM and SPF records for NetSuite are configured in your DNS settings (this will be located in something similar to GoDaddy). This will ensure emails sent from your email provider and NetSuite don’t go to a junk folder and provide value even for AR automation emails in addition to this solution.
- Click on the “Verify Email” and make sure you see the success message on the login page you get redirected to.
- Login with the email and password
- Ensure that the user is logged in
- Navigate to the recently created customer saved search
- Click edit on the test customer record and blacklist the customer
- Go back to the login page and, while being logged out, try logging in with the blacklisted username and password combo (you may have to press the log out button even though the user wouldn’t be able to add to cart anymore). Make sure you receive a message that the user has been blacklisted.
- Try registering a new customer account with the same blacklisted email but a new password, and ensure you are unable to use the same email.
- Now practice undoing the blacklisted customer
- Navigate to the customer IP address record > edit > uncheck Is Blacklisted
- Navigate to the customer record > edit > uncheck Blacklist customer
- Ensure the email verified checkbox is still enabled
- Login with the now whitelisted customer and ensure able to login
- Navigate to the employee record used to send the email verification, and go to the system information tab to see how to audit email sends
Suggestion on partial usage of email verification and IP block functionality (On Demand):
We know that email verification can create more clicks during the registration process for new customers, and that it is not always preferred. In the event that this is you, then you may want to go through the full configuration, setup, and testing, and then disable the extension until you receive an active attack.
What we are balancing is this vs the risk to the business of no transactions going through for multiple weeks if fraud occurs and the payment processor shuts down. But from what we have observed to date, is that they come in 2-4 week waves every 6-12 months. Because of that being our observation, it may be sufficient to enable on demand.
You would do this by simply inactivating the extension. In the event that you receive an attack, you will need to reactivate the extension, and you will want to make sure you run a CSV import on the “Email verified” field to true up the customer records. We recommend that you keep IP block functionality in place to still capture IP addresses so that you have some form of measuring odd activity.
Got stuck on a step in this article?
We like to update our blogs and articles to make sure they help resolve any troubleshooting difficulties you are having. Sometimes, there is a related feature to enable or a field to fill out that we miss during the instructions. If this article didn't resolve the issue, please use the chat and let us know so that we can update this article.
FREE SuiteCommerce Book
If you liked this article, you'll LOVE our book on SuiteCommerce. Order the free SuiteCommerce book today, and we'll even pay for shipping.

Oracle NetSuite Alliance Partner & Commerce Partner
If you have general questions about SuiteCommerce or more specific questions about how our team can support your business as you implement NetSuite or SuiteCommerce, feel free to contact us anytime. Anchor Group is a certified Oracle NetSuite Alliance Partner and Commerce Partner equipped to handle all kinds of NetSuite and SuiteCommerce projects, large or small.
![]()
We are a premium SuiteCommerce agency that creates powerful customer portals. Unlike our competitors, we have already solved your problems.
Tagged with Solutions