How to add a custom favicon to a SuiteCommerce site
Adding a Favicon to your SuiteCommerce website is an important element to building a brand. This is a tutorial on how to add your own custom favicon to your SuiteCommerce website.
- Date
- April 6, 2026
- Read
- 6 min
What is a Favicon?
Do you see that small icon on top of your browser page? That is called a Favicon. Though a small detail, it can be paramount to ensuring your customers are on the correct website and buying from you, and this small detail helps instill trust in your customers.

Changing the Favicon in NetSuite SuiteCommerce
Changing the default NetSuite favicon to a custom favicon is one of the first things you should do when you set up a SuiteCommerce site. Not only does it give your site a professional look, but it also makes it easier for customers to locate your site link in their bookmarks bar.
There are two main methods for adding your favicon:
- REPLACING the favicon within the existing folder.
- Creating a NEW folder in the File Cabinet
How to Replace a Favicon in SuiteCommerce Standard
Step 1: Determine the Favicon Folder Path
Navigate to the SuiteCommerce Configuration by following this click path: Commerce > Websites > Configuration.

Select your website and domain that you desire to configure.
Once in the Configuration record, navigate to the Advanced tab and then to the Favicon Path subtab text box. This textbox hosts the folder location in the file cabinet for your favicon folder.
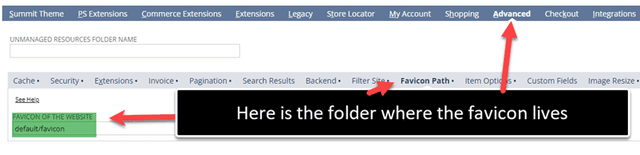
Take note of the folders listed in the Favicon text box.
Note: This folder is important for step 4, 5 and 6. Screenshots or writing this information would be highly recommended. Also note that this is folder path, not a URL or a specific image file link. The field help is NOT useful for this section.
Step 2: Locate the Favicon Folder within the File Cabinet
Navigate to the File Cabinet.
Search for the folder name from the “Favicon of the Website” folder found in step 2. Search using the search bar on the left and look for type “Folder”.

Click into the 'Default' folder; there should be a 'favicon' folder. Click into the favicon folder.
Note: It is possible that your folder from step 3 is named something different than “Default” – search what folder you found in the configuration record from step three.
There may be more than one subfolder in the Default folder – click until you get to the favicon.ico file.
Step 3: Add the Favicon File to this Existing Folder
Select the 'Edit' button, then under 'Select File,' add your file for the Favicon.
It is best when the favicon is already in an ICO format.
Hit the Save button.
Remember to Save the Configuration record (if it is still open).
Step 4: Submit a Cache Invalidation Request
If changes did not immediately surface, try refreshing the site (Cntrl + Shift + R) to validate that the favicon appears as you intended.
Though the changes sometimes immediately surface on the site, It is best practice to perform a cache invalidation request when working with the Configuration Record.
Need a reminder on how to accomplish this? Check out this tutorial article on submitting a SuiteCommerce Cache Invalidation Request.
Note: If your site has multiple folders under the same name in the File cabinet, it might be wise to replace both locations.
How to Add a Favicon in SuiteCommerce Advanced
Step 1: Set the favicon.io file path in the Configuration
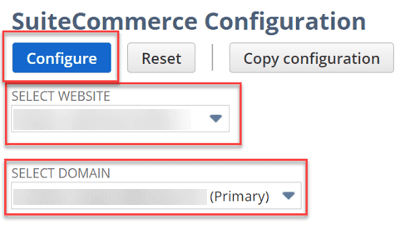
Navigate to the SuiteCommerce configuration record. Commerce > Websites > Configuration (This may be in a different location depending on when your environment was last updated).
Using the dropdown menus, select the website and domain that you want to change the favicon for and click Configure.
Under the Advanced tab > Favicon Path subtab, find the field titled "Favicon of the Website" and set it to "/" (just the slash, no quotation marks).
Save the configuration record.
Step 2: Create img folder in the file cabinet
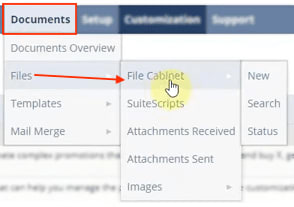
Navigate to the File Cabinet. Documents > Files > File Cabinet
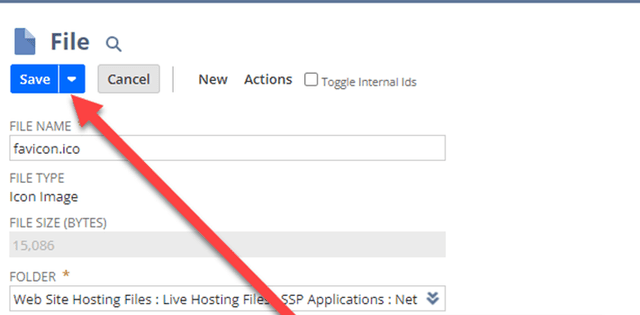
Navigate to the following folder: Web Site Hosting Files > Live Hosting Files > SSP Applications > NetSuite Inc. - SCA : 20XX.X (the version of your SuiteCommerce site) > Development
Click on the New Folder button.
Name the folder img in all lower case, and click Save.
Add the favicon file to the img folder and name it favicon.ico (it is important to name the file with the file extension ".ico").
Step 3: Submit a Cache Invalidation Request
Finally, you will need to invalidate the site's cache. Need a reminder on how to accomplish this? Check out this tutorial article on submitting a SuiteCommerce Cache Invalidation Request.
It's also a good idea to refresh the site (Cntrl + Shift + R) to validate that the favicon appears as you intended.
Related Article: Add Fonts & Icons to SuiteCommerce and SCA
Oracle NetSuite Alliance Partner & Commerce Partner
Hopefully, this post helped you customize your SuiteCommerce website and become more recognizable to customers. If you have general questions about SuiteCommerce, or more specific questions about how you can customize your SuiteCommerce website, feel free to contact us at any time. Anchor Group is a certified Oracle NetSuite Alliance Partner & Commerce Partner, and is equipped to handle all kinds of NetSuite and SuiteCommerce projects, large or small.
![]()
We are a premium SuiteCommerce agency that creates powerful customer portals. Unlike our competitors, we have already solved your problems.
FREE SuiteCommerce Book
Want to learn more about SuiteCommerce and how it can benefit your business? We'd like to gift you a FREE NetSuite Ecommerce paperback book. Here at Anchor Group, we pride ourselves on having the heart of a teacher... this is just one of the many ways that we follow through on that value. So, what are you waiting for?
Order the free SuiteCommerce book today, and we'll even pay for shipping.

Tagged with Troubleshooting