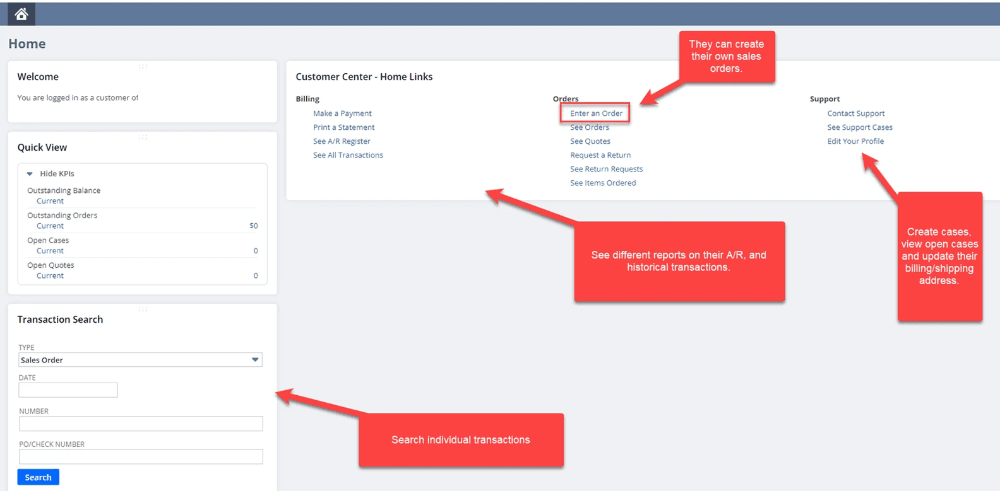
The customer portal is an Enabled Feature that allows your customers access to your NetSuite environment. This allows your customers the ability to create sales orders, make payments, contact support (create cases), and view their transaction history.

NetSuite Customer Portal Benefits
The key benefits of the NetSuite customer portal are that it:
- Allows customers to create cases
- They can view their order history, check order status, and place new orders around the clock
- Provides real-time updates on their orders.
Now, let's look at how to set up the feature, give your customers access, and view your customers' roles.
Enabling the Customer Access Feature
Go to: Setup > Company > Enabled Features. Under the Web Presence Subtab, select the Customer Access feature.
NOTE: If you would like your customer to be able to create Sales Orders then you will also want to enable the Online Ordering feature.

Click Save.
Giving a Customer Access to NetSuite
Start by opening a Customer record. Initially, after enabling the Customer Access feature, you will need to customize the form to show the Access fields.
To do this, on the Custom Entry Form page, go to the Sublist subtab. Under the System Information, you will see Access. You need this to be showing.

Once the form has been updated go back to the Customer Record. Then navigate to System Information > Access, and from here you will need to Check the Give Access box.
They will only have access to the Customer Center Role.
You can also manually assign their password as well.

NetSuite Customer Portal View
Now, your customer has access to their portal. See the screenshot below as to what it looks like.
NOTE: that you can customize this dashboard for your customers and you have the ability to edit their permissions to see what they can and cannot see.

Got stuck on a step in this article?
We like to update our blogs and articles to make sure they help resolve any troubleshooting difficulties you are having. Sometimes, there is a related feature to enable or a field to fill out that we miss during the instructions. If this article didn't resolve the issue, please use the chat and let us know so that we can update this article!
Tagged with Training
