Adding @Media Styling to SuiteCommerce CMS HTML Area
Make your SuiteCommerce CMS component mobile-friendly in NetSuite CMS using proper media tags for HTML area CMS. Quick fix for compatibility.
- Date
- April 6, 2026
- Read
- 5 min

If you are struggling to get your SuiteCommerce CMS component in your NetSuite CMS area to be mobile compatible, there is an easy fix to resolve the issue. Media tags can be used in the HTML area of CMS, but there is a certain technique to do it in order to meet your needs.
This is a tutorial on how to fix your @media style tags in your NetSuite CMS (SuiteCommerce) website.
Access your NetSuite CMS
First, navigate to the webpage with the element you wish to optimize. With the page now open in your browser, press "Esc" on your keyboard, and this will open up a NetSuite Login page.
Enter your NetSuite credentials. This will open up the Site Management Tools interface, through which you can access your SuiteCommerce CMS for this page.
Note: You will need to have the correct NetSuite permissions to access this part of NetSuite. Being an administrator is the best way to ensure access.
Add or Edit HTML CMS Area
You will need to be in the "Edit" mode, so click on the pencil icon at the top of the page after navigating to the page you'd like to edit.
- If you haven't added the HTML CMS area to the page, you can click the "+" icon to drag and drop it into the website.
- If you already have the content in position, you can edit the component by hovering over it and selecting the "Edit" pencil icon that appears in the top right-hand corner of the content block.
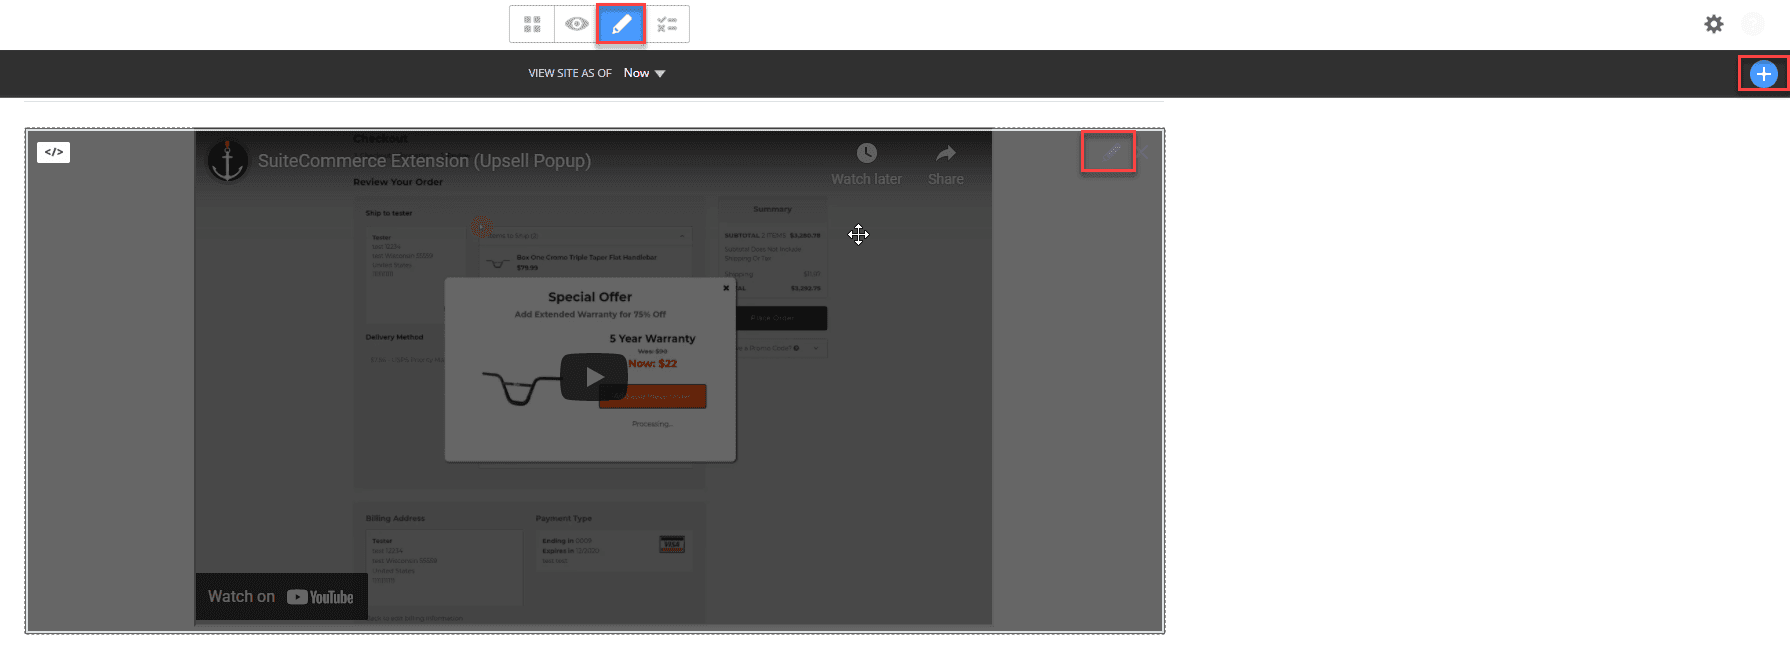
This will open up a view of the HTML CSS content block settings on the right of your screen to provide you with a side-by-side view of the page you're working with and the coding behind it.

Add the @Media Tags for different screen sizes
You will want to add different media tags for different screen sizes so that the video changes its size based on the device that is accessing the SuiteCommerce website.
Here is an example of adding "Media" tags to the styling:
<div class="container" align="center"><iframe class="container" src="https://www.youtube.com/embed/fm9-2wA0FTk?mute=1">
</iframe></div>


<style>
.container {
	width: 800px;
	height: 500px;
	margin-bottom:20px;
}
@media (max-width: 992px) {
	.container {
		width: 100%;
  	        height: 350px;
  	        margin-bottom:10px;
  	}

  }
  </style>
You may need to spend some time playing around with the numbers in your @media tags to get the element to look just right on different screen sizes. Just take your time and be patient with yourself during this step.
Publish Your Changes
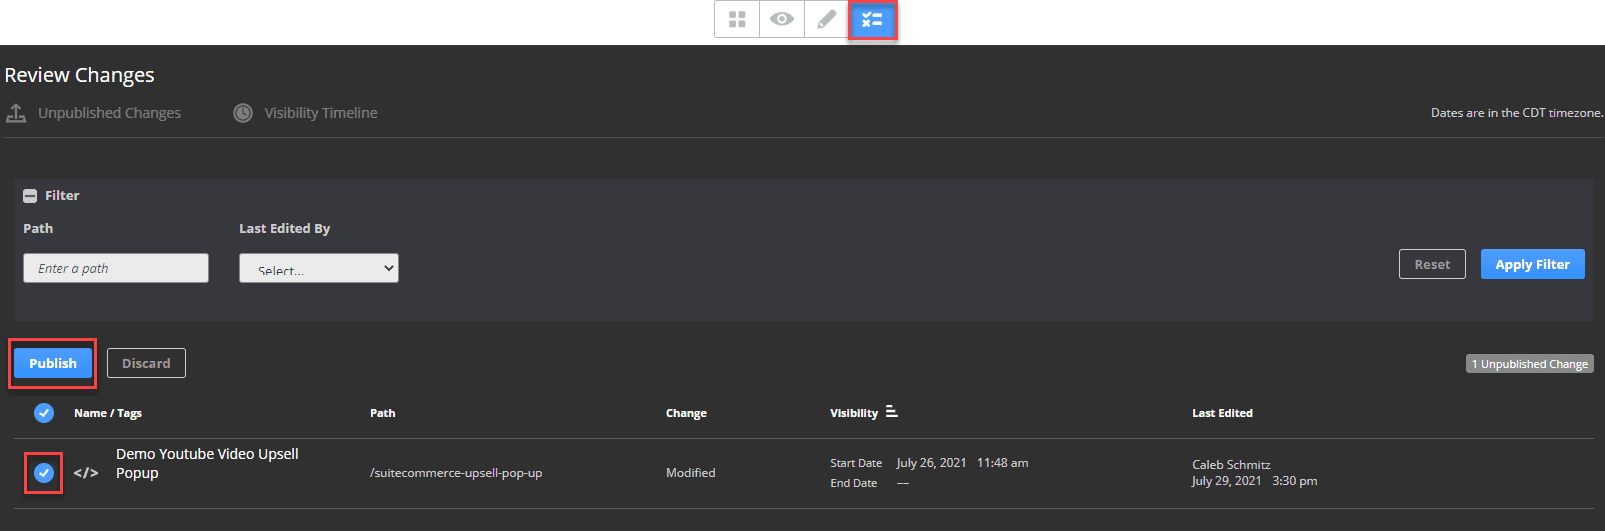
Once you have made the change, click on the Review & Publish Changes (list icon) button in the top menu. This will open up a Review Changes page.
From the list of changes on this page, select your edit and click "Publish".
Perform a Browser Cache Refresh
To review your newly published changes, navigate to the page on your SuiteCommerce website where you just made the edits and press CTRL + Shift + R to initiate a hard browser cache refresh.
Finally, click F12 on your keyboard to change the screen size and watch your changes take effect.
Hopefully, this post helped you set up your SuiteCommerce website and become more useful to customers.
Related Article: <Meta> Tags in SuiteCommerce | NetSuite Tutorial
Get stuck on a step during this article?
We like to update our blogs and articles to make sure they help resolve any troubleshooting difficulties you are having. Sometimes, there is a related feature to enable or a field to fill out that we miss during the instructions. If this article didn't resolve the issue, please use the chat and let us know so that we can update this article.
Oracle NetSuite Alliance Partner & Commerce Partner
If you have general questions about SuiteCommerce or more specific questions about how our team can support your business as you implement NetSuite or SuiteCommerce, feel free to contact us anytime. Anchor Group is a certified Oracle NetSuite Alliance Partner and Commerce Partner equipped to handle all kinds of NetSuite and SuiteCommerce projects, large or small.
We are a premium SuiteCommerce agency that creates powerful customer portals. Unlike our competitors, we have already solved your problems.
FREE SuiteCommerce Book for Continued Learning.
Want a free paperback copy of this NetSuite e-commerce book? We even pay for shipping. Order the free SuiteCommerce book today.
Tagged with Training, Troubleshooting