How to Add Items to Display in SuiteCommerce
There are two ways to make existing items available and visible in the SuiteCommerce webstore. You can update individual item records if you only have a few to do, or you can perform a csv upload to bulk update multiple items and display them all in the webstore at once.
- Date
- December 12, 2025
- Read
- 9 min
There are two ways to make existing items available and visible in the SuiteCommerce webstore. You can update individual item records if you only have a few to do, or you can perform a CSV upload to bulk update multiple items and display them all in the webstore simultaneously.
Displaying a Single Item in Your Webstore
In some cases, you may have a single item that you want to make available on your website. Perhaps you just released a new product you want to list on your site or forgot an item in a CSV bulk update to display items in your webstore. To display a single item in your webstore, follow these steps:
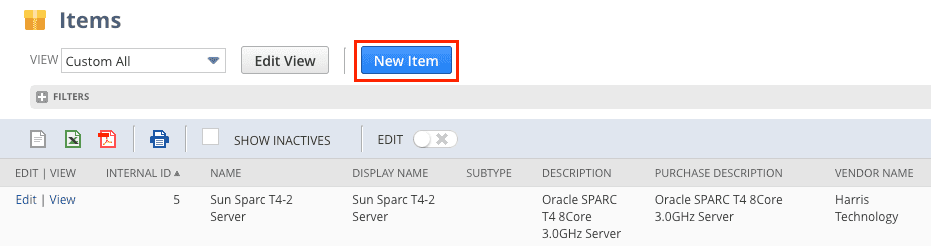
Step 1: Navigate to the Item Record by going to Lists > Accounting > Items.

If the item that you want to display in your webstore already exists in NetSuite, locate it on the list and click "Edit":

If the item does not yet exist, click "New Item" and enter any necessary item information into the your item record:
Step 2: Navigate to the Web Store tab on the item record.

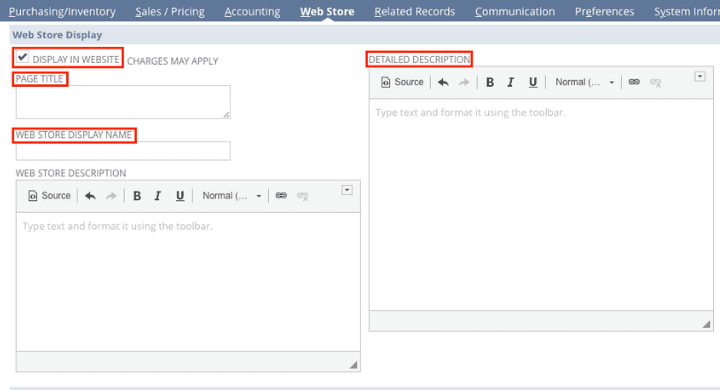
Step 3: Under the Web Store Display section, check the Display in Website box (the switch that makes the item available in the webstore). Next, add the appropriate display information:
- Add a Page Title (this will appear in the browser tab).
- Add a Web Store Display Name (this will appear as the header of the PDP).
- Add a Detailed Description (this will appear as details on the PDP). If you do not have a details tab set up on your PDP, see the Instructions in the article "How to Add Product Descriptions to a PDP."
Step 4: Further down on the Web Store tab, you will see the Search Engine and Feeds section. Here, you can change the URL Component (optional), which controls what will display in the URL when a user navigates to the PDP for the related item. If there is no value here, the display name usually displays by default.

Step 5: At the bottom of the Web Store tab, you will see an Associated Images subtab. Check if there is already an Associated Image for that item. If not, you will likely want to add some images. For more information on this step, check out our documentation on Adding Images to SuiteCommerce Items.
Step 6: Finally, if your website doesn’t display uncategorized items or if you have multiple websites, Check to make sure the item is in at least one commerce category for this website.
Step 7: Elsewhere on the Item Record
- If you have multiple price levels, check to make sure the designated default online price level has a value.
- If your website only displays items that are in stock, check to make sure the item has inventory available at a location that is set to have inventory available on the webstore.
Pro Tip:
If the item does NOT appear on the webstore after completing the above steps, check the following things (full details on checking these in the troubleshooting section)
- Is the Display in Website Field checked?
- Is the item marked inactive?
- Is the item’s subsidiary marked as ‘online’
- Which subsidiary is the default?
- Does the item have a price level set?
- Are any Personalized Catalog Views (PCVs) active?
Displaying Multiple Items on Your Webstore
Sometimes, you may have many products you want to make available in your webstore. For this, you will want to perform a CSV import to make all the items available at once rather than manually updating every item record.
Step 1: Create a CSV file with the appropriate item information. Remember to include the correct Item IDs.
Note that if your CSV file contains information ONLY for items you wish to display in your webstore, you do not need a column for the "Display in Webstore" option. You can simply establish this during your Import Field Mapping by adding the "Display in Webstore" NetSuite field and setting the input to "Yes".
Step 2: Navigate to "Import CSV Records" at Setup > Import/Export > Import CSV Records.

Step 3: Scan & Upload your CSV File
- Set the import type to "Items" and the appropriate record type. In most cases, the record type will be "Inventory Item".
- Select the CSV file with the item data you prepared for this import, and click "Next".
Step 4: Set your import options
- Select the appropriate data handling type ("Add", "Update", or "Add or Update").
- Click Next. (If you are only importing one file at a time, you will skip the File Mapping step.)
Step 5: Complete field mapping
- Establish the field mapping between your CSV columns and the appropriate field options in NetSuite.
- In your field Mapping, include the NetSuite Field "Display in Webstore".
- Click "Next".
Step 6: On the "Save mapping & Start Import" tab, complete the provided fields to label your import for future use, then click "Save & Run".
VIDEO: Item Data Management
To learn more about managing NetSuite item data for display on your SuiteCommerce webstore, check out this tutorial video:
NetSuite Tutorial | SuiteCommerce Item Data Management
Hopefully, this helped you set up your SuiteCommerce website to become more useful to customers.
Make Sure the Items now Display in Your Store
The hard part is over. The updated items should appear if you open your webstore in your browser. Please note that it may take a little while for all of your items to appear in your webstore, especially if you performed a CSV upload to display multiple items. However, if time has passed and the items aren't showing up, you'll probably want to troubleshoot to see what might have gone wrong.
Troubleshooting: Item(s) not Appearing
If the website items are not appearing after you have completed the above steps, there are several troubleshooting steps you can take.
Step 1: Verify the "display in website" checkbox
Navigate to an item you expect to see on the website
- Go to the “web store” subtab
- Look for the “display in website” checkbox and make sure it is checked

Step 2: Check if the item is inactive
- Navigate to an item you expect to see on the website
- Go to the “system information” subtab
- Look for the “inactive” checkbox and make sure it is NOT checked

Step 3: Check if the item's subsidiary is marked as "online" & which is the default
- Navigate to an item you expect to see on the website
- Go to the “accounting” subtab
- Look for the “subsidiary” field and take note of which is listed
- Go to Commerce > Websites > Website List
- Click “edit” next to the website you are working on
- At the bottom of the setup tab is a list of subsidiaries. Check to see which are marked as “online”.
PRO TIP: Note which is marked as ‘default’ as that can affect what non-logged-in website users see - even if both are marked as “online”.
Step 4: Does the item have a price level set?
- Navigate to an item you expect to see on the website
- Go to the “sales” subtab
- Look for the list of price levels and ensure at least one has a dollar value set. Even if the item’s price is $0, the item needs $0 in the price level.
NOTE: Double check the website’s price level. It may be that the item has no price set for the price level used on the website.
To check the website’s price level:
- Go to Commerce > Websites > Website List
- Click “edit” next to the website you are working on
- The price level is under the ‘Setup’ tab. Check which price level is set there.
Pro Tip: If the desired price level for web use is not in the website record listing, you need to edit your price level to have the “online price level” checkbox marked (Setup > Accounting > Accounting Lists)
5. Are any personalized catalog views (PCVs) active?
Personalized Catalog Views (PCVs) can affect which items are visible for logged-in or logged-out users. To check if the website has any active, do the following:
- Go to Commerce > Marketing > Customer Segments Manager
- If that menu item is not available, it is most likely that your website does NOT have any PCVs active
- Check for any item groupings.
- Looking at the customer segments manager, check the visibility level of “unmapped items”, if set to “hide fully”, items NOT in the other item groupings will not be visible.
- If this is the case on your website, check the item groupings for the item(s) that are not displaying. If they are not in the item groupings, the item(s) will not display.
For more information, check out the troubleshooting article Resolved Products Not Showing: Personalized Catalog Views.
Get stuck in a step during this article?
We like to update our blogs and articles to make sure they help resolve any troubleshooting difficulties you are having. Sometimes, there is a related feature to enable or a field to fill out that we miss during the instructions. If this article didn't resolve the issue, please use the chat and let us know so that we can update it.
Oracle NetSuite Alliance Partner & Commerce Partner
If you have general questions about SuiteCommerce or more specific questions about how our team can support your business as you implement NetSuite or SuiteCommerce, feel free to contact us anytime. Anchor Group is a certified Oracle NetSuite Alliance Partner and Commerce Partner equipped to handle all kinds of NetSuite and SuiteCommerce projects, large or small.
![]()
We are a premium SuiteCommerce agency that creates powerful customer portals. Unlike our competitors, we have already solved your problems.
FREE SuiteCommerce Book for Continued Learning.
Want a free paperback copy of this NetSuite e-commerce book? We even pay for shipping... Order the free SuiteCommerce book today.

Tagged with Training