Creating Personalized Catalog Views | SuiteCommerce PCV
In this tutorial, we enable you to provide different customers with access to different items. You can divide your customers into groups and provide each group with access to a tailored selection of catalog items.
- Date
- December 15, 2025
- Read
- 7 min
Purpose: to enable you to provide different customers with access to different items. You can divide your customers into groups and provide each group with access to a tailored selection of catalog items.
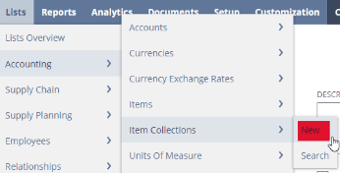
Create an Item Collection
Step 1: Go to List > Accounting > Item Collections > New.
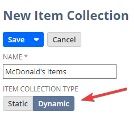
Step 2: Name your Item Collections.
Step 3: Pick which type of item collection that you would like to use:
- A Static Item Collection requires manually inputting the information.
- A Dynamic Item Collection will use a saved search for the information.
Note: If you choose a Static Item Collection, you can add items to your collection one at a time, by typing their name in and add a row or you can click the Add Multiple and choose many at once:

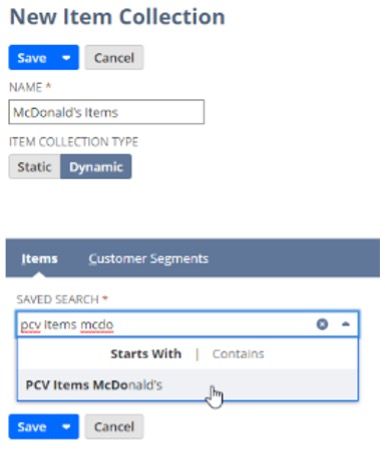
Note: If you choose a Dynamic Item Collection, in Saved Search, type your Saved Search Name that you are looking for and then click it when it appears.
Step 4: Add a Description for the Item Collection for clarity.
Step 5: Click Save.
How to Create an Item Saved Search
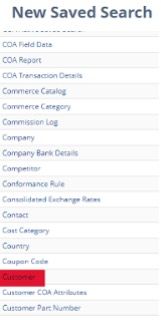
Step 1: To make an item saved search go to List > Search > Saved Searches > New. This will take you to the New Saved Search page.
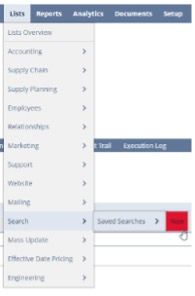
Step 2: On the New Saved Search page, scroll down and chose Items.
Remember that one of the best ways to speed up your work in NetSuite is to use key strokes. For faster navigation when searching in a large list like this, remember to use CTRL + F and search the team you're looking for, in this case "Items" .
Step 3: Name your Saved Search.
Step 4: Choose a filter(s) to narrow down your items. For example, brand, location, or name.
Step 5: Click Save.
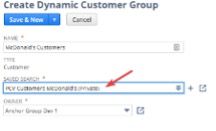
Create a Customer Collection
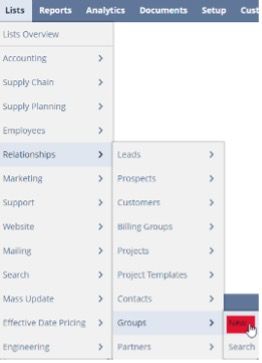
Step 1: Go to List > Relationships > Groups > New.
Step 2: Choose if your group will be static or dynamic. Static will use manual entry and Dynamic will use a saved search to fill your group.
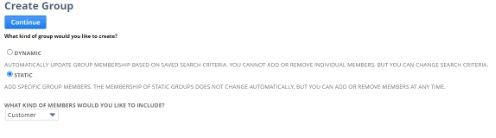
Step 3: Choose what type of members you would like in this group.

Step 4: Name your Customer Group.
- If you choose a Static Customer Group, you add customers to your collection one at a time, by typing their name in and add a row or you can click the Add Multiple and choose many at once.
- If you choose a Dynamic Customer Group, in Saved Search type your Saved Search Name that you are looking for and then click it when it appears.
Optional: Add a comment for the Customer Group if you feel it helps.
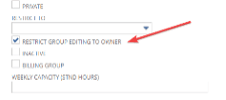
Note: By default, the Customer Group is set to “restrict group editing to owner”. Admins in NetSuite will still be able to edit Customer Groups even when this is checked. If you clear the Restrict Group Editing to Owner box and choose to make your group public, any user with access to a role with edit-level access to CRM Groups can access and edit your group’s content.
Step 5: Click Save & New.
How to Create a Customer Saved Search
Step 1: To make a customer saved search go to List > Search > Saved Searches > New. Choose Customers on the next page.
Step 2: On the New Saved Search page, scroll down and chose Customers.
Step 3: Name your Saved Search.
Step 4: Choose a filter(s) to narrow down your items. For example, brand, location, or name.
Step 5: Click Save.
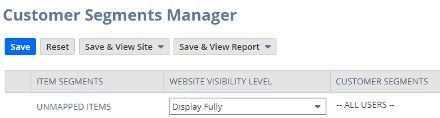
Manage Customer Segments
Step 1: In the universal search type in page: Customer Segments Manager and click it.

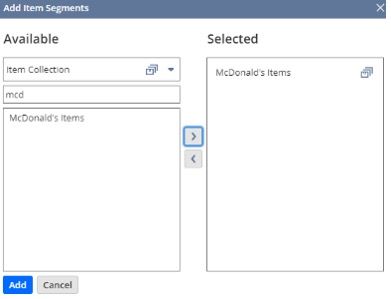
Step 2: At the bottom of the page click Add Item Segments. You may have to scroll down to the bottom of the page to find the button, depending on how many item segments there are.
Step 3: Search for the item collection you are looking for. Click on the it, it will turn gray. Then click the arrow to select it. Finally, click Add.
Step 4: Chose the customer access type that you would like, then search for your brand's customers.
- Display Full – this enables customers in the selected customer segment to view and purchase all items in the item collection.
- Disable Purchase – prevents customers in the selected customer segment from buying items in the item collection by hiding the Add to Cart button.
- Disable Purchase and Hide Price - prevents customers in the selected customer segment from viewing item prices and buying items in the collection.

Step 5: Scroll up to the top of the page and click Save.
That's it! Give yourself a high five on a job very well done! Hopefully, this post helped you set up your SuiteCommerce website and become more useful to customers. If PCVs don't meet your needs, check out this PCV Alternative for SuiteCommerce!
Related Articles:
- Setup SuiteCommerce PCVs via NetSuite CSV Import
- Resolved: SuiteCommerce PCV Products Not Showing
- Personalized Catalog View (PCV) Alternative
- Create External Catalog Sites in NetSuite for B2B
Get stuck in a step during this article?
We like to update our blogs and articles to make sure they help resolve any troubleshooting difficulties you are having. Sometimes there is a related feature to enable or field to fill out that we miss during the instructions. If this article didn't resolve the issue, please use the chat and let us know so that we can update this article!
Oracle NetSuite Alliance Partner & Commerce Partner
If you have general questions about SuiteCommerce or more specific questions about how our team can support your business as you implement NetSuite or SuiteCommerce, feel free to contact us anytime. Anchor Group is a certified Oracle NetSuite Alliance Partner and Commerce Partner equipped to handle all kinds of NetSuite and SuiteCommerce projects, large or small!
We are a premium SuiteCommerce agency that creates powerful customer portals. Unlike our competitors, we have already solved your problems.
FREE SuiteCommerce Book for Continued Learning!
Want a free paperback copy of this NetSuite e-commerce book? We even pay for shipping... Order the free SuiteCommerce book today!

Tagged with Training