NetSuite Saved Searches: A Complete Guide
In this article, we'll look at NetSuite Saved Searches and show you how to create and use them. Plus, we'll provide some tips on getting the most out of this feature.
- Date
- December 14, 2025
- Read
- 13 min

If you're a NetSuite user, you know that there are a lot of features to explore. One of the most useful is a NetSuite Saved Search. This article will look at Saved Searches and show you how to create and use them. We'll also provide tips on getting the most out of this feature.
NetSuite Tutorial | Saved Search
What is a Saved Search in NetSuite?
NetSuite is an excellent platform for managing company data from one centralized location. A NetSuite Saved Search is one of the best features for manipulating and using the data housed in your NetSuite account. It is also an excellent reporting tool that allows you to surface very specific data.
Benefits of a NetSuite Saved Search
NetSuite Saved Searches are easy to set up and can benefit companies in a wide variety of use cases:
- Monitoring Tool: A Saved Search can be added to your NetSuite dashboard in a portlet, allowing you to keep important, up-to-date information right in front of you. You can even use a NetSuite saved search to visually track progress toward a goal.
- Flexibility: It's easy to change criteria and add filters, and you can even add highlighting rules to manipulate data and see the important stuff.
- User-friendly: Learning how to use or create a saved search in NetSuite is easy. It can be learned within a few hours, which is excellent.
How to create a Saved Search in NetSuite?
Note: To create a Saved Search in NetSuite, you have to log in as an administrator. If you do not have the proper access and permissions to create a Saved Search, contact your system's administrator.
To create a NetSuite Saved Search, you will begin by navigating to Reports > Saved Searches > All Saved Searches > New.
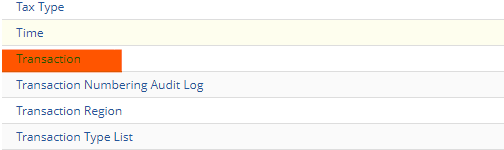
Once you click on the new Saved Search tab, it will show you a list of all the available Saved Search Types in NetSuite. For this demonstration, we will create a Saved Search to show bill payments and the corresponding Bill and purchase order relating to that bill payment. Given this use case, we will select the 'Transaction' type for our Saved Search.
This will open a page titled 'Saved Transaction Search', where you will set the parameters for the NetSuite Saved Search.
Note: Notice that our page title here, "Saved Transaction Search", matches the "Transaction" search type we just selected. If you are creating a different type of Saved Search, just keep in mind that the page title will reflect this difference.

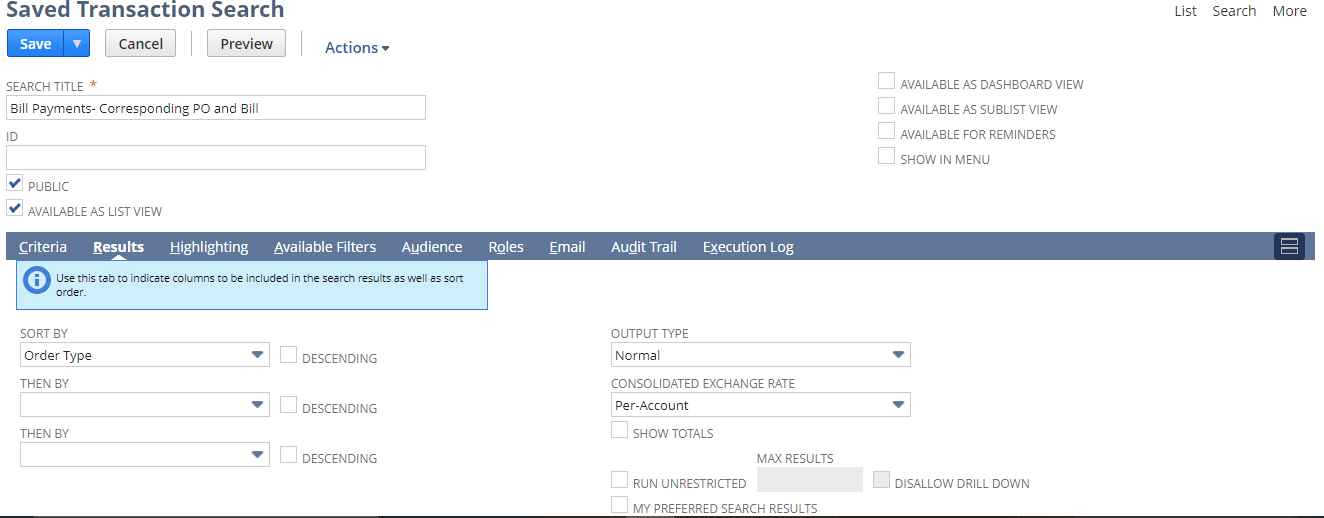
Set a Title, ID, and Basic Access/Display Preferences
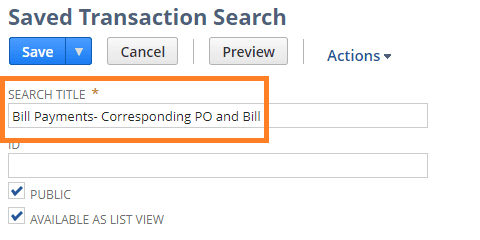
The first thing you want to do is enter a title for your NetSuite saved search. So, this one will be "Bill Payments - Corresponding PO and Bill".
NetSuite will automatically assign an ID to your saved search if you don't create one. However, we recommend assigning an ID manually so you can make it easily recognizable.
Note: A best practice when creating an ID in NetSuite is to begin the ID with an underscore since a standard prefix (ex. "customsearch") will be automatically added to any NetSuite ID you create. In our case, if we set the ID to "_bill_payments_PO_and_bill" the full ID with the prefix will be "customsearch_bill_payments_PO_and_bill".
If you want your NetSuite saved search to be available for all users, mark the 'Public' checkbox. To have this saved search available as a list view so that you can display it, for example, to display it as a list in a portlet on your dashboard, you will also need to mark the 'Available as List View' checkbox.
Define the Criteria for Saved Transactions Search
Criteria are all the rules you set to ensure that the data within NetSuite is configured so that you only see the information you want in your results. For example, if you run a Transaction Saved Search without specifying criteria, the search will return all transaction records in NetSuite. We don't want that, so we will restrict the Saved Search results using a few options on the Criteria Tab.
Define the Type in Criteria
The first thing you need to do is further define the type of transaction you want the NetSuite saved search to return. On the Criteria tab, Filter subtab, you can find the 'Type' option.
Note: This is different from the Saved Search Type (in this case "Transaction") that you selected in a previous step. The Saved Search Type defines what types of NetSuite records the saved search will consider, apply criteria to, and return as results for (in this case, transaction records). On the other hand, the "Type" filter selection under the criteria tab, which is being adressed here, allows you to further restrict the results of the saved search by specific types of transaction records, (in this case bills payments).

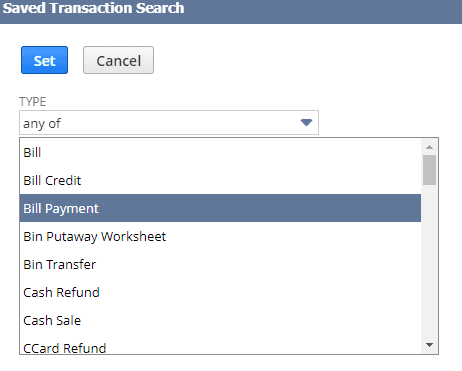
Once you select "Type," a pop-up will appear with a complete list of all transaction types in NetSuite. As mentioned earlier, we'll be reviewing bill payments. We will just select 'bill payment' as the type. Once you have selected the type(s) of transaction you want the NetSuite saved search to return in its results, click "Done" and then click "Set".
Now your NetSuite saved search will only return transaction records that are bill payments.
Specify the Main Line Criteria
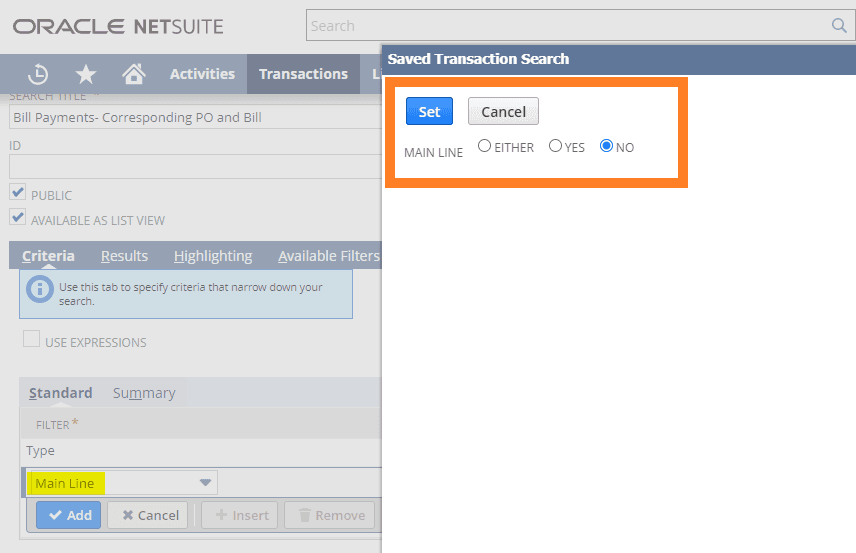
One essential aspect of transaction searches is the Main Line criteria. The Main Line refers to the header line of a transaction, which appears above all the line items. If you are interested only in the Header information, set the Main Line option to "yes." However, in this example, we will leave it marked as "no" since we want it to return all line items.
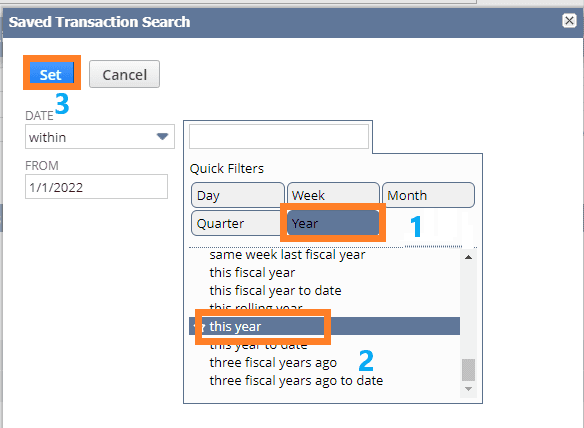
Select the Date Range for your NetSuite Saved Search
You can put as many criteria as you want here. For example, you might also be interested in a date and can select a date range of your choice.

You can type the date range directly into the 'From' and 'To' fields, or you can open the quick filters and use them to find available dynamic date ranges, such as 'this year' or 'same week last fiscal year'.
Specifying the Related Records
When you look at your Filters list, you'll notice ellipses after some options, indicating that these are drill-down fields. In this example, our NetSuite Saved Search can investigate or return data from NetSuite records related to the bill payment.

Now, what's a related record? For example, if you look at a Sales Order, you can see a customer record associated with it and item records. These records are not included on the sales order; they are separate records in the system that are associated with the sales order.
Load the NetSuite Saved Search Results
Once you've set the criteria, it's time to move to the results tab. At the top of the Results Tab, you'll find some sorting options. These allow you to sort the results returned by up to three parameters, each in ascending or descending order.
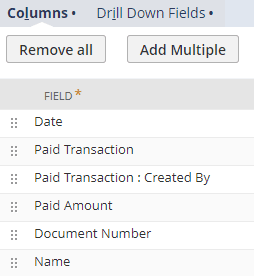
On the Results tab, there is a Columns subtab. Under the columns, you will see 'Fields'. This is where you will set up the columns to be included in your report by adding any/all fields for which you want to see information.
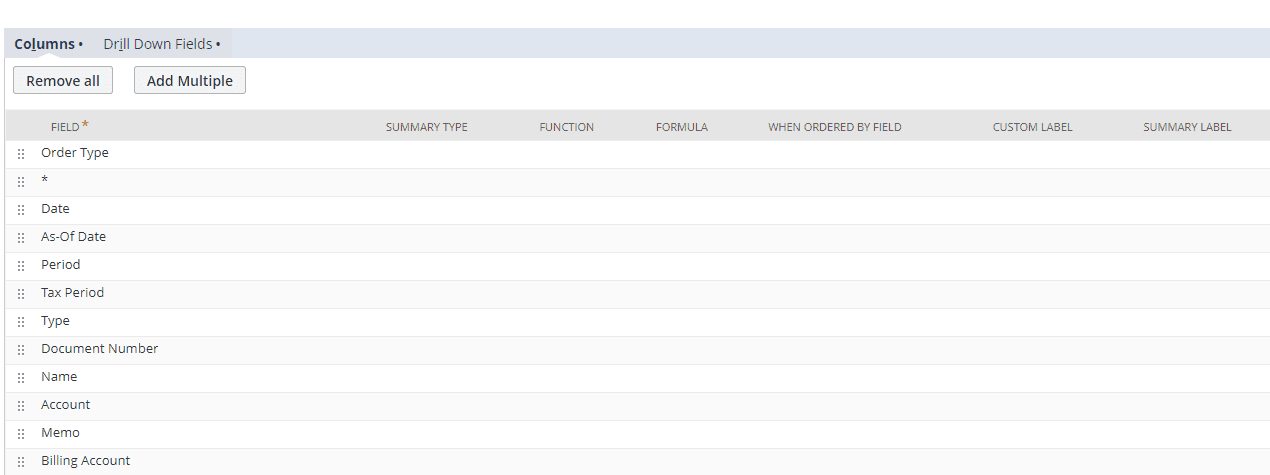
Under columns, the first thing I want to put is the date.
Next, I'll enter 'Paid Transaction', which will result in a column with information on the paid bills.
Then, we want one column to return information on the purchase order from which the bill payment was created. So, using that related records feature mentioned before, you can go to the paid transaction fields:
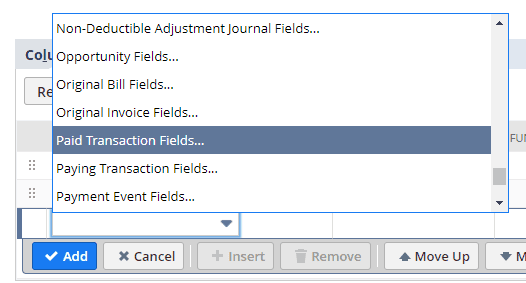
You can then explore the related record information. In this case, you want to add a "Paid Transaction: Created By" column, which will return information on the POs on which these bills were created.

I am also interested in the amount paid, the document number, and the payee's name. So, I will add all those as columns; I now have six columns on the report.
Once you have set the fields you want returned as columns in your NetSuite saved Search, you can adjust the Header labels for each column using Custom Labels.

In this example, you can see that we changed "Paid Transaction" to display "Bill Number" in the header, as that will make more sense in the final report based on the criteria we set for the saved search results. For the same reason, we also changed "Paid Transaction: Created By" to "PO Number", "Paid Amount" to "Amount Paid", "Document Number" to "Check Number", and "Name" to "Payee".
Highlights, Available filters, Audience, Roles
There are some additional features here where you can set your highlighting rules, available filters, audience, roles, and email.

NetSuite Saved Search Highlighting
Highlighting allows you to focus on specific results. For example, you might want to draw special attention to transactions above $10,000. You can set your condition and then highlight the requirements.
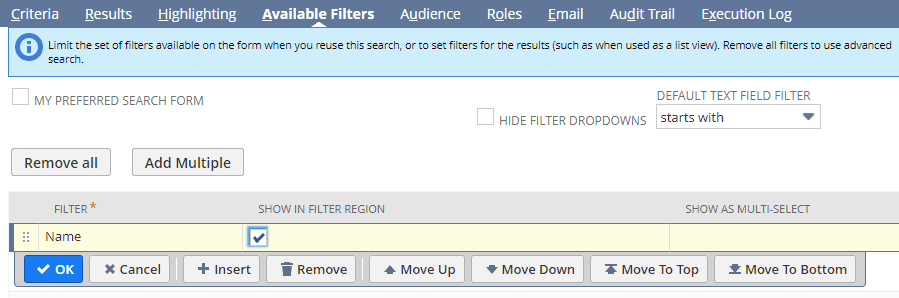
Available Filters
When you run your report, an available filter will appear at the top, allowing you to narrow the results. I will select 'Name' for this use case because I'm interested in filtering between payees once the Saved Search returns the results. Select the 'Show in filter region' checkbox if you want the filter to display at the top of the report in NetSuite.
NetSuite Saved Search Audience
Under the Audience subtab, you can define who in your NetSuite account can see this Saved Search. In many cases, it makes sense to set a Saved Search as 'Public' so that anyone with access to your NetSuite Account can benefit from it and doesn't accidentally recreate a saved search you have already worked to build.
However, if you want to restrict access to the NetSuite saved search, you can define this using Roles, Departments, Subsidiaries, Groups, Employees, and more. For example, if you only want to allow members of the accounting team or the A/R or A/P team access to this report, you can use roles to define this access.
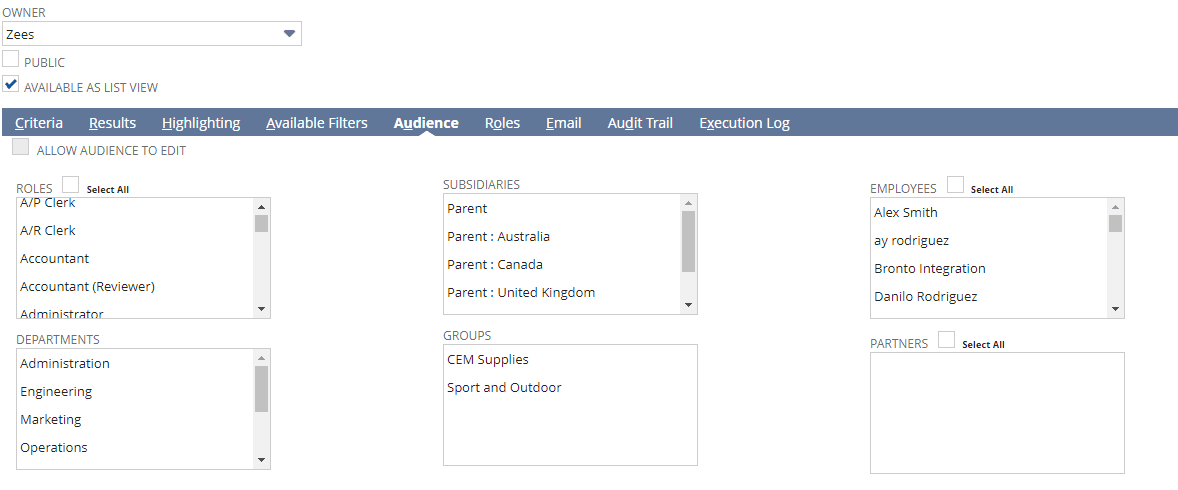
I will select 'Public' for our use case so everyone has access.
Run the Saved Search Report
We are ready to run the report. So, click the "Save" button, and the saved search report will start running in NetSuite. It may take a little time to load all the results available in your system.

How to Export a Saved Search in NetSuite?
You can export this information as a CSV, Excel, or PDF file and manipulate the data to create a report with the information you need. If you want to export your NetSuite Saved Search report, click on that report, and you will see some icons at the top left that you can use for exporting. Click on the icon to download the files.

Note: You can also add Saved Searches to your NetSuite dashboards or display saved searches in SuiteCommerce MyAccount.
Related Articles: Learn More About Saved Searches
You might want to check out these articles to learn more about working with NetSuite Saved Searches.
- 'When Filtered By Field' Option in Saved Searches
- Create a Running Total in a NetSuite Saved Search
- Viewing Private NetSuite Saved Searches as an Account Admin
- Why your NetSuite Saved Search 'Case When' is Broken
- View Unapplied Balances from Payments - NetSuite Saved Search
- NetSuite Saved Search Formula | Show Values by Week
- Unauthorized Status Change Detection via NetSuite Saved Search
- NetSuite Saved Search To Send Email on Record Create
- Setting Up a Text Box Filter on a NetSuite Saved Search
- How to Add Cell-Specific Conditional Highlighting to a NetSuite Saved Search
- Replacing Null Values in a NetSuite Saved Search
- Saved Search Results Page Redirect | Dynamic Filters
- Saved Searches Displaying in the Reports Tab
- Sorting a Saved Search With Two Formula Results Columns
- Serial/Lot Number Tracking by Transaction | NetSuite Search
- Item Trend by Customer | NetSuite
- Speeding Up a Saved Search in NetSuite by Splitting It
- Value Masking on a Saved Search
- Saved Search to Show When to Order More of an Item
NetSuite Alliance Partner & Commerce Partner
That's it for our NetSuite Saved Search tutorial. We hope you found this helpful and that you can now use Saved Searches to manage your business processes with NetSuite. If you have any questions about NetSuite or how it can benefit your business, contact us. Anchor Group is a certified Oracle NetSuite Alliance Partner & Commerce Partner equipped to handle all kinds of NetSuite and SuiteCommerce projects, large or small.
![]()
Tagged with Training