
One of our SuiteCommerce clients was having its customers register for events it was hosting through SuiteCommerce. These registrations are non-inventory item records in NetSuite, and when registering, the user can add their information on what looks like a product display page (PDP). The team desires that its customers print the PDP page to store registrations for recording purposes.
This extension does not natively have a way to apply to other pages, only the PDP. It would require customization to apply this functionality to other pages (Cart, Product List Page, etc.), but it would be possible conceptually.
Thankfully, there is a free bundle provisioned from NetSuite to complete this functionality in SuiteCommerce. Below are the instructions and training material to install, activate, and configure this bundle.
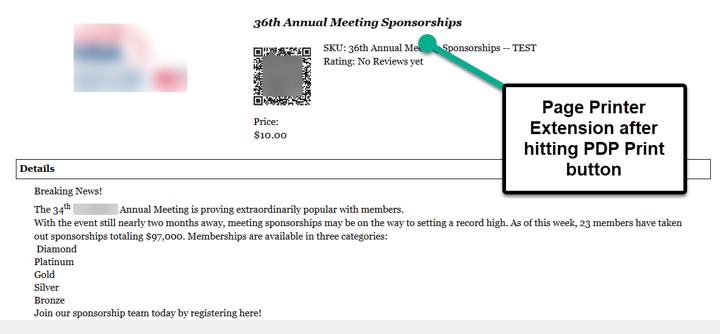
Print View from the PDP Printer Extension
There are three required sections to configure this bundle in SuiteCommerce – each broken into ‘Expand’ sections with a step-by-step guide to configure.
Install and Activate the PDP Printer Extension
Step 1: Navigate to the SuiteBundler to install the PDP Printer Extension. (Customization > SuiteBundler > Search & Install Bundles).
The role required for this bundle is Admin or Store Manager to install bundles and access the Configuration Record.
Step 2: Search “SC Product Page Printer” (or bundle 344590 at the time of writing) in the Search bar and hit the blue Search button. Select this bundle.

Step 3: Hit the blue “Install” button, then the user will be directed to a list of all installed bundles and their status. Refresh the page until the SC Product Page Printer bundle has a green checkmark next to it.

Step 4: Next, head to the Extension Manager to activate this bundle. (Commerce > Extensions > Extension Manager). Edit an existing site & domain, or Create a new Activation if this is your first time for this site.
This Anchor Group blog post linked here can give you more information on activating the extension manager if desired.
Step 5: Navigate to the Extensions tab and check the Product Page Printer extension. Select Activate, and refresh the page after the 8-step activation process.
- You will know this is completed after the status shows completed.
- {image placeholder}
Step 6: You may continue to the next section upon completion.
Field Sets Adjustment
For this extension to operate properly, a field needs to be added to Field Sets in the Website Setup Record.
Step 1: Navigate to the Field Sets in the Website Setup Record using this path: Commerce > Websites > Website List – enter your site and domain, and select the Field Sets Tab.

Step 2: In the Details field set, add the field ‘Print Button Behavior — Product Details Page’ by completing the following:
- Locate the Fields Included in Field Set column and click the Set button.
- Select the fields from the Field Name list and click Add.
- In the Field Set window, click Submit.
- In the Field Set row, click OK.
- Upon completion, select Submit.

Step 3: Save the Website Setup Record, and you are ready to move to the final section to Configure this bundle.
Pro tip: adding field sets can be tricky – though tedious, please follow the points outlined in #2 to complete adding the field to the field sets. If a point is missed, your field might not be added.
Configuration Record & Item Record Adjustments
Step 1: Navigate to the Extensions Tab in the Configuration Record (Commerce > Websites > Configuration).
Step 2: Here you can configure details of the extension, such as:
- Adding Company Logos
- Showing Price, SKU, or Ratings
- QR Code or URL
- Additional Supplier or Contact Info Notes
- Additional Item Record Fields
Note: The Detailed Description field on the Item Record is added by default with this extension, but you can certainly add more fields!

Step 3: Navigate to one of the item records that will be going online. (Display in Webstore = checked). Go to the SuiteCommerce Extensions Tab.
Step 4: From the ‘Print Button Behavior - Product Details Page’ field, you can determine to always have the print button on, deactivate the feature for this item, or default to the setting chosen from the configuration record in step 2.

Step 5: Save the item record and navigate to the PDP – you should see the Print icon on the PDP!
Author: KC Daniels
Got stuck on a step in this article?
We like to update our blogs and articles to make sure they help resolve any troubleshooting difficulties you are having. Sometimes, there is a related feature to enable or a field to fill out that we miss during the instructions. If this article didn't resolve the issue, please use the chat and let us know so that we can update this article!
Oracle NetSuite Alliance Partner & Commerce Partner
If you have general questions about NetSuite or more specific questions about how our team can support your business, contact us! Anchor Group is a certified Oracle NetSuite Alliance Partner and Commerce Partner equipped to handle all kinds of NetSuite and SuiteCommerce projects, large or small.
