Adding Images to NetSuite Items | SuiteCommerce
For companies using SuiteCommerce, there is an additional step to consider while uploading images to NetSuite and having them automatically associated with the items.
- Date
- December 15, 2025
- Read
- 8 min
If you are having trouble adding images to your NetSuite items, this is a good breakdown of what you need to do. For companies using SuiteCommerce, there is an additional step to consider while uploading images to NetSuite and having them automatically associated with the items.
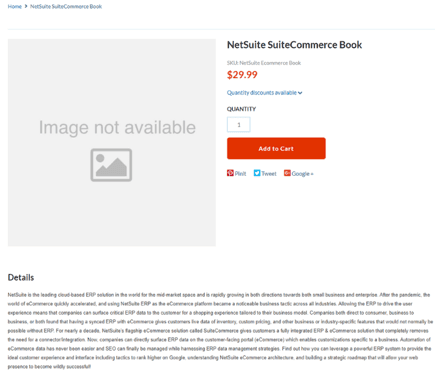
If the images on your website's product detail pages look like this and don't have an image, it is because the image is not associated with the item in NetSuite.
NetSuite Item Associated Images
Here is an example of an item in NetSuite showing where you might find the associated images.

Getting an associated image on the NetSuite item is NOT done by putting an image in the “item display image” field but by appropriately naming the image you upload to the file cabinet. The image file naming convention for your website can be changed in the website setup.
.
Preparing to upload the images
Before naming your images, validate your naming convention by navigating to the website setup.

Checking the Item Identifier
If you still have issues connecting images, you will want to check the item identifier in your image naming conventions. On the Web Site Setup page, under images, there is a dropdown to select “Item Identifier”, which is defaulted to Display Name/Code. If it is set to Display Name/Code, ensure that each item that needs a picture has the Display Name field filled, and use that value when naming the image file.
Alternatively, you can click into the Item Identifier dropdown to choose a different item identifier, such as Item Name/Number, and then the image files accordingly. Just remember that if you have any images already associated with items using the previous Item Identifier, they will disappear from the items they were connected to until they are renamed accordingly, or you change the item identifier back to the previous selection. Given its impact, the item identifier should be determined early on in your website setup. We don't recommend changing it after you have items live on your website unless you have a specific need to do so.

So, the full naming convention for our images in this example is as follows:
[Display Name/Code]_{Category 1}-{Category 2}.[EXT]
Example (no categories): Four Loco Fruit Punch_01
You need the “_01” because it assumes you will have multiple images per item record.
The categories only apply if the item is a matrix item (a product variant, like different colors or sizes of the same product). Ensure the inventory item has something in the display name/code field. This can have spaces and caps, so I copy the name exactly.
Assigning a Default Image
If you want to ensure an image is listed first, Add .default to a file name before the file extension to make it the default image for that item. The default image appears in search results and is first displayed on the product details page.
- Example: OM5447_media-blue-01.default.jpg
Checking the File Folder Location
Make sure to save the image in the appropriate file folder, which you can find in the website setup. In most cases, you'll want to use this folder for Live hosting files. If it is not configured in your website setup, you'll need to do this now.

Our site has this set as the folder: Web Site Hosting Files > Live Hosting Files > Website Item Images with the right file name in the right folder will be automatically associated with the item record.
Now, let's upload an image or edit an image in our file cabinet to get it to be associated with the product.
Uploading or Editing the Image
Now, we're ready to upload the image.
Note: Images will display better in the webstore if they are cropped tightly to the edges of the product. Any shadow coming off the side of the product or extra white space around it may make the image appear off-center when displayed in the PLP.
We'll open the file cabinet by navigating to Documents > Files > File Cabinet, then clicking on Web Site Hosting Files > Live Hosting Files > Your Folder. First, navigate to the folder that will hold your website images. We could create a new folder if we wanted to, but I will keep them in this folder for the sake of simplicity. Remember that this folder needs to match the Image Source mentioned previously.
From here, we're just going to drop the images in.
File Name of Item Image Before:

After adding the file(s), make sure they use the image naming convention you already established on the Web Site Setup record. Remember that if you upload multiple images, you need to use _01, _02, etc., to indicate the order in which you want them displayed in the PDP slider.
File Name of Item Image Done Correctly:

Want an easier way to add item images in NetSuite? Check out the Drag-and-Drop Item Image extension for SuiteCommerce.
Associated Image Alt Tags
This is an excellent time to ensure that each image has an image alt tag. We’ll click 'Edit' next to the image file, add an alt tag, and then click 'Save'. Be sure to repeat this process for each associated image. You can add image alt tags directly on the item record instead, but that involves a character limit that this method does not.
Now that the alt tags are in place let's navigate back to the associated images on the item record to ensure our naming conventions are correct.
Confirming Proper Image Setup
Go to Item Record > Web Store tab > Associated Images Subtab. If you scroll down to the bottom of the page, you should see two images.

Finally, let's confirm that images are showing up in SuiteCommerce. First, perform a cache invalidation request. Next, navigate to the product detail page and press Ctrl+Shift+R to refresh your browser cache. Your images should show up right away in the order you labeled them (e.g., 01 or 02).

Note: If your files are in different formats (one image is a PNG, and one is a JPEG) it won’t necessarily follow the order you indicate. So if you're trying to use the ordering and the naming convention, make sure the file type and the file format of the image match as well.
Image upload for large quantities of NetSuite items
If you will be uploading many images to associate with the items in NetSuite, you will want to use a more bulk upload method. This can be done using the Bulk Renaming method, and you might even want to consider using a free product called bulk rename utility.
VIDEO: Item Data Management
To learn more about associating images with items or to learn more about item data management in general, check out this tutorial video:
NetSuite Tutorial | SuiteCommerce Item Data Management
Hopefully, this helped you set up your SuiteCommerce website to become more useful to customers.
Related Article: Adding Multiple Image Files | NetSuite File Cabinet
Get stuck in a step during this article?
We like to update our blogs and articles to make sure they help resolve any troubleshooting difficulties you are having. Sometimes, there is a related feature to enable or a field to fill out that we miss during the instructions. If this article didn't resolve the issue, please use the chat and let us know so that we can update it.
Oracle NetSuite Alliance Partner & Commerce Partner
If you have general questions about SuiteCommerce or more specific questions about how our team can support your business as you implement NetSuite or SuiteCommerce, feel free to contact us anytime. Anchor Group is a certified Oracle NetSuite Alliance Partner and Commerce Partner equipped to handle all kinds of NetSuite and SuiteCommerce projects, large or small.
![]()
We are a premium SuiteCommerce agency that creates powerful customer portals. Unlike our competitors, we have already solved your problems.
FREE SuiteCommerce Book for Continued Learning.
Want a free paperback copy of this NetSuite e-commerce book? We even pay for shipping... Order the free SuiteCommerce book today.

Tagged with Training