View Only Item Pricing Sublist in NetSuite Custom Record
There are no permissions for the Item Pricing sublist in a Customer record, so if a company wants to restrict a Role only to view Item Pricing for Customers, they must do this.
- Date
- August 16, 2025
- Read
- 4 min

There are no permissions/restrictions for the Item Pricing sublist in a Customer record, so if a company wants to restrict a NetSuite Role to only viewing Item Pricing for Customers, they must do the following.

Native view of Item Pricing sublist when editing Customer record

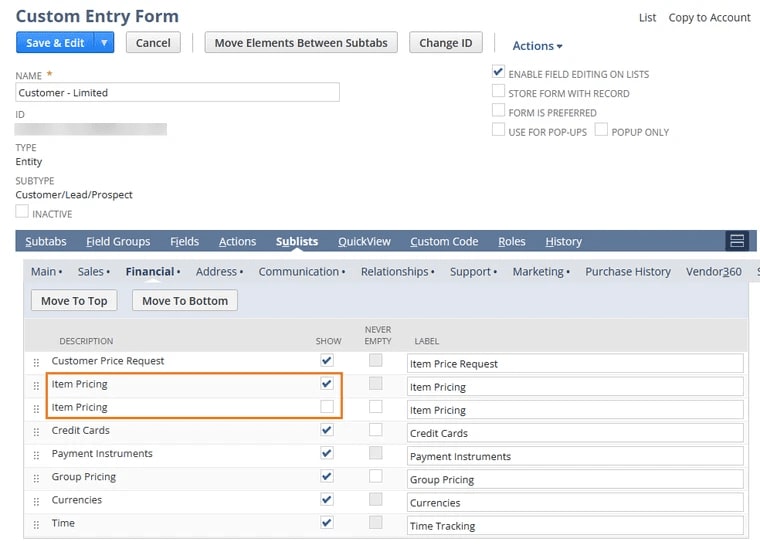
Custom sublist view when editing Customer record
Create a Custom Item Pricing Sublist
Several steps are involved in creating a custom item pricing sublist to restrict the item pricing sublist on a customer record to view only.
First, you will need to create an item pricing Saved Search. Second, you will need to build an item pricing custom sublist. The third step is to update customer forms to implement the sublist. Finally, you will need to restrict forms in Roles within NetSuite.
We will go through each of these steps one at a time.
Build an Item Pricing Saved Search
First, create a Customer saved search to show the list of Customers that use Custom Item Price Level.
Navigate to Reports > Saved Searches > All Saved Searches > New.
Choose Customer as the search type.
Under Criteria tab > Standard subtab, add the following fields as parameters:
- Inactive = F (Filter the search to view only active customers)
- Pricing Item = None of > then choose from the list: None
- Filter the search to view customers who have Item Pricing set under Financial tab > Item Pricing subtab
Formula (Text) = In the popup window, add the following details:
- Formula = {itempricinglevel}
- Formula (Text) = choose "is" in the dropdown
- Value = Custom
- To further customize the filter for Item Pricing Level = Custom
Under Results tab > Columns subtab, add the following fields:
- Name (Name of the Customer): summary type = Group
- Pricing Item: summary type = Group
- Item Pricing Level: summary type = Group
- Item Pricing Unit Price: summary type = Group
Make sure to sort it by Name or Pricing Item.
Enter the search title.
Click on Save & Run.
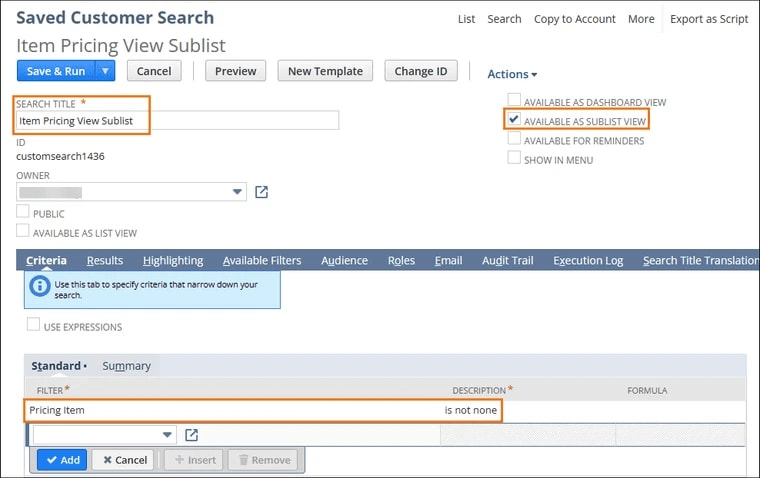
Give the search a title and remember it for the next step.
Set Available as Sublist View to True (i.e., check the checkbox).
Criteria Tab
On the criteria tab, set Pricing Item = None of >, then choose from the list None
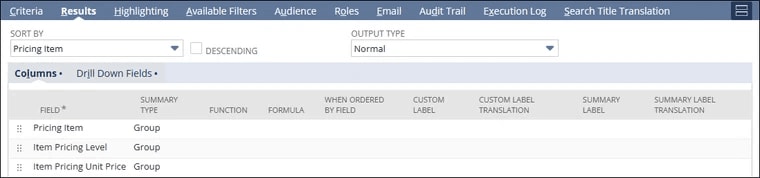
Results Tab
On the results tab, set the following fields:
- Pricing Item: Summary Type = Group
- Item Pricing Level: Summary Type = Group
- Item Pricing Unit Price: Summary Type = Group
Sort by Pricing Item.
Available Filters Tab
On the available filters tab, add Internal ID as a filter.

Item Pricing Custom Sublist

Create a new Custom Sublist record with the following configuration:
- Type: Entity
- Tab: Financial
- Search: {enter the search you created above}
- Label: Item Pricing
- Customer: Checked
Related Article: Making a Sublist Mandatory via SuiteScript
Update Customer Forms
Hide the view-only Item Pricing sublist from Customer Forms, which should have the editable Item Pricing sublist.
Hide the editable Item Pricing sublist from Customer Forms, which should only have the view-only Item Pricing sublist.
Tip: Change the custom sublist label to something like "Item Pricing (View)" if you're getting the sublists in the form mixed up.
Restrict the Forms in Roles
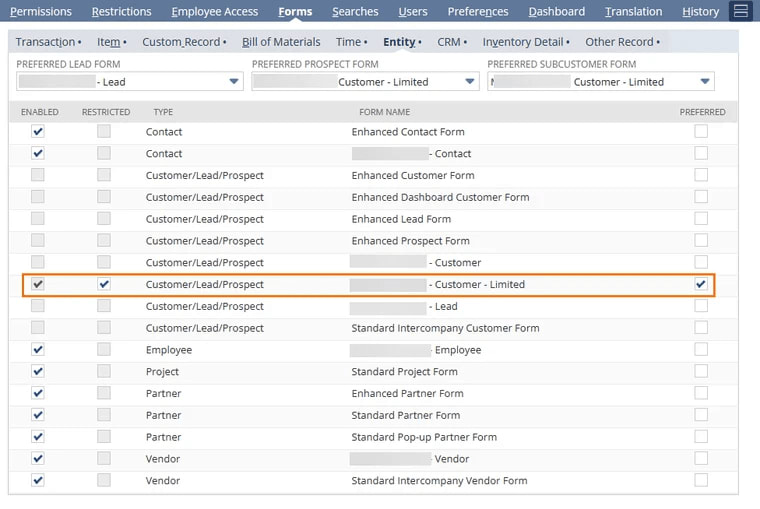
In the roles which should only be able to view Item Pricing:
Step 1: Edit the role.
Step 2: In the Forms tab > Entity subtab:
Step 3: Make the Customer Form with the view-only Item Pricing sublist the preferred form.
Step 4: Uncheck the "Enabled" checkbox for other Customer forms (lead and prospect forms should all be fine to leave since they should not have the Item Pricing sublist).
Related articles
- Custom Employee Center Roles and Dashboards
- Creating Custom Sublist with Attach + New Buttons | NetSuite
Get stuck in a step during this article?
We like to update our blogs and articles to make sure they help resolve any troubleshooting difficulties you are having. Sometimes, there is a related feature to enable or a field to fill out that we miss during the instructions. If this article didn't resolve the issue, please use the chat and let us know so that we can update this article.
Tagged with Training