SensePass Checkout Integration Install Guide
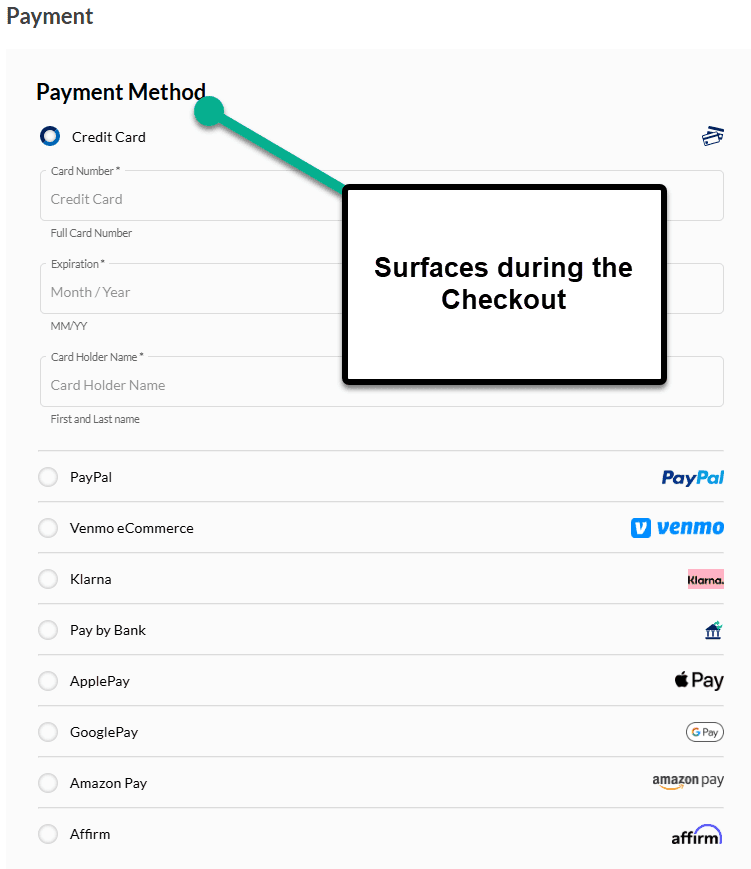
Anchor Group has partnered with SensePass to create an integrated checkout solution for SuiteCommerce and SuiteCommerce Advanced customers. This solution allows for credit card, debit card, Apple Pay, Klarna, Venmo, Paypal and other payment methods.
- Date
- April 6, 2026
- Read
- 11 min

Anchor Group has partnered with SensePass to create an integrated solution for SuiteCommerce and SuiteCommerce Advanced customers that allows a true ‘One-Page’ Checkout. Additionally, this solution allows the user to use Credit/Debit Card, Apple Pay, Klarna, Venmo, Paypal and other non-conventional payment methods during checkout.
Below is the installation guide for the SuiteCommerce Admin or Anchor Group PM to install this solution.
Install SensePass Payments Bundle
Once you receive your PayTrace API information from SensePass, the bundle will be ready to install.
Step 1: In your NetSuite account, navigate to Customization > SuiteBuilder > Search & Install Bundles.
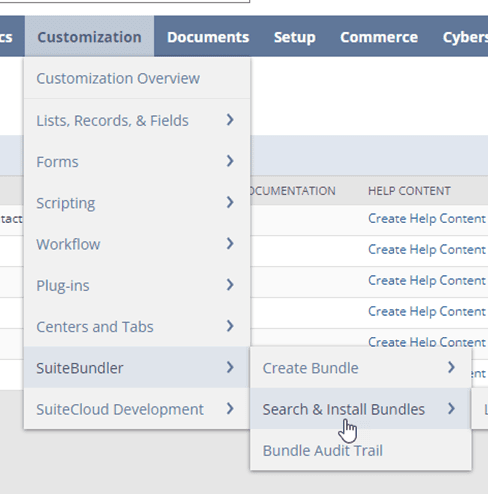
Step 2: On the following page, search for the following bundle: Sensepass Payments for SC.
Step 3: Select the hyperlink for the SensePass Payments which will bring you to the bundle overview page to prepare for an installation.

Step 4: This will bring you to the Bundle Preview where you can click on the Install Bundle button. Click Okay on the confirmation popup to install the bundle into your account.
At this point, the SensePass Payments bundle will begin installing into your NetSuite environment. You will be brought to a list of your installed bundles that will show the status of the bundle installation. This may take up to 15 minutes to complete.
Step 5: Click Refresh at the top of the page to see the updated status.

You have now successfully installed the bundle.
Connect API with SensePass
Before you can start to capture payments, you will need to complete further configurations to connect SensePass with Netsuite.
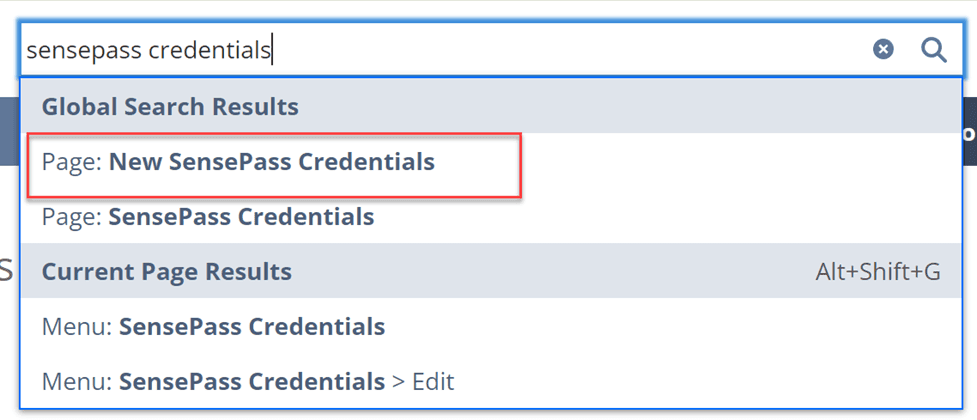
Step 1: In your NetSuite account, type ‘SensePass Credentials’ into the Global Search bar and click ‘New SensePass Credentials’.
Step 2: In the following record, enter the values into the following fields:
API URL:
- For Production Accounts: https://api.sensepass.com/api
- For Sandbox Accounts: https://api.sandbox.sensepass.com/api
API KEY: Found in SensePass Merchant Account.
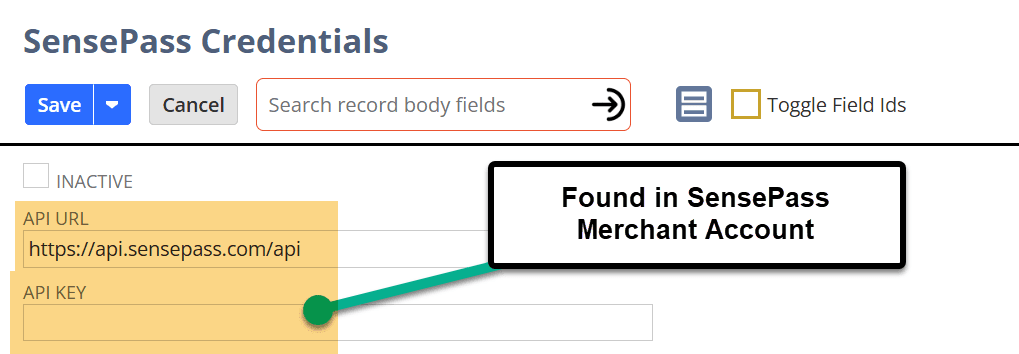
Step 3: Save the record upon completion.
Payments Logo URL
The SensePass Payments Bundle will upload images into your NetSuite File Cabinet. You will need to download an image from the bundle and upload it into the Live Hosting Files of your File Cabinet.
Step 1: Navigate to Documents > Files > Live Hosting Files. In the search bar type ‘Sensepass’ and click Search.
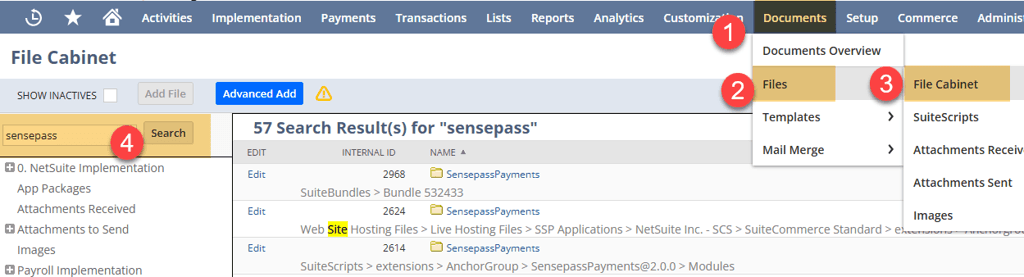
Step 2: Once you have downloaded the image onto your computer, you will need to upload it into a different place in the file cabinet. Click Website Hosting Files > Live Hosting Files > Site, and click Add File. Now locate the image that you just downloaded and select it for upload.
Note: If the ‘site’ folder does not exist, go ahead and create one.

Activate the SensePass Extension
You will now activate the SensePass Payments extension.
Step 1: Go to Commerce > Extensions > Extension Manager, and edit the website and domain in which you want to use SensePass. Click Next.
Step 2: Under the Extensions tab, click the checkbox next to SensePass Payments Integration, then click Activate.

Step 3: Refresh the page until you see the status of the activation show Complete. You should also see the SensePass extension under Active Extensions.

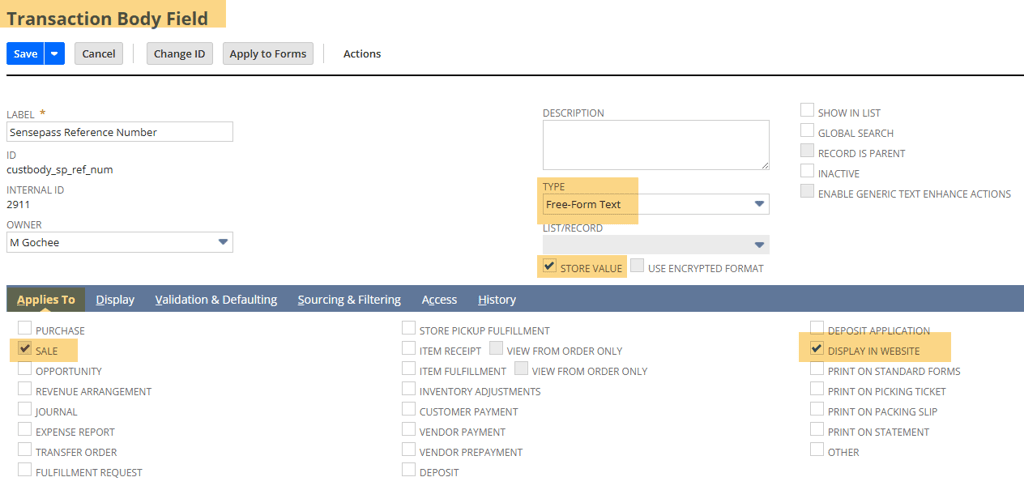
Verify Settings on the Custom Transaction Body Field
Step 1: Navigate to the Custom Transaction Body Field list through Customization > Lists, Records, and Fields > Transaction Body Fields.
Step 2: Verify that the SensePass Reference Number custom body field has the following settings.
- Select the Type as Free-Form Text and check the Store Value text box.
- In the Applies To tab, make sure that the Sale and Display in Webstore options are checked.
Step 3: Save the Field. Keep this page open as we will reference the custom field ID in the next section in Step 4.
Modify Website & Configuration Record
Next, go through the webstore configuration record and enter a couple of pieces of information.
Step 1: In your NetSuite account go to Commerce > Websites > Configuration. Select the website and the domain in which you will be using SensePass and click Configure.
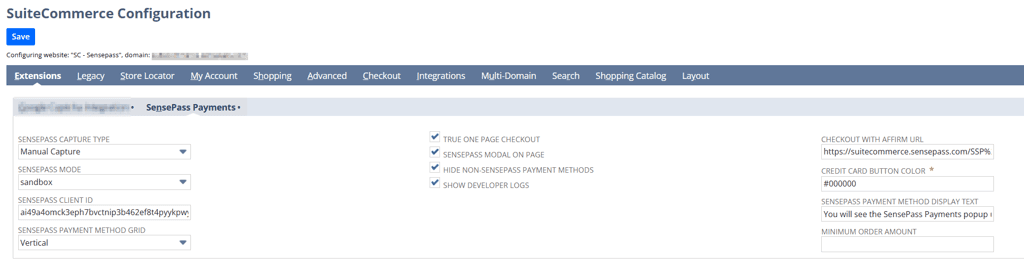
Step 2: Navigate to the Extensions Tab and SensePass Payments subtab.
Here you will see multiple fields:
- SENSEPASS CAPTURE TYPE: Authorize or Manual Capture delays in payment receipt, or use a Cash Sale Manual Capture to capture payment immediately upon checkout.
- SENSEPASS MODE: Select the SensePass Mode to run for this site. For sandbox environments, this is typically Sandbox. For production environments, select Production.
- SENSEPASS CLIENT ID: Found in SensePass Merchant Account.
- SENSEPASS PAYMENT METHOD GRID: Select the orientation you would like to use for the payment method grid.
- TRUE ONE PAGE CHECKOUT: Tick this value to use a one page checkout. This option is required to have the payment modal in-page.
- SENSEPASS MODAL ON PAGE: Tick this value to have the SensePass modal on the payment page. If false, the modal will appear right before the order is submitted.
- HIDE NON-SENSEPASS PAYMENT METHODS: Tick this value to automatically select the SensePass payment method, and to hide other payment method options on the page.
- SHOW DEVELOPER LOGS: This shows developer logs sent by the SensePass extension. If this is on a live site, you will want this turned off.
- CHECKOUT WITH AFFRIM URL: Do a global search in NetSuite for 'sensepass_affirm.png'. The image result with more than one URL link is the result you should use. Copy the URL that uses your SuiteCommerce site's URL to this text box.
- CREDIT CARD BUTTON COLOR: Indicate the color of the ‘Pay with Credit Card' button in Checkout using 6 Digit Hex Color Code. To have a solid red button, enter '#FF0000' (including the pound sign '#') as the button color. This field is required, and defaults to black with the value '#000000'.
- SENSEPASS PAYMENT METHOD DISPLAY TEXT: Configure the text displayed when not using the Sensepass Modal On Page feature. This text will display when you select the SensePass payment method. This value defaults to 'You will see the SensePass Payments popup upon placing your order on the next step. Once your payment is approved, your order will be placed.'
- MINIMUM ORDER AMOUNT: If you are using a minimum order amount for your site, copy the value from the website setup page and paste the value here. If you are not using a minimum order amount, leave this field blank.
- PAYMENT METHOD TITLE: Enter the payment method name to display on the payment method option in Checkout. If left blank, a SensePass logo will display for the SensePass payment method.
- SENSEPASS PAY ELEMENT ID: This is the ID for the payment-button (element) the customer will click to start the SensePass payment process during checkout.
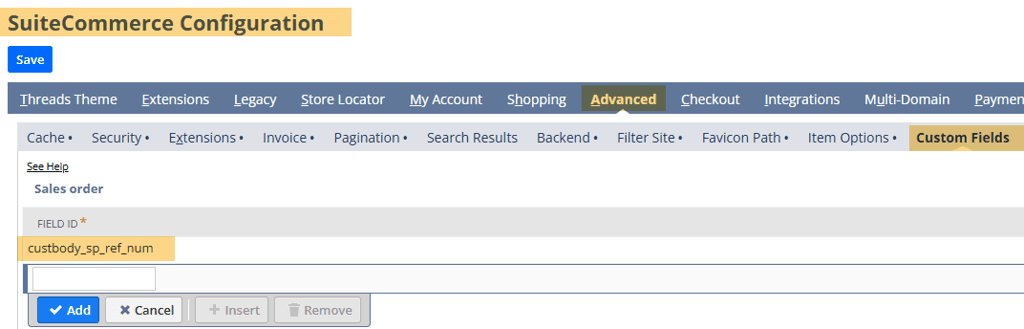
Step 3: Navigate to the Advanced Tab > Custom Fields Subtab. In the Field ID on this subtab, add the SensePass Reference number’s internal ID in this array.
Save the Configuration Record.
Step 4: After you have saved the configuration record, go to Commerce > Websites > Website List and click Edit next to the correct website. Under the Shopping tab, check the following boxes:
- Display Purchase Order Field on Payment Info Page
- Allow Non-Credit Card Payment Methods during Checkout

Step 5: Save the website setup record.
Create the SensePass Payment Method
The next step is to create a Sensepass payment method for transactions and sales orders made on the web store.
Step 1: Go to Set Up > Accounting > Accounting Lists > New > Payment Method.

Step 2: Enter 'Sensepass' in the NAME field, select 'Offline' for the TYPE, and make sure the DISPLAY IN WEB SITE box is checked.
Make sure that the naming is 100% matched when adding this Payment Method. The payment method name is case sensitive, and will throw an error on the site if it is not exactly ‘Sensepass’.
Step 3: Under the Payment Visuals tab, enter 'Web/Standard' in the FLAGS field and copy the following URL into the URL field: /site/SensePass_Logo.png.
Step 4: Click Add.
Step 5: Click Save on the Payment Method.
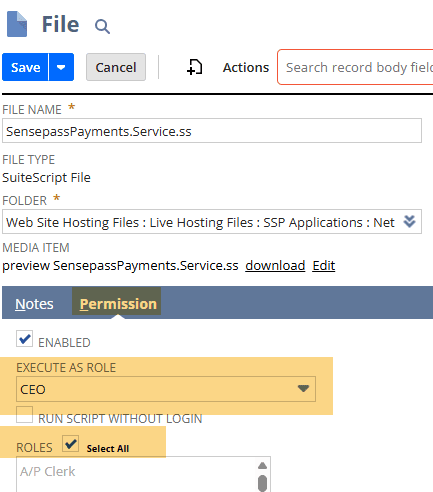
Update the SensePass Payments Service File
Next, download the SensePassPayments.Service.ss file from the file cabinet, and place the file in the correct folder location.
Step 1: In the file cabinet (Documents > Files > File Cabinet) on the left hand search bar, search SensePassPayments.Service.ss.
Step 2: Hit Download on the file that follows this folder location:
Web Site Hosting Files : Live Hosting Files : SSP Applications : NetSuite Inc. - SCS : SuiteCommerce Standard : extensions : AnchorGroup : SensepassPayments : <VersionNumber> : services

Step 3: Next hit Edit on the file and navigate to the Permission Tab.
- For Execute as Role, select CEO.
- For the Roles, hit the Select All Checkbox.

Step 4: After this file downloads, add the file to the following folder:
Web Site Hosting Files > Live Hosting Files > SSP Applications > NetSuite Inc. - SCS > SuiteCommerce Standard > services

Step 5: Upon adding the file, complete the earlier steps for this newly added file.
- Next hit Edit on the file and navigate to the Permission Tab.
- For Execute as Role, select CEO.
- For the Roles, hit the Select All Checkbox.
Add Apple Pay Folder and File
Next we need to add a folder and file to the file cabinet to make Apple Pay functional.
Step 1: In the file cabinet (Documents > Files > File Cabinet), navigate to Web Site Hosting Files > Live Hosting Files.
Step 2: Click New Folder to create a new folder.

Step 3: Set the Folder Name to “.well-known” and save the folder.
Step 4: Click Add File to add your text file to the newly created folder.

Step 5: After the file is added, click Edit next to the image. Confirm that the URL for the file matches the desired file path.


In SuiteCommerce, any domains referencing the same hosting files will utilize the same folder structure and files. This means that any domains utilizing the Live Hosting Files structure will reference the same Apple Pay file. So you can set 1 file per Hosting Files, NOT per domain necessarily.
Cache Invalidation Request
Once all of the above steps are complete, make sure to invalidate the cache for your site so the changes are reflected immediately. Then hard refresh your browser (Ctrl+Shift+R) to ensure you see the updated content.
Related Article: ACH Implementation into SuiteCommerce Webstores
SensePass Testing Cards
In this section, you will find the testing cards that SensePass sends to its customers. This information is helpful when your developers test the extension. Linked here is the Sensepass Test Cards Page
Congratulations. You have finished configuring the SensePass-NetSuite integration.
Tagged with Training, Solutions, Integration