NetSuite Advanced Revenue Management (ARM) and Charge-Based Billing
We had a client that wanted to bill their customers based on fixed dates, but recognize the revenue as time was logged to the project in NetSuite. Here's how we helped them.
- Date
- April 6, 2026
- Read
- 5 min

If you use projects, one crucial thing to determine at the start is how you plan to bill your customers. One benefit of Charge-Based billing is that it allows for easier Revenue Recognition by using your Charge Based rules. However, this can cause many issues if not set up correctly.
Recently, we had a client that wanted to bill their customers based on fixed dates but recognize the revenue as time was logged to the project. They had previously been set up to use Charge-Based Billing, and this had caused a whole slew of accounting issues for them. Here's how we helped them.
NetSuite Advanced Revenue Management and Charge-Based Billing
First, there are some important pieces of information to know when talking about NetSuite Advanced Revenue Management (ARM) and Charge-Based billing.
- When you create a Charge-based Project, revenue recognition is set based on the charge rules.
- NetSuite will natively assume that you are recognizing revenue the same way you are billing.
- Typically, the NetSuite ARM module allows you to separate the Billing process and the Revenue Recognition process. The image below shows how ARM separates the billing and revenue recognition process.

- If you are using ARM and Projects and are not using Charge-Based billing, then the revenue recognition will be derived from the Service Item’s record.
Step-by-step Solution
To help them bill at fixed intervals and recognize revenue based on project progress, these are the steps I recommended they take.
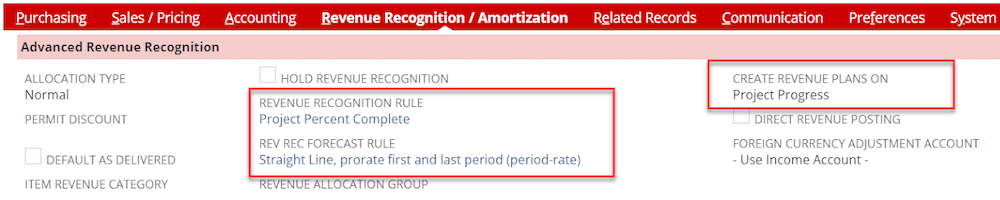
Step 1: Create new service items to match the following under the Revenue Recognition / Amortization subtab.
Step 2: They should set up Billing Schedules on their Estimate record, and then not include a Billing Type on the Project record.
Step 3: Create a Project Record.
- Go to Transactions > Customers > Create Projects from Sales Transactions.
- You should not be using an existing Project Template.
- There are now no edits that need to be made on the Financial Subtab.
- The field Billing Type should remain empty.
Step 4: Create your Project Tasks.
- Assign the proper employees and updated Service Item’s.
Step 5: Create and Approve your Sales Order from your Estimate.
Step 6: To invoice the upfront amount, go to the Sales Order and click Next Bill.
- You will notice that the invoice loads with 50% of the order total.
Step 7: Log Time to the Project Task.
- The Time Entry should be billable.
- In my example, I logged 3 hours of my 10-hour project. The total amount on the transaction was $1,200.
Step 8: Update Revenue Arrangements and Revenue Plans

Access the Update Revenue Arrangements and Revenue Plans page by going to: Transactions > Financial > Update Revenue Arrangements and Revenue Recognition Plans
Step 9: View the updated Revenue Arrangement from either the Project or Sales Order record.
Step 10: Mark the new Revenue Arrangement as Compliant.
- You may need to uncheck the Transaction is Allocation Bundle.
Step 11: Click the Update Revenue Plans button on the Revenue Arrangement record.
Step 12: Go back to the Revenue Arrangement and click the View Revenue Plans button.

Step 13: This will allow you to see your Revenue Recognition Plan. Click the linked field under the Revenue Plan Number to view how much you will recognize based on the Revenue Recognition Rules you have set up.

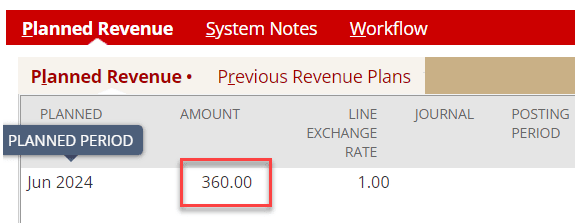
Step 14: If you scroll to the bottom of this record, you will see a Planned Revenue subtab. Under this subtab you can see how much revenue you are planning to recognize in this period.
- The amount here should match the amount that you set to recognize based on the rule you have set on the Service Item.
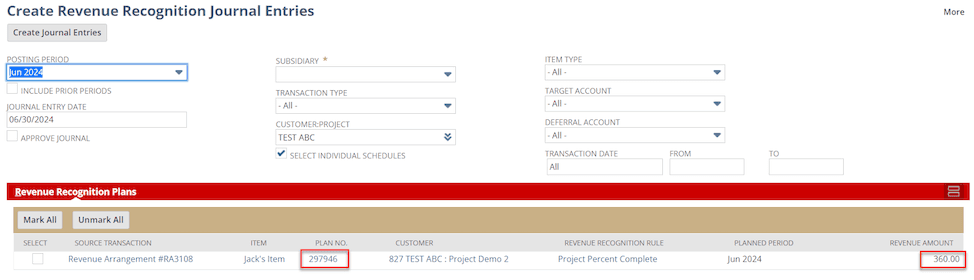
Step 15: From here, I can create my Revenue Recognition Journal Entries by going to Transactions > Financial > Schedule Revenue Recognition Journal Entries > Run Now.
- Here, I will be able to see the Revenue Recognition Plan.
- The amount to be recognized this period is $360. This is 30% of $1200.
Related Article: How Are Values in Revenue Fields on NetSuite Projects Populated?
Got stuck on a step in this article?
We like to update our blogs and articles to make sure they help resolve any troubleshooting difficulties you are having. Sometimes, there is a related feature to enable or a field to fill out that we miss during the instructions. If this article didn't resolve the issue, please use the chat and let us know so that we can update this article.
Oracle NetSuite Alliance Partner & Commerce Partner
If you have general questions about NetSuite, SuiteCommerce or more specific questions about how our team can support your business as you implement these solutions, feel free to contact us anytime. Anchor Group is a certified Oracle NetSuite Alliance Partner and Commerce Partner equipped to handle all kinds of NetSuite and SuiteCommerce projects, large or small.
Tagged with Training, Troubleshooting