Hiding SuiteCommerce PLP and PDP Fields | Tutorial
Getting your NetSuite fields to not show up on your SuiteCommerce website is easy. This is a short guide on how to hide fields on the product listing page and product detail page of your SuiteCommerce website.
- Date
- December 16, 2025
- Read
- 5 min

Fields are useful tools for organizing item and transaction data for your SuiteCommerce website. They can help customers sort and filter through items or select item options. They are also helpful for organizing data in your NetSuite environment. However, sometimes fields that you need to use in the NetSuite backend can appear on your SuiteCommerce site - particularly in the Product List Page (PLP) and Product Display Page (PDP). This is a short instructional article on how to hide your SuiteCommerce fields that are showing up.

Hiding SuiteCommerce PLP (Product Listing Page) Fields
PLP fields are often used to sort or filter through items. Here's an example below:
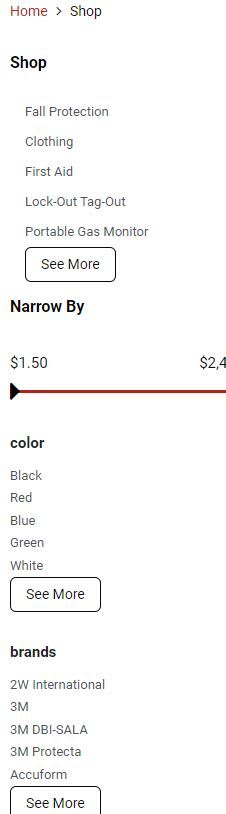
If you are seeing a field that shouldn't be visible to customers, follow these steps:
Step 1: Open up the facet settings in the SCA configuration record for the SuiteCommerce site and domain that you wish to edit:
- Navigate to Commerce > Websites > Configuration
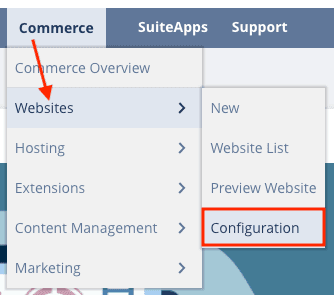
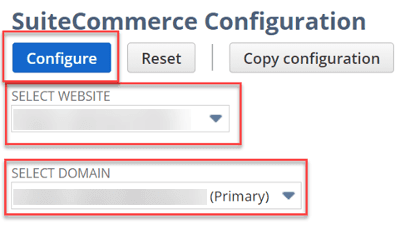
- Select the correct Site and Domain from the provided drop-down menus
- Click "Configure" to open up the SuiteCommerce Configuration record
- In the Configuration record, go to the "Shopping Catalog" tab and click on the "Facets" subtab

Step 2: Make sure the item field is included in the list of facet fields
- If an item is already in the Facet list, you're ready to move on to step 3.
- If the item field is not already included in the Facet list, add the Item Field ID and field Name to the Facets list using the provided fields.
Step 3: Adjust the Facet Field Settings to match the following list:
- Priority: 10
- Behavior: (blank)
- Template: facets_faceted_navigation_item.tpl
- Color palette: (blank)
- Collapsed: Yes
- Non collapsible: (blank)
- Show Heading: (blank)
- Title format: (blank)
- Title Separator: (blank)
- Parser: Default
- Is URL parameter?: (blank)
- Max: (blank)
Step 4: Click the "Add" button below the Facet Field you just edited to lock it into the Facet Field list and/or to begin adding another field.
Step 5: Once you have added/edited all of the fields you want to hide, click "Save" on the SuiteCommerce or SuiteCommerce Advanced (SCA) Configuration Record to activate the changes.
Step 6: Perform a hard refresh on your site PLP: To perform a hard refresh on your website, navigate your website URL and press CTRL+SHIFT+R. This will refresh the browser cache.
Your changes will now be visible, so the PLP fields you edited should be hidden.
.
Hiding SuiteCommerce PDP (Product Detail Page) Fields
See below for an example of a PDP that has unwanted fields on it:

Here's how you would hide these fields:
Step 1: Inspect the elements on the PDP that constitute the fields that are undesired. Make note of their ID’s.
Step 2: Navigate to the following location in your NetSuite environment: Customization > Lists, Records, & Fields > Transaction Line Fields

Step 3: Open the Transaction Line Items that match the ID’s you found in the HTML. If you can’t find the ID in Transaction Line Items, open the Transaction Item Options page and look there (Customization > Lists, Records, & Fields > Transaction Item Options).

Step 4: Once you have located and opened the Transaction Line Items that match the ID’s you found in the HTML, uncheck the box for the “Store Item” field. Do this for each field you need to eliminate.
Step 5: Cache invalidate the site and verify that your changes applied.
Step 6: Perform a hard refresh on your site PDP: To perform a hard refresh on your website, navigate your website URL and press CTRL+SHIFT+R. This will refresh the browser cache.
Your changes will now be visible, so the PDP fields you edited should be hidden.
Hopefully, this post helped you set up your SuiteCommerce website and become more useful to customers.
Get stuck in a step during this article?
We like to update our blogs and articles to make sure they help resolve any troubleshooting difficulties you are having. Sometimes there is a related feature to enable or field to fill out that we miss during the instructions. If this article didn't resolve the issue, please use the chat and let us know so that we can update this article.
Oracle NetSuite Alliance Partner & Commerce Partner
If you have general questions about SuiteCommerce or more specific questions about how our team can support your business as you implement NetSuite or SuiteCommerce, feel free to contact us anytime. Anchor Group is a certified Oracle NetSuite Alliance Partner and Commerce Partner equipped to handle all kinds of NetSuite and SuiteCommerce projects, large or small.
![]()
We are a premium SuiteCommerce agency that creates powerful customer portals. Unlike our competitors, we have already solved your problems.
FREE SuiteCommerce Book for Continued Learning.
Want a free paperback copy of this NetSuite e-commerce book? We even pay for shipping... Order the free SuiteCommerce book today.
Tagged with Training