Google Tag Manager Set Up, Configuration | NetSuite SuiteCommerce
Google Tag Manager integrates natively with NetSuite. It is a free tool that companies can use to streamline data collection and performance measurement.
- Date
- May 18, 2026
- Read
- 9 min

Want to improve your Search Engine Optimization (SEO) and drive more traffic to your site to increase revenue? The Google Tag Manager integrates natively with NetSuite, and it is one of the free tools that companies like yours can use to streamline how they receive data and measure their performance.
Google Tag Manager vs. Google Analytics 4 (GA4)
Google Tag Manager is one of the free tools that companies can use. Another that integrates seamlessly is Google Analytics (G4). As you work to decide which tool to utilize, it's important to note that these tools are different.
Google Tag Manager
- Manages tags or scripts without modifying the source code.
- Does not offer reporting functionality, though it does streamline the data collection process and provides insight into your company’s performance.
Google Analytics (G4)
- Collects and evaluates user data based on their interaction with the app or the website.
- Provides reporting insight based on user behaviors and engagements.
The remainder of this article will be for the Google Tag Manager.
To configure the Google Tag Manager, you will need access to both your NetSuite account as an Admin and your Google business account.
Related Services: Google Tag Manager Services for NetSuite
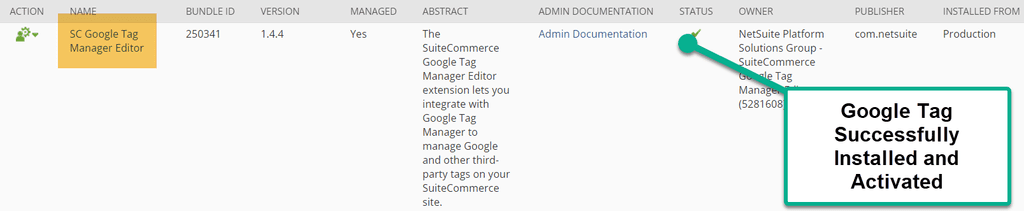
Step 1: Install the SC Google Tag Manager Editor
Follow this article’s steps to install and activate the “SC Google Tag Manager Editor” bundle into your NetSuite environment:
Install SuiteCommerce Applications
- Go to Customization > SuiteBundler > Search & Install Bundles.
- Install all SuiteApps (bundles) required for your implementation. In the Keywords field, enter “SC Google Tag Manager Editor” and click Search.
Step 2: Sign Up for Google Tag Manager
Sign Up for Google Tag Manager (GTM)
- Go to Website Tag Management Tools & Solutions - Google Tag Manager.
- Sign in to GTM with your Google ID.
- Click Create Account and enter a name for your account.
- Select your country from the Country field and click Continue.
- Enter your site name in the Container Name field.
- Select Web from the Where to Use Container field.
- Click Create.
- Close the Install Google Tag Manager window.
- Go to the GTM Workspace tab and make a note of the GTM ID located in the submenu header area in the upper right portion of the page.

Google Tag Manager ID Listed Here
Step 3: Authenticate your NetSuite Account with the Google API
Google requires you to authenticate your NetSuite account with the Google API using a Google OAuth Client ID. Complete the following procedures to create a free Google OAuth Client ID and authenticate your NetSuite account with the Google API:
1. Create your Google API OAuth Client ID credentials.
- Log in to the Google API Credentials Console using your Google account credentials.
- Click Create credentials > OAuth client ID.
- On the credentials form, select Web application for the application type.
- Enter NetSuite in the Name field.
- Enter your Authorized JavaScript origins and Authorized redirect URIs (Uniform Resource Identifiers).
- Click Create. A modal window provides your OAuth client ID and client secret.
- Make a note of your OAuth client ID value and click OK.
2. Provide values for your Google API OAuth consent screen.
- As in the previous step, log in to the Google API Credentials Console using your Google account credentials.
- Click Credentials in the left navigation bar.
- Click the OAuth consent screen tab.
- Enter the values shown in the following table.
- Click Save.
3. Link your Google API OAuth client ID to your NetSuite account.
- In NetSuite, go to Setup > Company > General Preferences.
- Go to the Custom Preferences tab.
- Enter or paste your OAuth Client ID in the Google OAuth Client ID field.
- Click Save.

Setup > Company > General Preferences

Plug in your Google OAUTH Client ID Here
Step 4: Link your Google Tag Manager Account to a Domain
To link your Google Tag Manager account to your domain:
- Go to Commerce > Web Sites > Configuration. Select your website and domain and click Configure.
- In the configuration record, go to the Integrations tab and the Google Tag Manager subtab.
- Enter your GTM ID in the Google Tag Manager ID field. Leave the Google Tag Manager Data Name field set to the default value of dataLayer.
- If you use separate domains for shopping and checkout, check the Is A Multi-Domain Site box.
- Click Save.
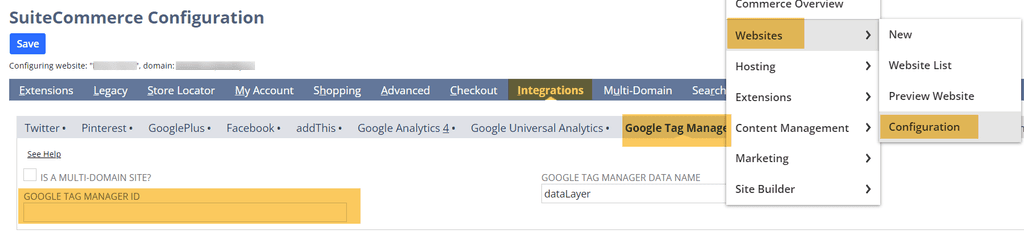
Commerce > Websites > Configuration – Integrations Tab and Google Tag Manager Sub Tab
Step 5: Add Services to Your Google Tag Manager Container
- In NetSuite, go to Setup > SuiteCommerce Advanced > Google Tag Manager Editor.
- Click Sign In With Google and choose your account.
- Authorize NetSuite to access your Google account by clicking Allow for each permission.
- On the Accounts & Containers – Google Tag Manager Editor page, click your container name.
- Click Add Service.
- Select the service you want to add in the Service menu.
- Fill in the fields for the service you are adding. Each service has a different set of fields that apply to that service. For example, if you are adding the Google Analytics service, you must enter a unique name of your choice, your Google Analytics tracking ID, and the domains you want to use with this service. Click the question mark icon for more information about finding the values to enter in these fields.
- Click Add. If one instance of the service already exists, a warning displays with a link to edit the existing service. If more than one instance of the service already exists, a warning displays with a link to the list of existing container services.

In NetSuite, Set Up > SuiteCommerce Advanced > Google Tag Manager Editor
Step 6: Review and Publish Changes in your Google Console
To review and publish your changes:
- From the Container Services page in the GTM, click Review and Publish Changes. This redirects you to your workspace and container in GTM.
- On the GTM Workspace page, click Submit.
- On the Submit Changes page, you can add a version name and description. Adding this information is optional, but adding it makes it easier for you to identify the changes made to your container.
- Click Publish.
Step 7: Preserve Google Tag Manager Session Data
You worked hard to get this valuable data – now it’s time for you to preserve it. You have four different routes you could take to store this data.
1. Enable SuiteScript and Custom Records
This procedure provides instructions for enabling SuiteScript and custom records in NetSuite.
To enable SuiteScript and Custom Records:
- In NetSuite, go to Setup > Company > Enable Features.
- Go to the SuiteCloud tab. In the SuiteBuilder section, check the Custom Records box.
- In the SuiteScript section, check the following boxes: Client SuiteScript, Server SuiteScript, SuiteScript Server Pages
- Click Save.
2. Create a Custom Record
This procedure provides instructions for creating custom records used to store data between sessions.
To create a custom record:
- In NetSuite, go to Customization > Lists, Records & Fields > Record Types > New.
- In the Name field, enter a name for your custom record.
- Example: SC GTM DataLayer
- In the ID field, enter: _ns_gtm_datalayer.
- Enter this value exactly as shown (including the underscore character at the front).
- In the Access Type list, select No Permission Required
- Clear the Include Name Field box.
- Click Save.
- The new Custom Record Type page displays. The title of your new record type is displayed in the Name field.
- Go to the Fields tab and add two new fields: gtm_id and gtm_events. Use the settings and values shown in the following table.
3. Create Scheduler File
This procedure provides instructions for creating the scheduler file that deletes unneeded session data records every 60 minutes.
Using a text editor, create a JavaScript file called gtmScheduler.js. Create a file with the following content:
4. Create Scheduler Script
This procedure provides instructions for creating the scheduler script that runs every 60 minutes.
In NetSuite, upload your script file:
- Go to Customization > Scripting > Scripts > New.
- In the Scripts File field, click the Plus icon (+).
- Click Choose File.
- Go to your local files to select the gtmScheduler.js file.
- Click Open.
- Click Save.
Next, create the script record:
- Click Create Script Record.
- Click Scheduled.
- In the Name field, enter: SC GTM Scheduler.
- In the ID field, enter: _ns_gtm_scheduler_script.
- On the Scripts tab, in the Function field, enter: gtmScheduleController.
- On the Deployments tab, click Add the desired values.
- Click Deploy Script.
Related Articles
- Setting Up & Configuring Google Analytics | SuiteCommerce
- Google Shopping Feed for NetSuite SuiteCommerce
Got stuck on a step in this article?
We like to update our blogs and articles to ensure they help resolve any troubleshooting issues you are having. Sometimes, there is a related feature to enable or a field to fill out that we miss during the instructions. If this article didn't resolve the issue, please use the chat and let us know so that we can update this article.
FREE SuiteCommerce Book
If you liked this article, you'll LOVE our book on SuiteCommerce. Order the free SuiteCommerce book today, and we'll even pay for shipping.

Oracle NetSuite Alliance Partner & Commerce Partner
If you have questions about how our team can support your business as you implement NetSuite or SuiteCommerce, feel free to contact us anytime. Anchor Group is a certified Oracle NetSuite Alliance Partner and Commerce Partner equipped to handle all kinds of NetSuite and SuiteCommerce projects, large or small.
![]()
We are a premium SuiteCommerce agency that creates powerful customer portals. Unlike our competitors, we have already solved your problems.
Tagged with Training