Naming NetSuite Matrix Item Images | Parents and Children
These steps are needed to name parent and child matrix item images and associate them with matrix items in NetSuite so the images surface correctly on SuiteCommerce.
- Date
- December 23, 2025
- Read
- 4 min

If you're still working to setup your matrix items in NetSuite (beyond just associating the images), here's a tutorial article on How to Create Matrix Items in NetSuite that you might find helpful too!
Congratulations—you've completed setting up the NetSuite matrix item! Next, you need to associate the images with the new matrix items to clearly show your customers what they are buying.
To associate images with your non-matrix items, this Anchor Group blog post on adding images to items displayed in SuiteCommerce is a terrific guide. Please follow the steps listed in that blog post to double-check the image filename format and image source folders in your specific NetSuite account. Below is advice that pertains directly to Matrix items, both parent and child items.
Step 1. Note Your File Name Format and Image Folder
These steps are needed to name parent and child matrix item images and associate them with matrix items in NetSuite so the images surface correctly on SuiteCommerce.
- Note the Image File Name Format and folder found on the website set-up record.
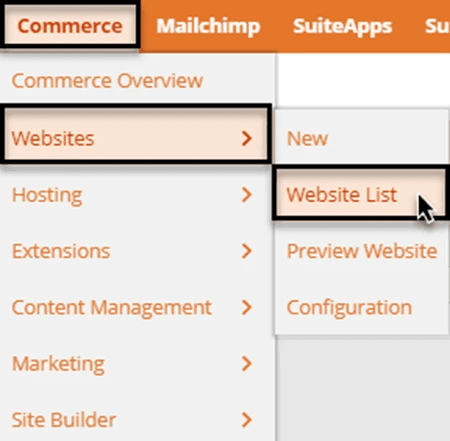
Figure 1. Navigate to the Website Set Up Record.
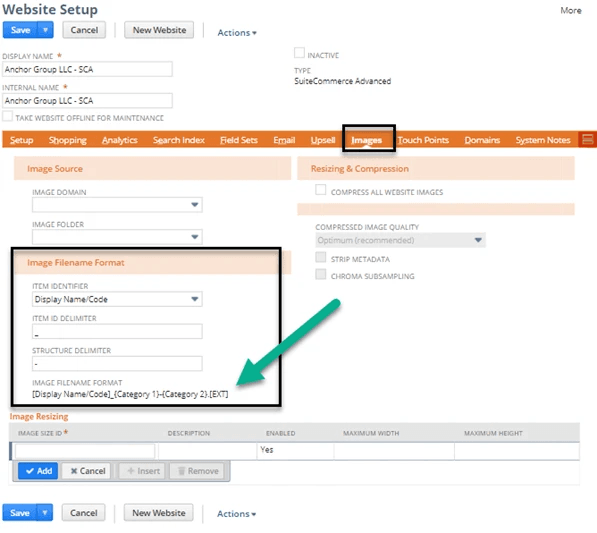
Figure 2. In the Images tab, note the Image Filename Format.
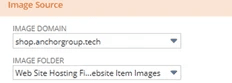
Figure 3. Note the Image Folder
Important When Naming Your Images
In Figure 2 above, Category-1 and Category-2 are your Item options. Note their custom field IDs.
For example, the full naming convention for our images in this example is as follows:
- [Display Name/Code]_{Category 1}-{Category 2}.[EXT]
- Example (no categories): Sedona Floral Maxi Dress_01
- Example (2 Categories / Item Options: Sedona Floral Maxi Dress_large-blue_01
You need the "_01" because it assumes you will have multiple images per item record. If you have a second image, the suffix "_02" will be added.
Step 2. Assigning a Default Image
If you want to be sure an image is listed first, Add .default to a file name before the file extension to make it the default image for that item. The default displays in search results and is first displayed on the product details page.
- Example: OM5447_media-blue-01.default.jpg
Step 3. Double-Check Your Folder Path and Test Images
Your site will have a set folder (for example, Web Site Hosting Files > Live Hosting Files > Website Item Images) where images with the right file name in the right folder will be automatically associated with the item record.
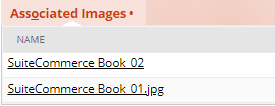
To check whether the correct images are being automatically associated with an item, go to the item record, Webstore Tab, and Associated Images sub-tab. If you have double-checked your image naming already but still do not see associated images that should be on an item, check the file folder to make sure your image is saved in the correct location.
Hard Refresh (Ctrl + Shift + R) your site after seeing these images, and you should see your Matrix items with images!
Want an easier way to add and name NetSuite item images? The Drag-and-Drop Item Image extension for SuiteCommerce allows you to upload images from the item record and automatically names the images according to your naming conventions!
Got stuck on a step in this article?
We like to update our blogs and articles to make sure they help resolve any troubleshooting difficulties you are having. Sometimes, there is a related feature to enable or a field to fill out that we miss during the instructions. If this article didn't resolve the issue, please use the chat and let us know so that we can update this article!
Oracle NetSuite Alliance Partner & Commerce Partner
If you have general questions about SuiteCommerce or more specific questions about how our team can support your business as you implement NetSuite or SuiteCommerce, feel free to contact us anytime. Anchor Group is a certified Oracle NetSuite Alliance Partner and Commerce Partner equipped to handle all kinds of NetSuite and SuiteCommerce projects, large or small!
![]()
We are a premium SuiteCommerce agency that creates powerful customer portals. Unlike our competitors, we have already solved your problems.
Tagged with Training