How to Create NetSuite Matrix Items | NetSuite Tutorial
It's important to take extreme care when creating NetSuite matrix items and their associated fields/item options.
- Date
- November 28, 2025
- Read
- 11 min
What is a Matrix Item in NetSuite?
In NetSuite, matrix items are inventory items that allow you to track multiple product variations (child items), such as different size and color combinations.
Matrix items also natively provide an excellent user interface on SuiteCommerce PDPs. However, companies running on NetSuite must purchase Advanced Inventory to use matrix items, which has historically been a drawback.
Best Practices for Creating Matrix Items in NetSuite
Matrix items can involve many details, potentially creating hundreds, if not thousands, of child items. It's important to take extreme care when creating matrix items and their associated fields/item options.
It is better to move slowly through the matrix item once rather than having to delete the numerous child items and start over from scratch.
Even though I've built matrix items many times, I have found it helpful to have the steps outlined below as "recipe cards" when creating matrix items. Following the instructions below as closely as possible will help make the process go smoothly.
I also highly suggest producing a subset of the matrix items in a sandbox environment before creating the full matrix. This allows you to complete the correct steps to create matrix items successfully.
NetSuite Matrix Item Prerequisites
The following records or fields need to be created before starting on Matrix Items. Here is why:
- Custom Lists - A custom list is used to create a list of the available matrix item options. You will need to create a separate list for each option. For example, if you sell T-shirts in different sizes and colors, you'll need separate lists for size and color options.
- Custom Item Fields - Custom item fields are used on your item records to select available options from your custom lists.
- Custom Transaction Item Options - A custom transaction item option adds the option you created for the item matrix to the product details page (PDP).
Creating a Custom List in NetSuite
As mentioned above, the first prerequisite of creating a matrix item in NetSuite is creating any custom item lists you need to reference. To begin, navigate to Customization > List, Records, & Fields > Lists > New.
Step 1: Enter a name for your custom list in the Name field.
Step 2: Select the custom list Owner from the list. Only the owner can edit this record.
Step 3: Enter a Description of this list.
Step 4: Show these options in either Alphabetical Order or the Order Entered.
Step 5: Check the Matrix Option List box to indicate that this list is for an item matrix.
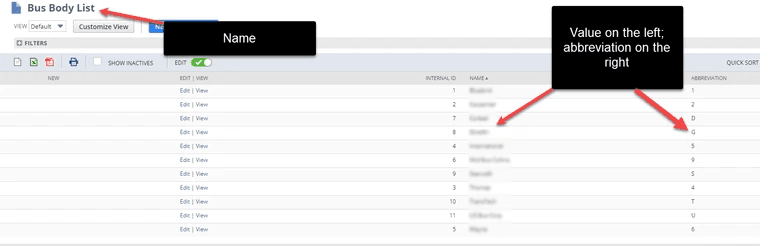
Step 6: Click the Values subtab and then complete the following:
- In the Value column, enter the first value for your list.
- In the Abbreviation column, enter an abbreviation for this value.
- Check the Inactive box if you do not want this to show in lists.
- Click Add.
- Continue adding values and translations as necessary.
Step 7: When you have finished, click Save.
Repeat these steps for each list of options for your matrix items. For example, here is a list used by one of the item options for the matrix item.
After creating your list of options, you must create a custom item field for each list.
Setting Up Custom Item Fields in NetSuite
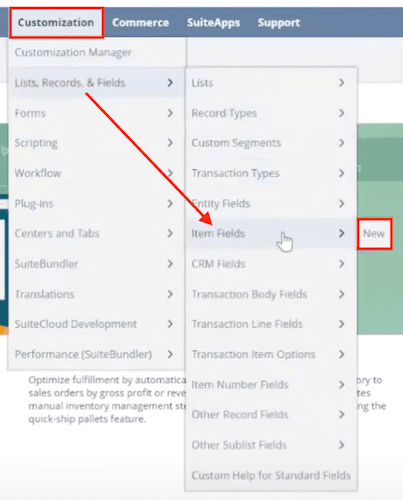
The next step in creating a matrix item is setting up a custom item field in NetSuite. To begin, in the navigation bar, go to Customization > Lists, Records, & Fields > Item Fields > New.
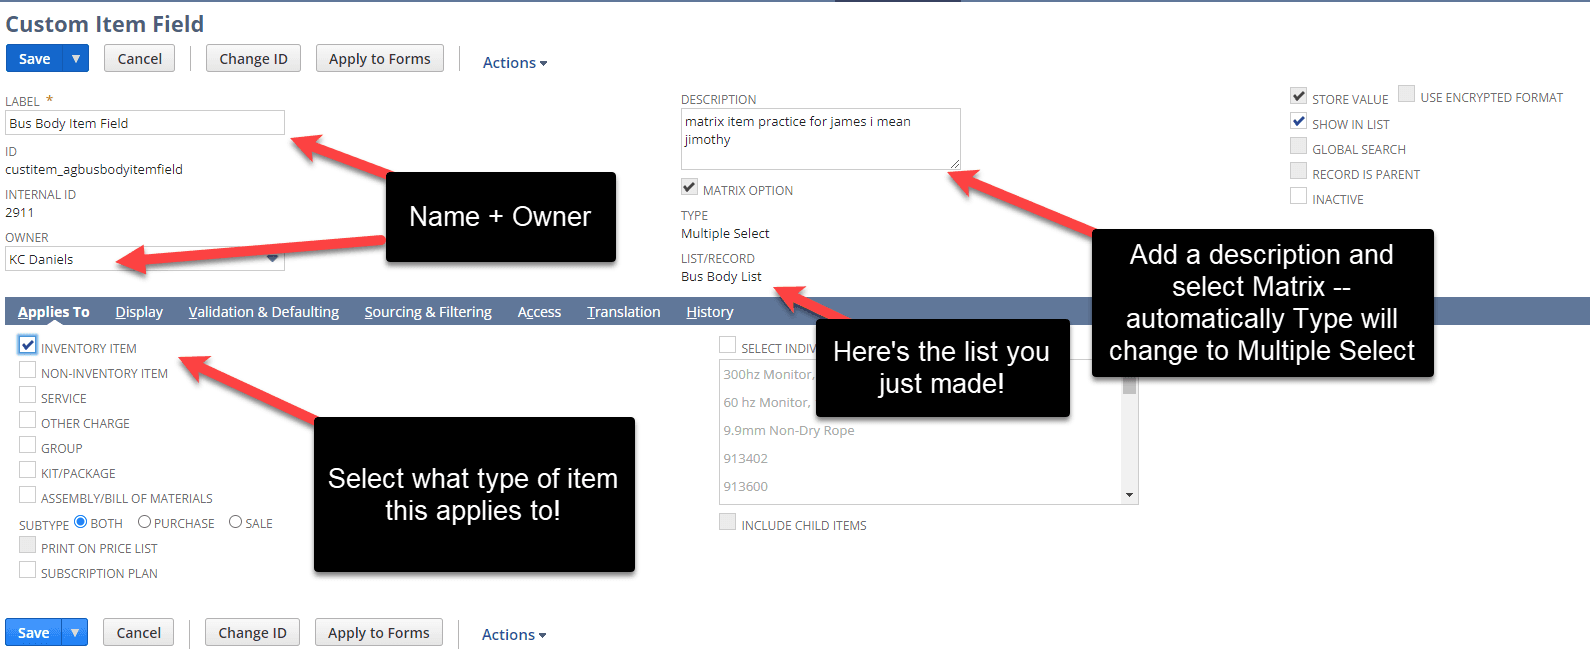
Step 1: In the Label field, enter the name of one of the custom lists you entered for this item matrix.
Step 2: Select the custom item field Owner from the list. Only the owner can edit this record.
Step 3: Enter a Description of this custom field.
Step 4: Check the Matrix Option box to indicate that this field is an option for matrix items. The Type field is automatically set to Multiple Select, and the Subtab field is set to Matrix.
Step 5: Select the Type of field you want to create.
Step 6: Select your custom list in the List/Record field.
Note: The Store Value box will be checked by default. When this box is left checked, the information entered in this custom field is stored in your NetSuite account. If the information stored in this custom field is for display only, you can uncheck the box and the information will not be stored in your account.
Step 7: Check the Show In List box to have your custom item field appear in your items list.
Step 8: To index this custom field for global search, check the Global Search box.
Step 9: If creating a List/Record custom field, check the Record is Parent box to specify that the selected record type is a parent record.
Step 10: Click the Applies To subtab and then check the boxes next to the items to which you want to apply this field.
Step 11: Be sure to double-check your fields, then click Save.
Remember to repeat these steps for each list of options for your matrix items!
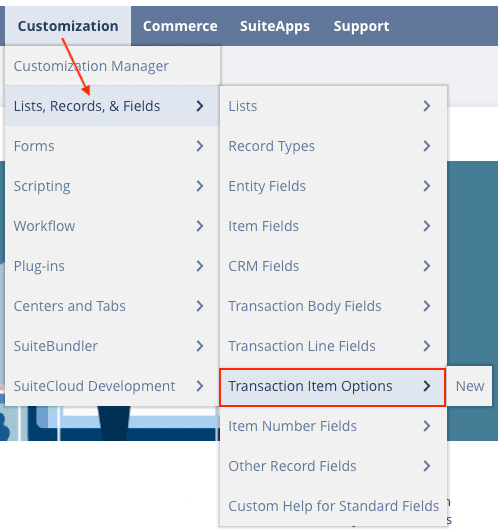
How to Create a Custom Transaction Item Option in NetSuite
The next task is to set up custom transaction item options. To view the options in your account and confirm that a new item option is necessary, navigate to Customization > Lists, Records, & Fields > Transaction Item Options.
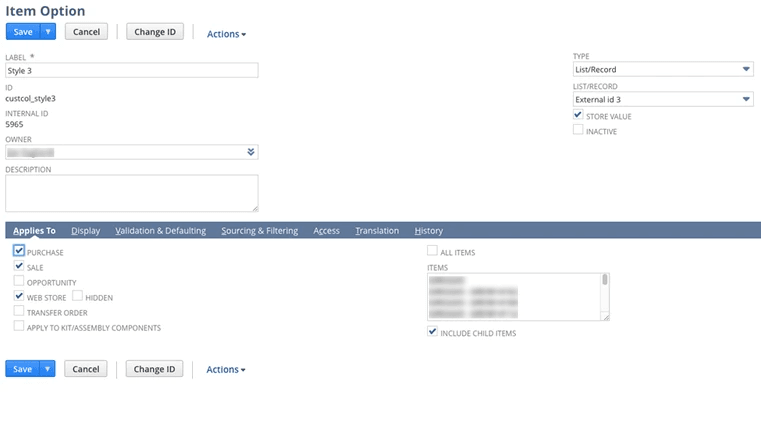
Step 1: If no transaction item option meets your needs, click New in the page header to create a new one.
Step 2: Enter a Label and ID in the corresponding fields.
Step 3: In the Type field, select List/Record. In the List/Record field, select the name of your custom list.
Step 4: Make sure the Store Value box is checked.
Step 5: In the Applies To subtab, check the boxes for Purchase, Sale, Opportunity, Web Store, Transfer Order, and Apply to Kit/Assembly Component. These checkboxes determine the transaction types the option can apply to.

Step 6: In the Items field, enter the items to which you want to apply the option. The custom option appears on the PDP for each item entered in this field.
Best Practice: Don't check the All Items checkbox, even if it does apply to all of the items currently on your webstore. Otherwise it will be automatically applied to all of the items that get added to your site in the future. Remember you can edit this transaction item option at any time to add or remove items from this list.
Step 7: Go to the Sourcing & Filtering subtab.
Step 8: In the Source List field, select Item.
Step 9: In the Source From field, select your custom item field.
Step 10: Quickly double-check your fields, and then click Save.
After you create your custom lists and custom item fields, you are ready to create your item matrix.
How to Create NetSuite Matrix Items Manually
To set up a matrix item in NetSuite, navigate to Lists > Accounting > Items and click the Matrix Item Assistant. Then, use the matrix item assistant to complete the following steps:
Step 1: Fill in the required information for the matrix item, such as the item name, description, tax schedule, and price. To display on the website, ensure the 'Display in Website' checkbox is checked, and the 'Store Display Name' field is populated.
Step 2: If you've been following along through this article, you can select the list you created earlier. Otherwise, you can use another existing list or jump to the top of this article to learn how to create a new list of options.
Step 3: Give the list a name and create its properties. You can create multiple new lists.
Step 4: You can then choose property combinations. I've found the best way to do it is to select the actual list of options that could be used for the children. This will automatically create the Matrix Item Name Template.

Step 5: You can then choose the actual child items created. This is helpful for creating a subset of items to practice building more matrix items.
Completing the steps above would be a good time to adjust inventory levels (at least when creating test matrix items).
Note: Depending on the extent of the item option selections, you could be creating hundreds if not thousands of child items. Be sure to take extra caution when selecting item options.
How to Display Matrix Items on SuiteCommerce
Step 1: Surfacing Matrix Items to the SiteAfter the above setup, the parent matrix item should surface on the site.
Step 2: It would be prudent to populate these additional fields:
- Webstore Tab: Page Title, Detailed Description
- Custom Tab: Item Options (Using the matrix item wizard will auto-populate these, but if you add these items by CSV or manually, populate this field with the correct Item Options.)
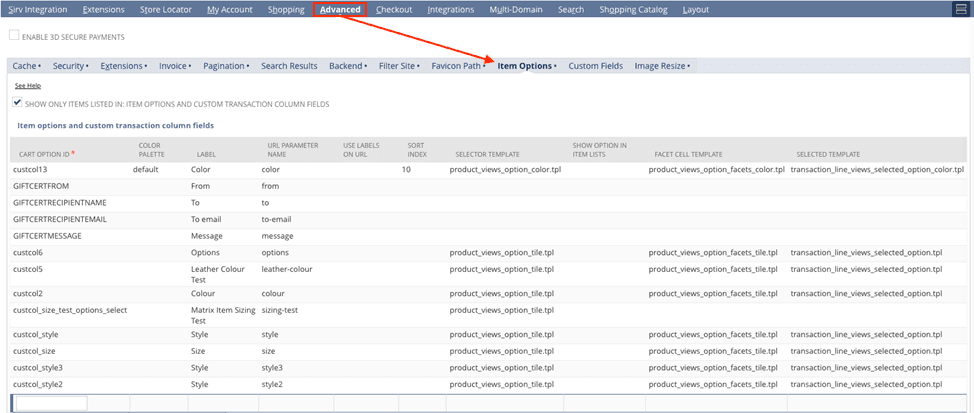
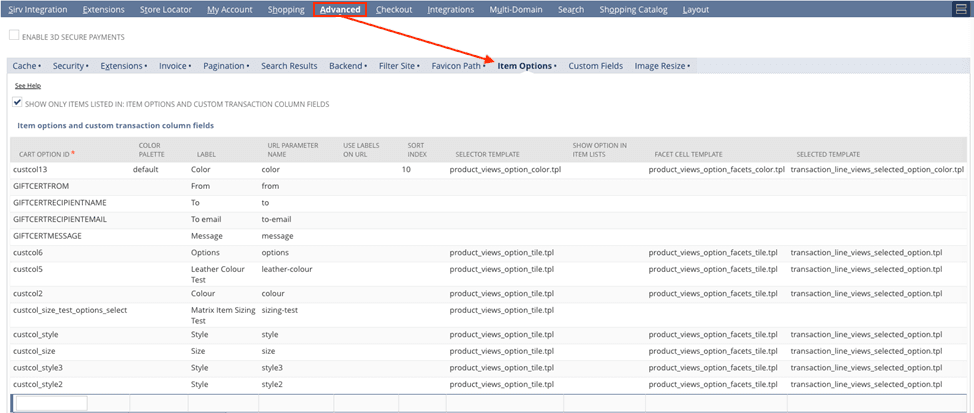
Step 3: You must add the item options to the configuration record. Navigate to Commerce > Websites > Configuration > Choose your website > Advanced > Item Options.
- Make sure you know your item options' IDs. (These can be found at Customization > Lists, Records, & Fields > Transaction Item Options)
- Add your options and set them up as needed. This is the standard layout, but you could use alternative selector templates, etc.
![]()
Step 4: Add your options and set them up as needed. This is the standard layout, but you could use alternative selector templates, etc.
It's important to note that a matrix item is not a physical item. Instead, it represents different child items; you need to create the child items that compose the matrix for the correct inventory tracking.
Trying to promote your matrix child items through Google or Facebook ads? Check out this article tutorial/troubleshooting article on How to Add Schema to Matrix Child Items.
You can also use additional matrix item features, such as managing prices, item images, and custom fields, based on the specific options of the matrix item.
Selecting the item options on the item record is an often overlooked step. For a quick solution, use this troubleshooting article on matrix item configuration errors!
Creating NetSuite Matrix Items Through An Import
Before beginning the item import process, you will want to create a detailed CSV template file for your item data.
As you create this template, think through the field mapping you will need to have in place. Here is an example field mapping setup that you can use to help guide you:

Need a refresher on how to upload item data to NetSuite? Check out this tutorial video on Importing Data to NetSuite through CSV Import!
An item option should be created for each unique option available on a matrix item (color, size, etc). These must be created as Transaction Item Options, with Sale, Purchase, and Web Store selected.
The sourcing and filtering for these item options need to be set to a custom list that is created:

So, if you're doing this via import, you'd need to create/import these lists before importing the matrix items. These lists would be something like:
Colors:
- Red
- Blue
- Green
Once the matrix items are set up, they must also be added to the configuration on the Item Options subtab under the Advanced tab.
Related Articles
- Render Specific Child Views from the Parent View | SuiteCommerce
- Set Up a Simple Parent-Child Record Relationship in NetSuite
Get stuck in a step during this article?
We like to update our blogs and articles to make sure they help resolve any troubleshooting difficulties you are having. Sometimes, there is a related feature to enable or a field to fill out that we miss during the instructions. If this article didn't resolve the issue, please use the chat and let us know so that we can update this article!
Oracle NetSuite Alliance Partner & Commerce Partner
If you have general questions about SuiteCommerce or more specific questions about how our team can support your business as you implement NetSuite or SuiteCommerce, feel free to contact us anytime. Anchor Group is a certified Oracle NetSuite Alliance Partner and Commerce Partner equipped to handle all kinds of NetSuite and SuiteCommerce projects, large or small!
![]()
We are a premium SuiteCommerce agency that creates powerful customer portals. Unlike our competitors, we have already solved your problems.
Tagged with Training, Troubleshooting