Mailchimp NetSuite Integration Installation Guide
Installation instructions for the Anchor Group Mailchimp NetSuite Integration. Learn how to install the bundle, find API Keys, and configure the Mailchimp connector record.
- Date
- April 21, 2026
- Read
- 21 min

The Anchor Group Mailchimp NetSuite Integration is one of the most robust connectors on the market. It comes with most of the configuration ready to go. This installation guide is specifically for the Anchor Group Mailchimp NetSuite Integration. The guide will go over the end-to-end setup of the bundle and provide additional tips & tricks on how to leverage the connection of data between the two power systems.
Expected Mailchimp Integration Setup Time: 5 - 10 Hours
Perfect Scenario Integration Setup Time: 2 hours
Although this bundle is able to be self-installed, we suggest that you purchase a block of 15-20 hours from Anchor Group to support the installation, modify scripts, and provide guidance of best practices for setting up Mailchimp based on your NetSuite integration. This block of hours can be purchased by reaching out to Anchor Group on our contact page.
Prerequisite: Bundle Provisioning
If you have recently purchased the NetSuite Mailchimp integration, it can take up to 1 business day for the bundle to be provisioned to your NetSuite account. You will be unable to search and install the bundle if it has not yet been provisioned to your NetSuite account. In order for the bundle to be provisioned to your NetSuite account, you will need to provide to Anchor Group your NetSuite Account ID. If you do not know your NetSuite Account ID, you can navigate to SETUP > COMPANY > COMPANY INFORMATION and then find the field on the page labeled ACCOUNT ID. This will be the number you need to provide to Anchor Group. Check your inbox to see if you have already received an email requesting your NetSuite Account ID or contact support now.

Step 1: Search and Install Bundle
The first step after the bundle is provisioned to your NetSuite account will be to install the bundle to your NetSuite account.
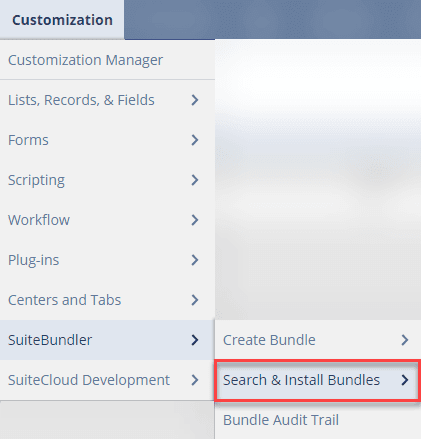
Navigate to CUSTOMIZATION > SUITEBUNDLER > SEARCH & INSTALL BUNDLES
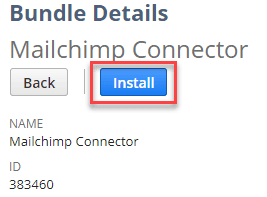
Search for Bundle ID in Keywords Field: 383460

Select the hyperlink for the Mailchimp Connector which will bring you to the bundle overview page to prepare for an installation.
Click on the INSTALL button.
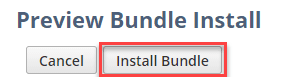
This will bring you to the Bundle Preview and require you to select INSTALL BUNDLE.
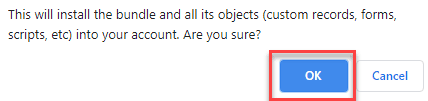
You will likely get a popup asking you to confirm that you want to install the bundle. Click OK.
At this point, the Mailchimp bundle will begin installing into your NetSuite environment. You will be brought to a list of your installed bundles where you can see the status of your Mailchimp connector installation. Click REFRESH until you see that the STATUS has a checkmark.

If you do not see a checkmark within 10 minutes. Please contact Anchor Group for support.
CONGRATS. Your NetSuite Mailchimp Connector is now installed in your NetSuite environment. Now it's time to do a short configuration.
STEP 2: Mailchimp Configuration Record
Creating a New Mailchimp Configuration Record
The next step to getting your Mailchimp NetSuite connector configured is to setup the Mailchimp Configuration Record. You can find the record by navigating to SETUP > INTEGRATION > AG MAILCHIMP INTEGRATION > NEW.

When you click new, a new Mailchimp configuration record is available to configure. To assist with a faster integration setup, some fields are pre-populated.

API KEY
To find the API Key, you will need to log in to your Mailchimp account. Navigate to the API Key and Generate it if it doesn't yet exist.
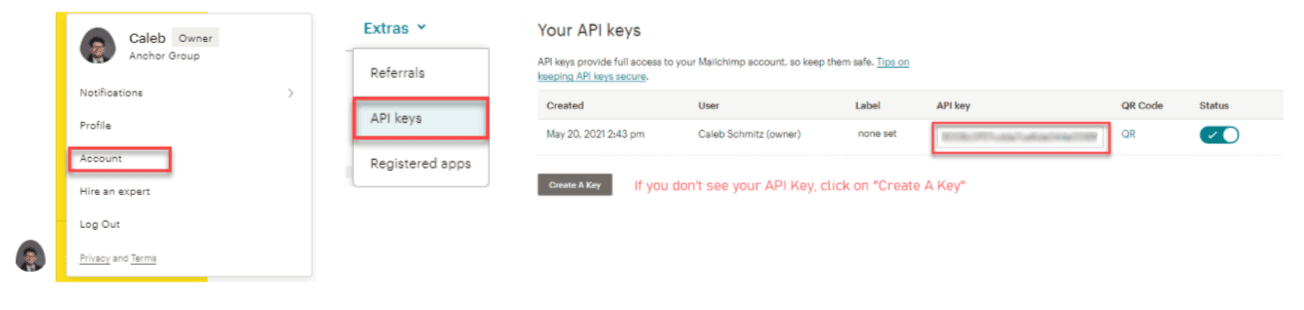
You will then copy/paste the API Key from your Mailchimp account into the field in the NetSuite Mailchimp configuration record.
Audience ID
Next, you will need to find the AUDIENCE ID inside of your Mailchimp account. Upon the creation of your Mailchimp account, a new audience will automatically be created under the name of the store that you used to create your account.
IMPORTANT NOTE: If you want to sync data from NetSuite to multiple Mailchimp Audiences, you will need to create a new Mailchimp Configuration Record for each new Mailchimp Audience. We recommend creating a new API Key for each Mailchimp Configuration Record you create and clearly label them, however, the current integration is only designed to support one audience.
Navigate to your Mailchimp account audience and copy the Audience ID.

Paste the Audience ID into the NetSuite Mailchimp configuration record.
Default Status
This default status dropdown will decide how the contacts going from NetSuite to Mailchimp will be marked. If this is set to "Subscribed", NetSuite will make a new contact set as "Subscribed" by default.
The out of box options include:
- Subscribed
- Unsubscribed
- Cleaned
- Pending
- Transactional
Note: You can modify this list and add new options by modifying the field list called "Mailchimp Subscription Status". This can be found by navigating to CUSTOMIZATION > LISTS, RECORDS, & FIELDS > MAILCHIMP SUBSCRIPTION STATUS > LIST. It is not common that this list of options needs to be modified.
Store ID, Store Name, and Store Created

If you want to have product/item functionality in Mailchimp, you will need to have a Store ID setup. In most cases, you probably don't have a store already created if you are making your first Mailchimp Configuration Record.
Store ID: For people that don't already have a store, you can make up any store ID. In our case at Anchor Group, we called it "AGSTORE".
Note: Ensure that your Store ID does not contain any spaces.
Store Name: If you don't yet have a Store in Mailchimp, input your desired Store Name.
Store Created: If you don't already have a store, LEAVE THIS BOX UNCHECKED. This will create a new store using your desired Store ID and Store name. CHECK this box if you have already created the store within Mailchimp that you are trying to connect NetSuite to. One reason you might already have a store is if you have created a different Mailchimp configuration record and need to connect NetSuite to another Mailchimp audience. In this case, your other Mailchimp configuration record has the information about the Store ID and Store Name.
Currency Code and Currency

Currency Code: The currency code is the default currency for your Mailchimp store. In almost all cases, this will be selected as "USA".
Currency: This field is automatically populated after you select the Currency Code you want to use. For those who like to know the technical aspects to this configuration, this field exists because the Currency Code field uses a NetSuite ID and the Currency field converts that ID into a text. Mailchimp wants to have this data come in as a text field.
Customers to Sync (Saved Search), Items to Sync, & Cart Abandonment Data Search
To assist with a faster integration setup, the following saved search fields are prepopulated:

Customers to Sync (Saved Search): This is a field you will need to check and adjust depending on how you structure customer data in NetSuite.
- If the email addresses that you want to sync to Mailchimp exist on the NetSuite customer records, you will want to use the saved search for customer records: customsearch_ag_mc_customers. This would typically apply in a B2C scenario where NetSuite customer records are used to manage the information of individuals who shop on your site.
- If the email addresses that you want to sync to Mailchimp exist on the NetSuite contact records, you will want to use the saved search for contact records: customsearch_ag_mc_contacts. This would typically apply in a B2B scenario where NetSuite customer records are used to manage company information, while contact records associated with those customer records are used to store information for the individuals (decision-makers) working at those companies.
You can create a copy of a saved search and modify the criteria in order to customize the data that is being sent from NetSuite to Mailchimp. One reason why you might want to modify it is if you have multiple subsidiaries and want to have customers of one subsidiary send to a unique audience in Mailchimp or for testing purposes. The default saved search will pull all customers that have an email, are not inactive, and do not have a Mailchimp ID. You can replace the default saved search with your modified copy before saving your Configuration Record if you do not want your audience to consist of all of the contacts that meet the default criteria.
IMPORTANT NOTE: if you copy the saved search and modify it, DO NOT CHANGE THE RESULT SETTINGS of the saved search. Only modify the criteria of the saved search. The results that are set by default are required for the integration to work properly.
Disable Customer Sync From Mailchimp:
Check this box if you do not want to sync customers from Mailchimp to NetSuite. The script can often take a very long time to run because Mailchimp does not have the ability to sync using a saved search in the way that NetSuite does. Because of this the sync sends all of the existing contacts in Mailchimp to NetSuite. Just know that this will disable any updates to the contacts in Mailchimp from syncing to NetSuite, including subscription status updates made in Mailchimp.
Note: If a contact in Mailchimp already exists in NetSuite, this sync will not create a duplicate record in NetSuite.
Syncing Customer Information (Mailchimp Merge Tags Settings)
When syncing customers from NetSuite to Mailchimp, make sure that the MERGE TAGS in Mailchimp are set up so that the correct information syncs over with the customers. Go to your Mailchimp audience and navigate to the list of contacts. Select Settings>Audience Fields and *|MERGE|* tags.

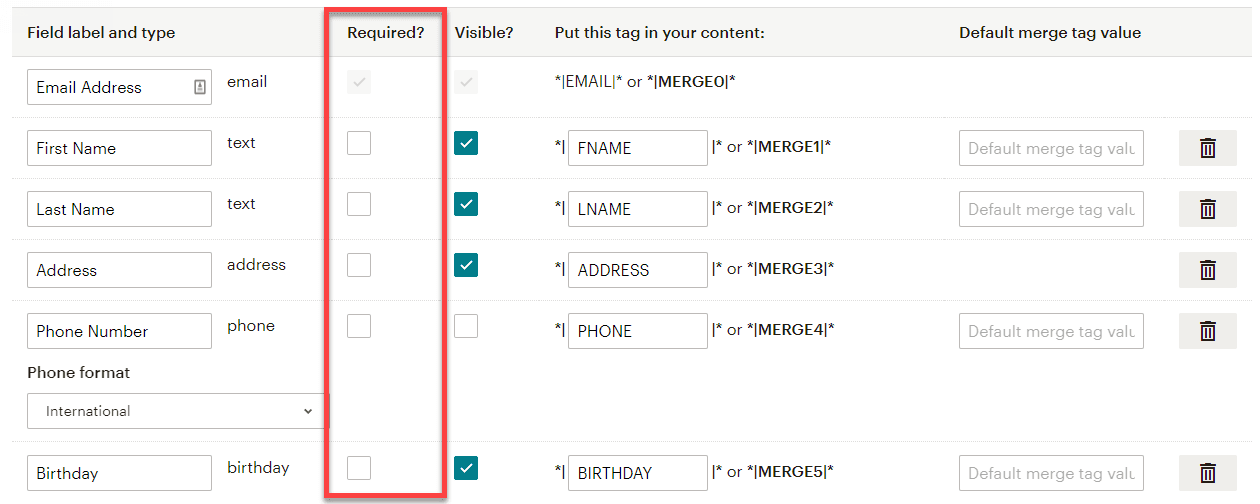
The required option allows you to specify which contacts sync over from NetSuite based on whether or not those fields contain values in NetSuite. If a NetSuite contact does not have a value for a field that is marked required, that contact will not sync to Mailchimp. For example, if you mark First Name as required, any contact that does not include a first name in NetSuite will not sync to Mailchimp, these could include customers marked as Companies or contacts that only include an email.
Ensure that only the correct fields are marked as required. Here, we have none of the fields listed as required so that the widest array of customers will sync from NetSuite (other than email which is always required).
Items to Sync: Out of the box, this bundle has default saved searches that are pre-populated in this field.
You can create a copy of the saved search to have modified criteria of the item data that is sending from NetSuite to Mailchimp. One reason why you may want to modify it is if you have multiple stores with different data in them. You might also want to narrow the types of items/products that sync to Mailchimp.
IMPORTANT NOTE: if you copy the saved search and modify it, DO NOT CHANGE THE RESULT SETTINGS of the saved search. Only modify the criteria of the saved search. The results that are set by default are required for the integration to work properly.
Disable Item Sync: Check this box if you don't want to send the items from the Items to Sync saved search to Mailchimp. Disabling this script will help the other scheduled scripts run better and you can always uncheck the box and sync items to Mailchimp later by manually deploying the Sync Items to Mailchimp script.
Another reason you may want to disable the sync is that, in order for items to display correctly in Mailchimp, you must add a Mailchimp Item Image and a Web Store Item url to the 'Mailchimp Integration' subtab of each item record you wish to sync. Disabling the sync will allow you to add these fields to the item records so that you do not have to remove the items from Mailchimp and then resync.
To add item images and Web Store Item urls go to the item record, select Edit and navigate to the Mailchimp Integration tab. Here you can select an image and paste a url in to the respective fields. If you do not have an image in NetSuite you'll need to upload one to Live Hosting Files.
Note: If you wish to edit or remove individual products from Mailchimp after they have been synced, you will need to run the Remove MC Products, edit the item in NetSuite and/or the item saved search and resync the desired products to Mailchimp.
Cart Abandonment Data Search: Out of the box, this bundle has default saved searches that are pre-populated in this field.
You can create a copy of the saved search to have modified criteria of the cart data that is sending from NetSuite to Mailchimp. One reason why you might want to modify the saved search is if you want to only send this data to Mailchimp if the data has been in the cart for more than 4 hours. A very good usage of this cart abandonment data is for SuiteCommerce (NetSuite's Ecommerce solution). The cart data goes directly into NetSuite which is accessible via a saved search. The cart abandonment data this integration sends to Mailchimp comes directly from that NetSuite record.
IMPORTANT NOTE: if you copy the saved search and modify it, DO NOT CHANGE THE RESULT SETTINGS of the saved search. Only modify the criteria of the saved search. The results that are set by default are required for the integration to work properly
Cart URL
In the cart url field, enter the url for the cart on your website. This will be the link that a customer is taken to when they click a "Return to Cart" button in a cart abandonment email. NetSuite does not have a Unique Cart ID for customers, so you'll need to enter your url into this field in order for the buttons in your cart abandonment emails to work.
Subscription Expired
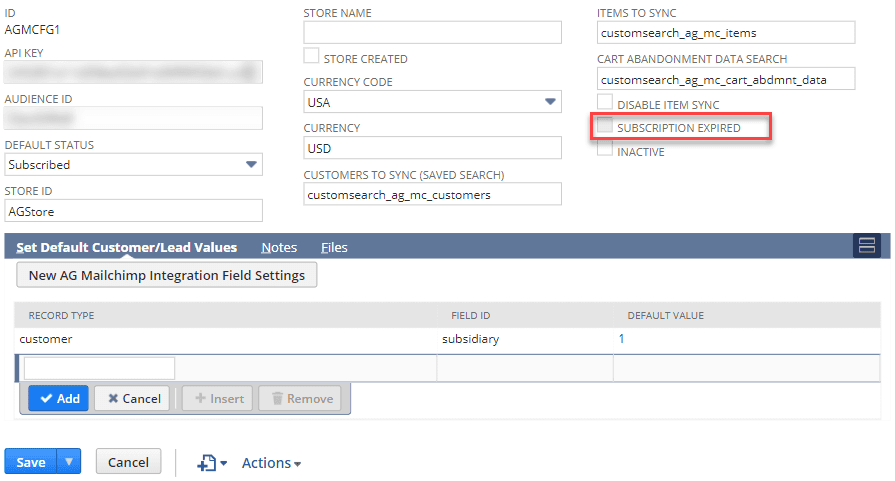
Subscription Expired: This field on the Mailchimp Configuration record is for display purposes only. If your integration subscription is expired (free trial ended or payments not received), this checkbox will be checked. If you see this checked and believe it should not be, contact Anchor Group support.
Set Default Customer/Lead Values
The bottom section of the Mailchimp configuration record allows you to set default values of data coming from Mailchimp into NetSuite. Contacts come from Mailchimp into NetSuite as a Lead record. Those contacts will be tagged, but our integration also allows you to set default values of the new contacts coming from Mailchimp.
Use Case 1: You have multiple subsidiaries and have each subsidiary as a new Mailchimp Audience. You would want to create a new Mailchimp configuration record for each new audience and have the contacts coming from Mailchimp be preselected with the correct subsidiary when entered into NetSuite. In our example here, we have set the Record Type to "customer", the Field ID to "subsidary", and the Default Value to "1". This means that every contact that comes from this Audience ID into Mailchimp will have the subsidiary automatically selected.

Use Case 2: You have created a checkbox on your lead customer record in NetSuite that is labeled Mailchimp Lead. For every new contact that comes into NetSuite from Mailchimp, you want to make sure that it is recorded. In this case, you would want to have set the Record Type to "customer", the Field ID to "mailchimpLead", and the Default Value to "1/True". This means that every time someone uses a Mailchimp form and is a new contact for that audience, the data will come into NetSuite with their lead customer record Mailchimp field already checked.
Note: You don't need to click the "New AG Mailchimp Integration Field Setting" as long as you are able to use the inline editing as shown in the examples above.
Customer Field Mappings

The last tab on the configuration record allows you to map specific fields on the NetSuite customer record onto contact records in Mailchimp. This allows you to customize the information that comes to Mailchimp from NetSuite.
NetSuite Field ID: This is the actual field id for the field that you want mapped to the Mailchimp contacts. Above, you can see that we have the field id listed as internalid, this means that the internal id of the customer record will be listed on each contact that is synced to Mailchimp.
Mailchimp Field Name: This can be whatever you want to make it, it will be the name that the information will be labeled as in the Mailchimp contact. We have ours listed as NS Internal ID.
Mailchimp Field ID: This is the field id in Mailchimp, this should be all lowercase letters with no spaces. We have filled ours out as nsinternalid.
Field Type: This is the NetSuite field type that information is being pulled from. We have outs set to Text because the internal id field on the NetSuite Customer Record is a text field.
Is Public: This section controls whether or not you want customers to be able to influence this information, for example in a survey or something of that sort. We have set ours to No so that customers cannot see this information or interact with it.
Is Synced: This field is automatically populated when the customer field is synced to Mailchimp. This indicates nothing about whether or not any information has been synced to those fields, only that the field has been created in Mailchimp.
Mailchimp Merge ID: This indicates what the Merge ID in Mailchimp is for the field. This can be useful if you wish to use the information in an email, you can use the merge tag to pull information for specific contacts easily. Merge tags are always MERGE6 (number corresponds to the order in which the tags are listed).
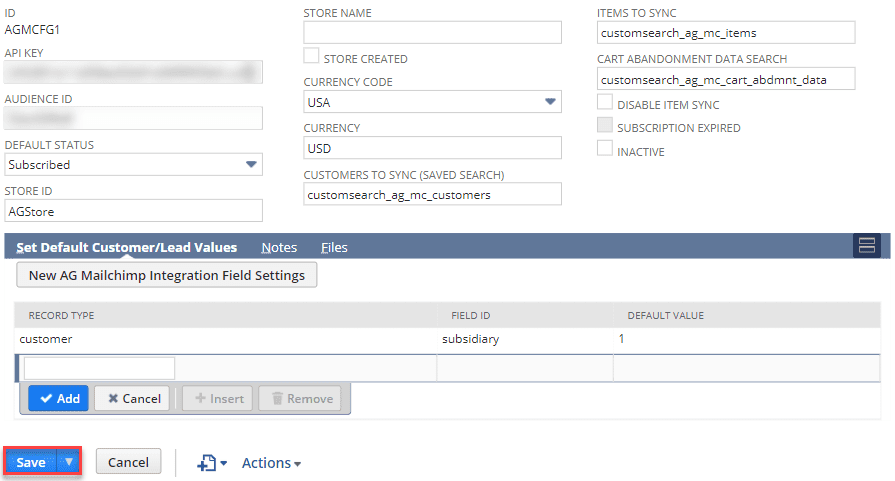
Save the Mailchimp Configuration Record
The last step after completing this configuration record is to click save.
Allowing Mailchimp to Access Shopping Cart Abandonment Data
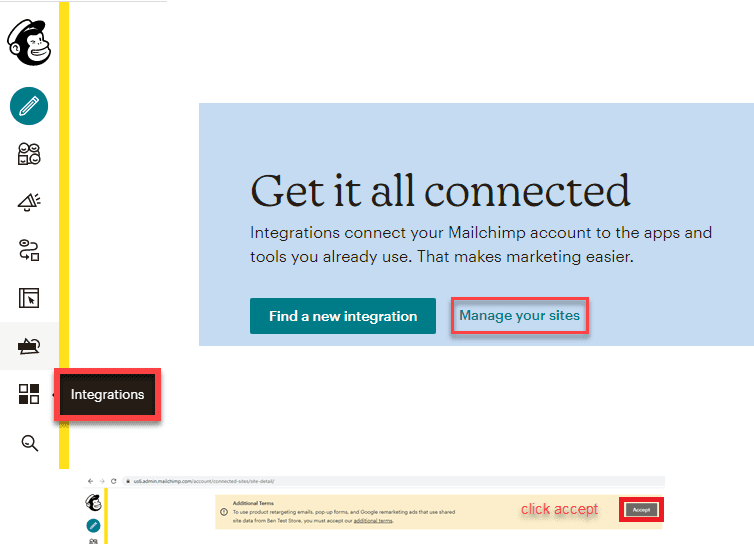
Once you have saved the configuration record, follow these steps to sync Shopping Cart Abandonment Data, go to:
ACCOUNT>INTEGRATIONS>MANAGE YOUR SITES and click ACCEPT on the notification banner at the top of the screen.
Step 3: Validate Mailchimp Tags on Customer Records
You don't need to take any specific action to set up the tags in the integration so this step is for training and education purposes.
Navigate to one of your customers in NetSuite to see the new "Mailchimp Integration" subtab on the Record.

Mailchimp ID: This is where you can see the Mailchimp ID of this customer. The Mailchimp ID is what comes directly from Mailchimp to identify specific contacts.
Mailchimp Subscription Status: This is the same list that exists on the Mailchimp configuration record. This status will be auto-populated from Mailchimp if this contact has subscribed or unsubscribed. Manually changing it in NetSuite will change the status of the Mailchimp contact as well.
If you want to change the default value new contacts in NetSuite send to Mailchimp, change your Mailchimp configuration record default.
Note: If you want to modify the options available on this list, see the notes in this installation guide located with the Mailchimp configuration record.
Mailchimp Tag: This field pulls all of your Mailchimp tags and auto selects any tags associated with that contact in Mailchimp. You can also manually select a tag for customers that have not yet synced to Mailchimp and those customers will sync with the tags you have selected. Tags can be created in Mailchimp or in NetSuite. You can create tags on the bottom of the configuration record after it has been saved and the tags will sync to Mailchimp. Tags can also be made in Mailchimp and synced to NetSuite through the manual deployment of the Sync Customer Tag from Mailchimp script.
Note: In the Mailchimp Tag field there is an option to select New. Tags created on the customer record in this fashion do not sync directly to Mailchimp, whereas those created on the configuration record do. Best practice is to create new tags using the configuration record.
Mailchimp E-Commerce Customer: This field indicates whether or not the customer has been added to the Mailchimp E-Commerce list due to e-commerce activity that has been synced from NetSuite to Mailchimp. This field cannot be edited manually and must be checked for any of the customer's e-commerce data to sync to Mailchimp.
Mailchimp Groups: This field pulls all of your Mailchimp Groups and will auto select any groups associated with that contact in Mailchimp. You can also manually select a group for customers that have not yet synced to Mailchimp and those customers will sync with the groups that you have selected. Groups can be created in Mailchimp or NetSuite. You can create groups on the bottom of the configuration record after it has been saved and the groups will sync to Mailchimp. Groups can also be made in Mailchimp and synced to NetSuite through the manual deployment of the Sync Customer Groups Child script.
Note: In the Mailchimp Groups field there is an option to select New. Groups created on the customer record in this fashion do not sync directly to Mailchimp, whereas those created on the configuration record do. Best practice is to create new groups using the configuration record.
Troubleshooting: NetSuite Mailchimp Integration
There are a few reasons your Mailchimp NetSuite integration might not be working properly. This is a list of some of the common reasons.
Subscription Expired
You can look to see if your subscription has expired by looking at the SUBSCRIPTION EXPIRED checkbox. This is not a checkbox that you can edit and is intended for display purposes only. If you see this checkbox as Checked, then it means your integration subscription has expired and it will no longer work. This could have happened due to a failed payment or because your admin canceled the subscription. If you'd like to resolve this issue, please contact Anchor Group support.
For More helpful information on the Mailchimp Integration, see these Mailchimp Integration Helpful Tips.
Anchor Group Support
If you are experiencing any issues with your Mailchimp integration, please contact Anchor Group via the website contact page.
Alternatively, you can contact Anchor Group direct sales at (608) 575 - 9053.
Tagged with Solutions, Integration