Mailchimp Integration Helpful Tips
Get some helpful tips for setting up the NetSuite Mailchimp integration by Anchor Group.
- Date
- December 2, 2025
- Read
- 28 min
Integrating NetSuite and Mailchimp allows for increased marketing and greater ease in customer interaction. Greater organization and targeting specification with audiences, segments, groups, and tags. Campaigns and automations allow you to instantly put your data to use for both marketing and customer interaction, while reports allow you to see how your automation's performance and results, as well as subscriber activity. This guide will show you a number of helpful ways in which you can put the data you have synced from NetSuite to use.
Getting Started
The first step to maximizing your email marketing is creating the Mailchimp Configuration Record which involves connecting NetSuite to a Mailchimp audience. Usually, the best practice is to only utilize one audience if possible and to use tags, groups, and segments to organize contacts within that audience. If you do need to create more than one audience, this guide will cover that as well.
Saved Searches
Some of the scripts sync data that is pulled by associated saved searches, these are, Sync Cart Abandonment Data, Sync Customer to Mailchimp, Sync Items to Mailchimp, Sync Orders to Mailchimp. These scripts sync the data that is pulled by the 4 saved searches that are listed on the Mailchimp configuration.
There are some important things to note when it comes to saved searches and making sure that they operate correctly. If changes are made to the saved searches used in the configuration, it is important that the Results tab is not changed. Always check to make sure that the results are the same as the default saved search, even if you did not change the results, double-check to confirm that they are the same.
AG Mailchimp Cart Abandonment

These are the default search criteria, you can add criteria or remove criteria, however, the best practice is to remove criteria for testing purposes only. The Login Audit trail can be changed to match whatever date is desired, this can be as small as a day but whatever time frame works best. The formula looks for cart contents attached to a customer record. A Mailchimp ID is required to sync cart abandonment data to Mailchimp, for this reason, new customers must first be synced to Mailchimp before their cart data can be synced.
AG Mailchimp Customers

These are the default search criteria, you can add criteria or remove criteria, however, the best practice is to remove criteria for testing purposes only. The most important of the two criteria are the Mailchimp ID, which ensures that customers that have already been synced to Mailchimp are not being synced twice, and the email, which ensures that customers without emails are not synced to Mailchimp as this can cause errors with the script, and defeats the purpose of syncing contacts to Mailchimp anyway.
AG Mailchimp Items

These are the default search criteria, you can add criteria or remove criteria, however, the best practice is to remove criteria for testing purposes only. Display in Web Site ensures that only items that can be purchased through your store are synced to Mailchimp, Sent To Mailchimp ensures that duplicate items are not being sent over to Mailchimp.
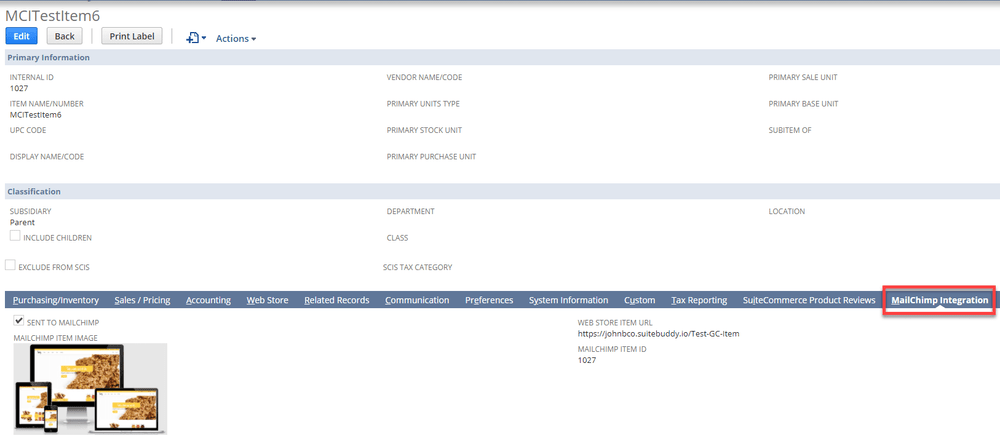
Note: Ensure that all items being synced to Mailchimp have a Mailchimp Item Image and a Web Store Item URL or they will not display correctly in Mailchimp.
Note: Saved Searches must be made public or there will be an error when trying to update a customer record.
AG Mailchimp Orders

These are the default search criteria, you can add criteria or remove criteria, however, the best practice is to remove criteria for testing purposes only. Type specifies that results pulled are sales orders, Sent To Mailchimp ensures that duplicate sales order data is not being synced to Mailchimp.
Note: In the results tab, the Item and Order searches both have values listed under Custom Label, this is required for these two searches but not for Cart Abandonment or Customer searches.
Creating Tags and Groups
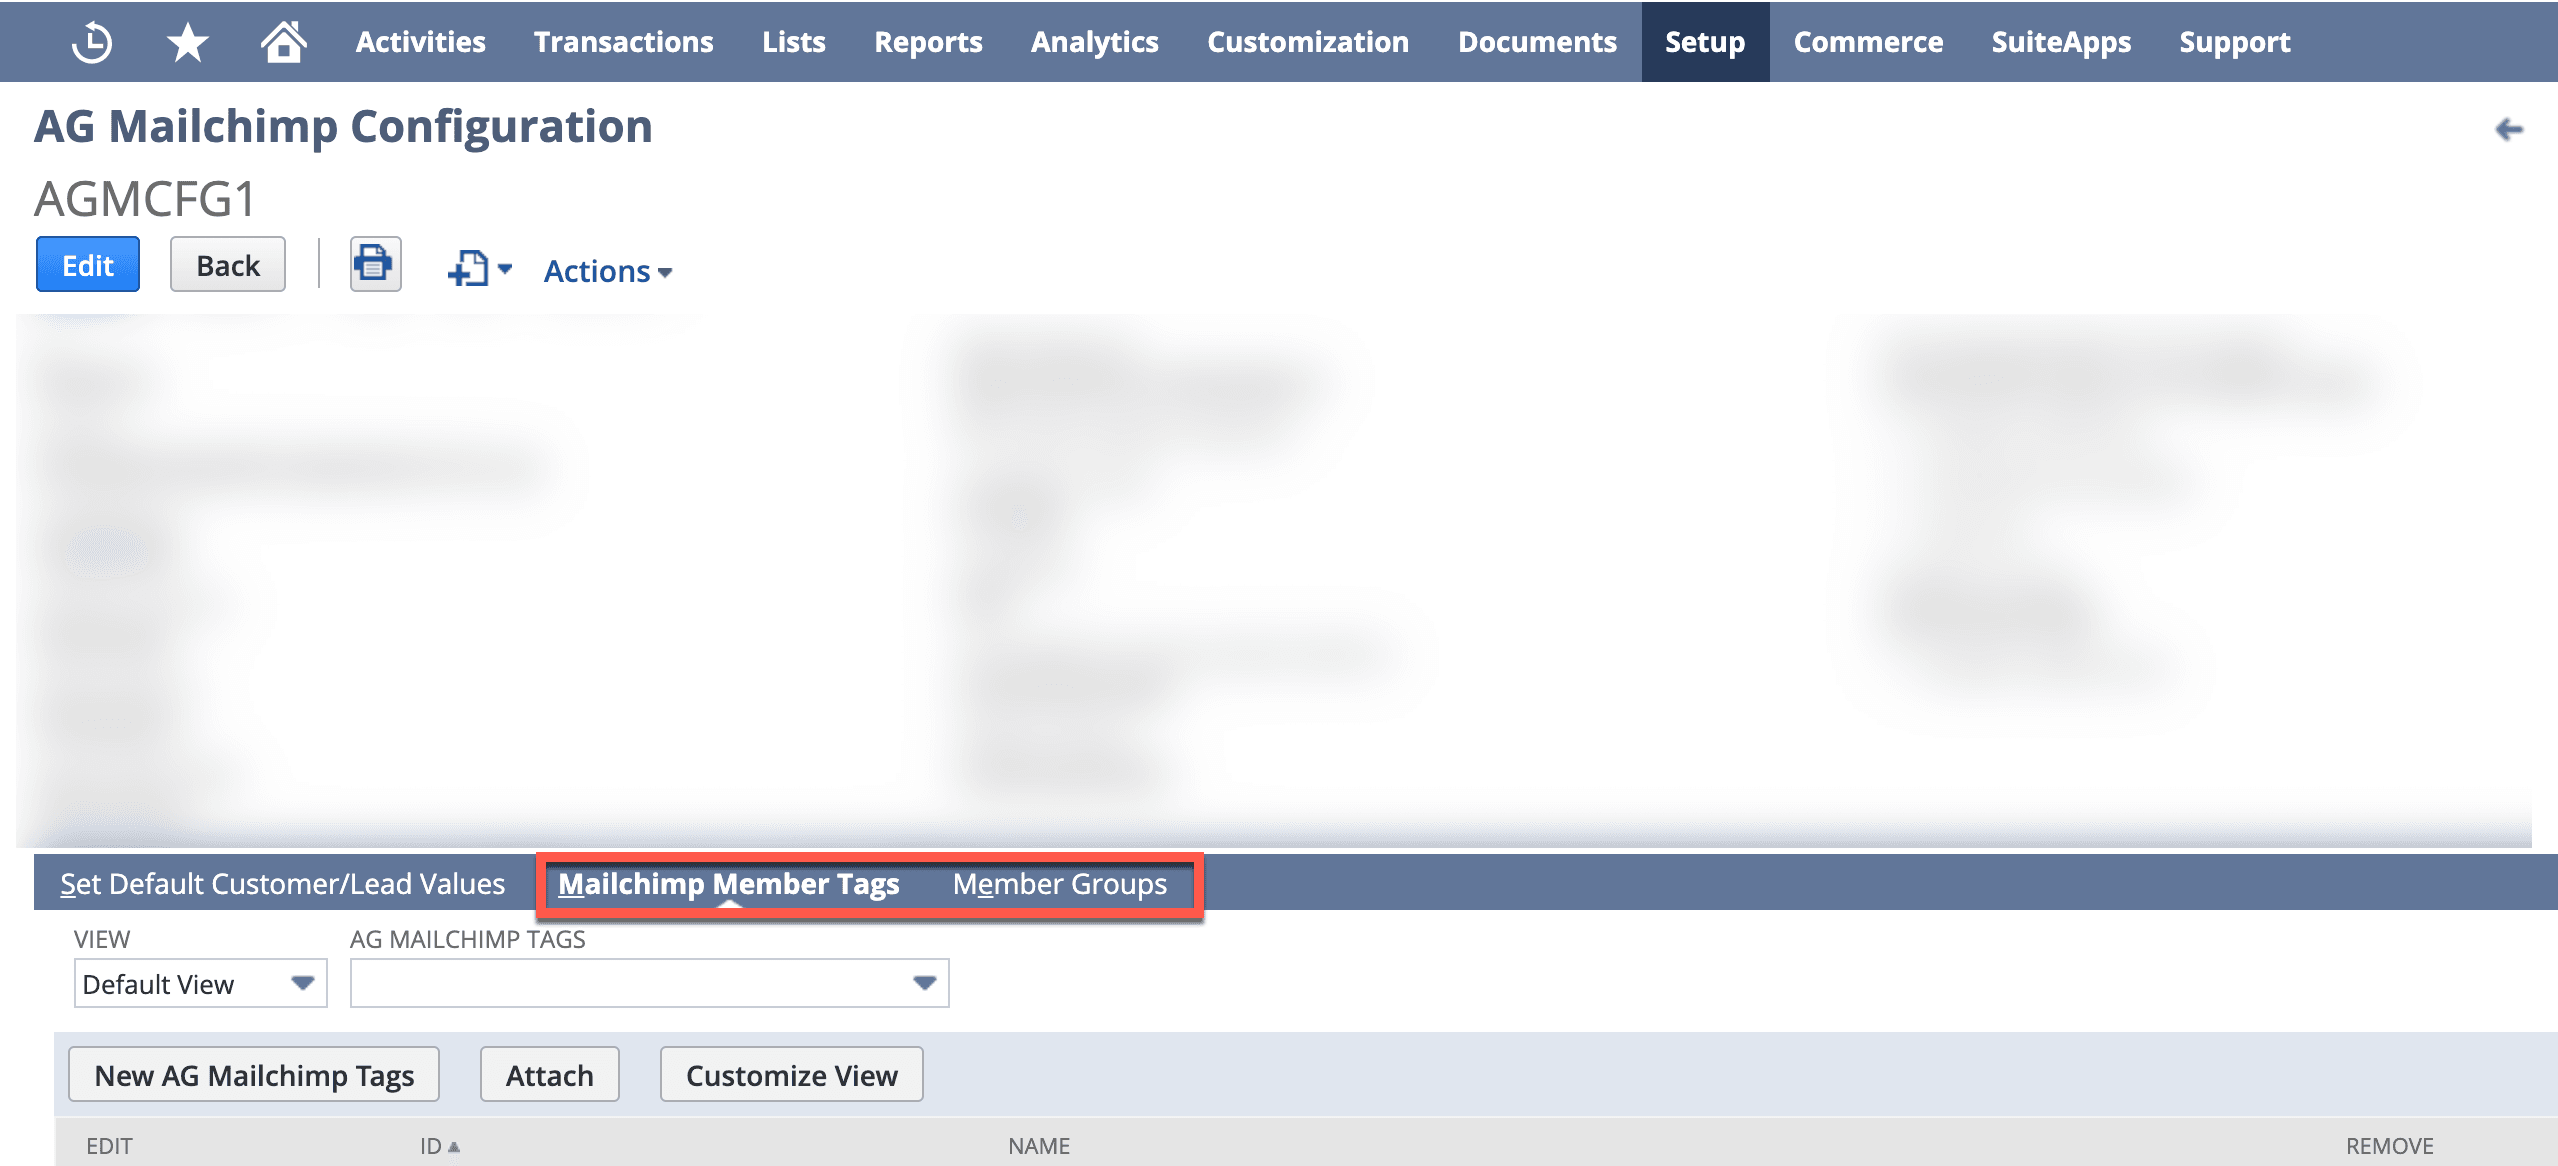
Tags and Groups are both created in the same way from within NetSuite. After saving your Mailchimp Configuration Record you can create tags and groups at the bottom of the record and those tags and groups will sync into Mailchimp. Select the sub-tab Mailchimp Member Tags, this tab will display all of the tags that are already attached to the configuration record, the configuration will likely start with no existing tags. Select New AG Mailchimp Tags

Name your new tag or group and click save, it will then sync to Mailchimp and will be visible on the configuration record.
Creating Tags/Groups Via the AG Mailchimp Tags Page
Tags and groups can also be created via the page AG Mailchimp Tags>New AG Mailchimp Tags OR AG Mailchimp Group Category>New AG Mailchimp Group Category. Name your tag/group and under Configuration you will have to specify the configuration record to which you want the new tag/group to attach. If you want a tag/group to apply to more than one configuration you must attach it to that configuration using the Attach button on the configuration record. Select the desired tag/group in the AG Mailchimp Tags field and click Attach.

If you want to sync more than one Mailchimp audience to NetSuite you need to create a separate configuration record for each of those audiences. Similarly, tags and groups do not carry across to multiple audiences. If you want to use the same tag/group for a different audience you will have to attach it to your configuration record or create that tag/group in your audience in Mailchimp.
Segments
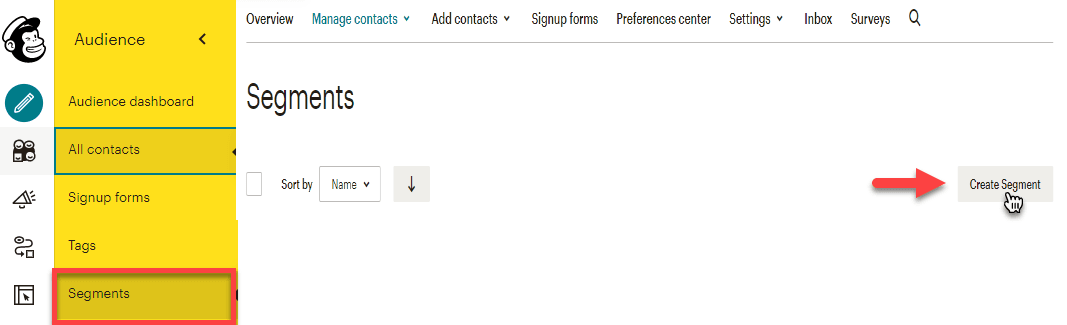
Segments are essentially like a saved search of your contacts in Mailchimp. You can create a segment to organize your contacts by whatever qualities you want to group them by. You can then send emails and campaigns that send specifically to these segments. To create a segment go to Audience>Segments>Create Segment
OR
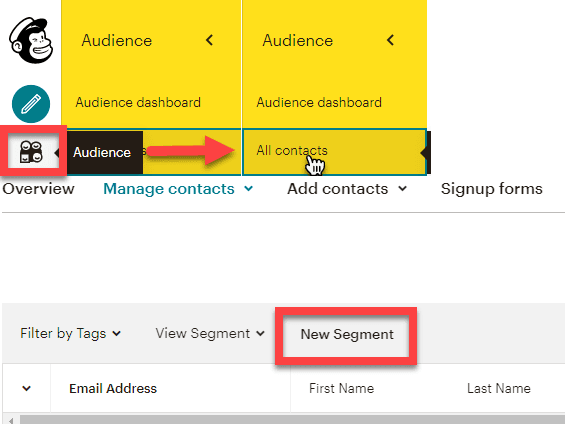
Audience>All Contacts>New Segment
You can then create filters that will specify which contacts are in your segment.
Mailchimp Scripts
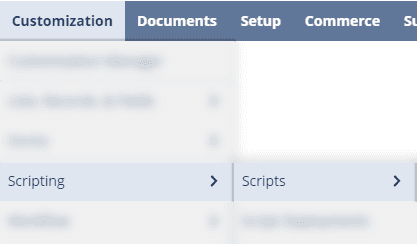
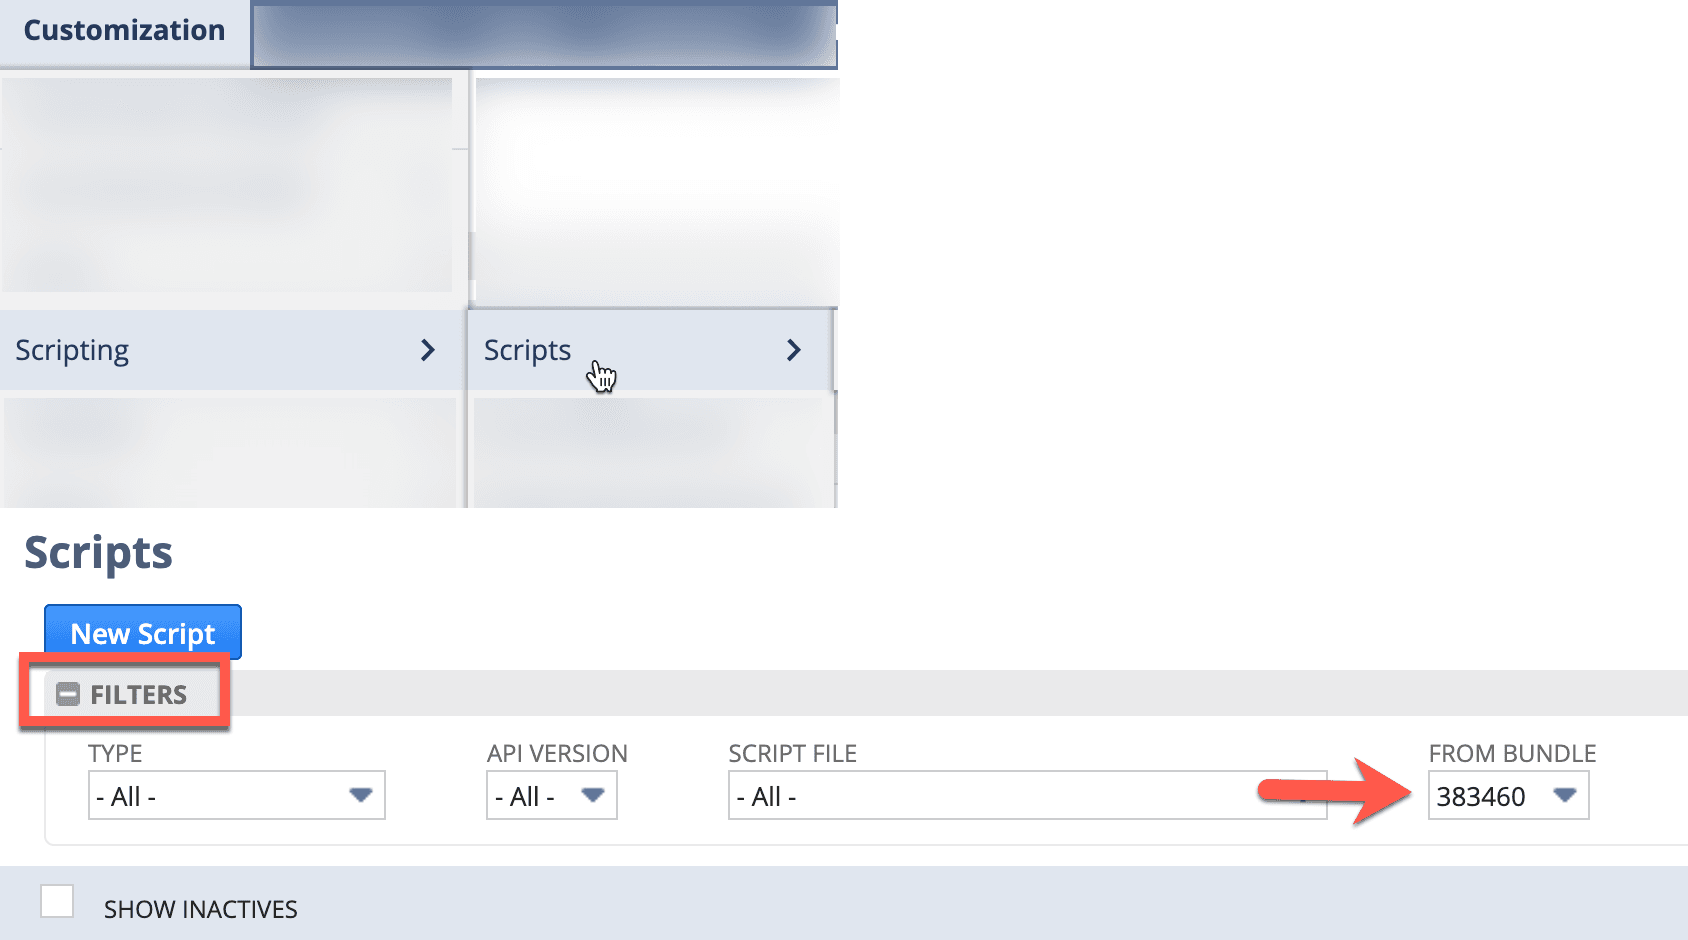
To view all of the scripts that come with the Mailchimp bundle, go to CUSTOMIZATION>SCRIPTING>SCRIPTS, you can search for the Mailchimp scripts by selecting the bundle ID 383460 in the filter tab.
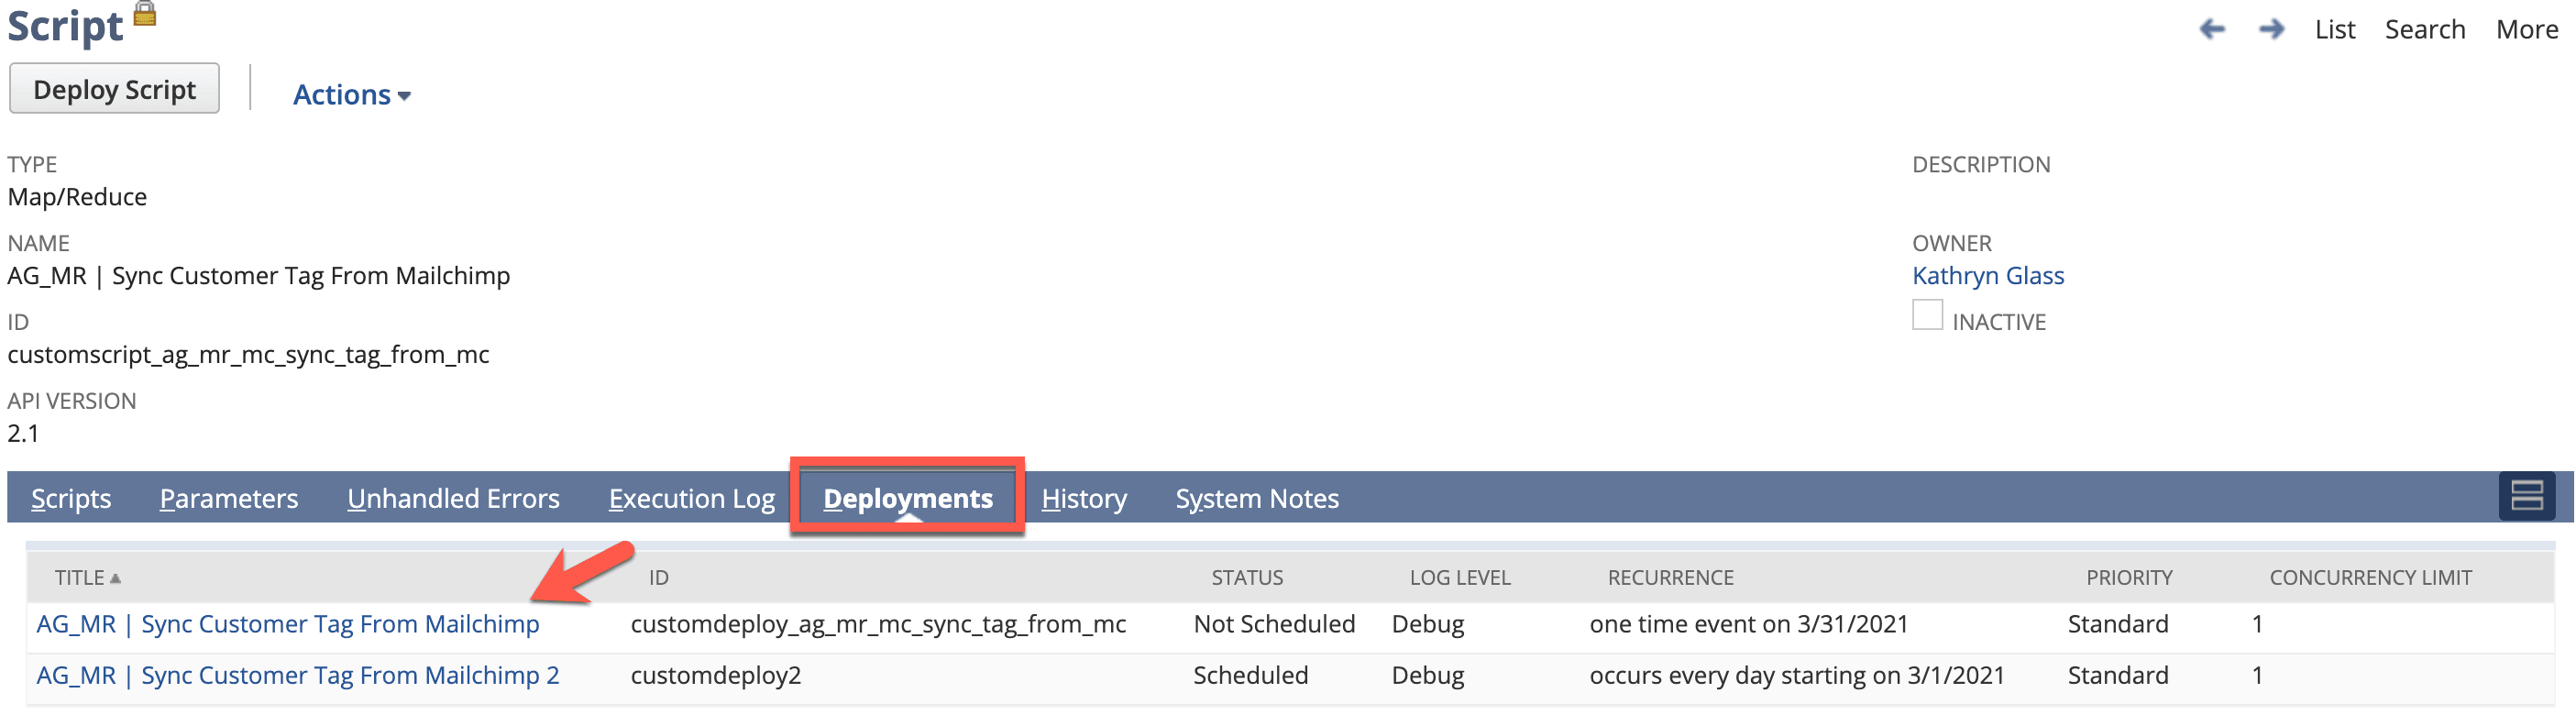
Some scripts can only be deployed manually (see below for instructions on how to manually deploy scripts), other scripts run on a scheduled basis. When viewing a script, select the Deployments subtab, here you will be able to see if the script runs on a scheduled basis by looking at the Status.

Scripts that are scheduled will also have an unscheduled deployment that can be run manually at any time.
Scheduled Scripts
Sync Customer To Mailchimp: This is a scheduled script that syncs all Customers (category), pulled by the associated saved search, from NetSuite to Mailchimp. This script will also update a contacts info in Mailchimp, if a customer in NetSuite has an email that already exists as a contact in Mailchimp, a duplicate will not be created, but the Mailchimp contact information, such as name, tags, groups, etc. will be updated.
Note: The customer sync will send customers to Mailchimp with the subscribe status listed as the default in the configuration unless otherwise specified in the individual's customer record.
Sync Customer From Mailchimp: This is a scheduled script that syncs all of the contacts in Mailchimp into NetSuite when manually deployed. This sync will update customers that already exist in NetSuite AND create a lead for that contact. This script may take a long time to run if there is a large number of contacts being synced from Mailchimp. ****The script will also update groups, tags, and subscription status in NetSuite.****
Sync Cart Abandonment Data: This is a scheduled script that syncs shopping cart abandonment data from NetSuite to Mailchimp. Shopping cart abandonment data can be viewed in the Shopping Cart Abandonment page in NetSuite, however, this page does not display the customers who abandoned their carts. To view these customers, you can either look at the individual customer record under the sub-tab, Sales>Cart Contents, or look at the execution log of the cart abandonment script (covered below). Lastly, if working properly, you will be able to view customers who abandon their carts in Mailchimp cart abandonment email queues (to learn how to view cart abandonment queue see Cart Abandonment Automation below).
Note: Transactional data can only sync to Mailchimp if the parent customer has a Mailchimp ID, thus, transactional data can only sync after the customer has been synced to Mailchimp.
Sync Items to Mailchimp: This is a scheduled script that syncs items, pulled by the associated saved search, from NetSuite to Mailchimp. You can check the Disable Item Sync box on the configuration to disable the scheduled sync, this is not permanent and can be unchecked at any time. Items synced to Mailchimp require a Mailchimp Item Image and Web Store Item URL, these must be added to the item record before the sync is run. Go to Lists>Accounting>Items, select Edit on an item that will be synced, and go to the Mailchimp Integration sub-tab. Select an image and paste a URL in the respective fields.

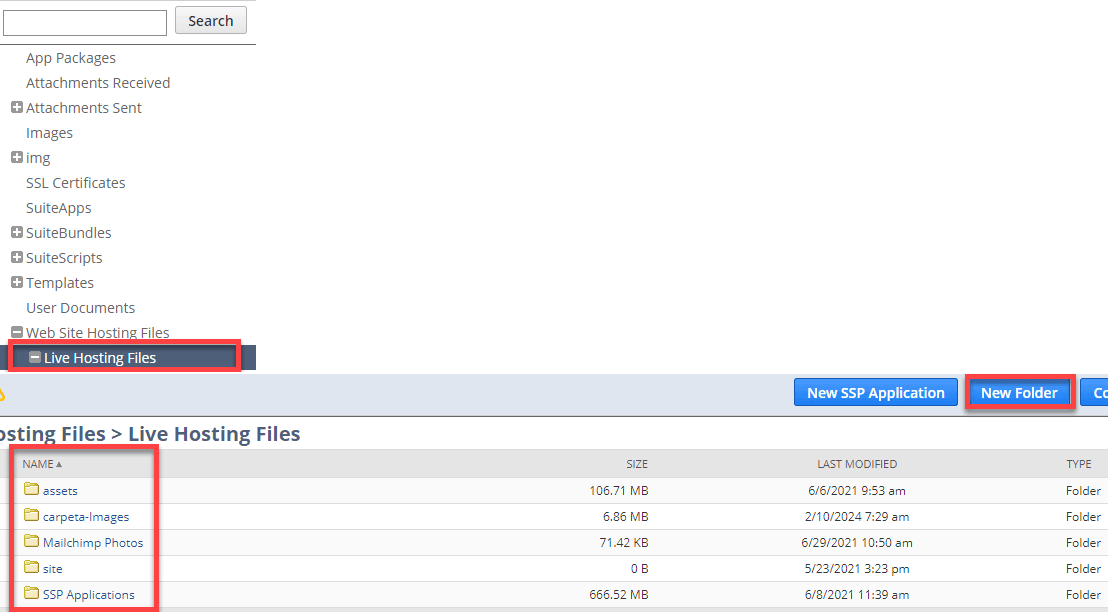
You will most likely need to upload the item image to NetSuite before selecting it on the item record, to do this go to Documents>Files>File Cabinet then Web Site Hosting Files>Live Hosting Files. Select a folder to upload to or create a new one, and upload your photo.
Removing/Editing Products in Mailchimp: There is no way to update items from NetSuite or in Mailchimp, nor is it possible to remove individual items from from Mailchimp. In order to edit or remove items from Mailchimp it is necessary to rerun the Remove MC Products script, edit the items and/or the item saved search and resync the items into Mailchimp.
Sync Orders To Mailchimp: This is a scheduled script that syncs all orders, specified by the associated saved search, from NetSuite to Mailchimp. You can check the Disable Order Sync box on the configuration to disable the scheduled sync, this is not permanent and can be unchecked at any time.
Note: Transactional data can only sync to Mailchimp if the parent customer has a Mailchimp ID, thus, transactional data can only sync after the customer has been synced to Mailchimp.
Sync Customer Tag From Mailchimp: This is a scheduled script that syncs all tags from Mailchimp into NetSuite. If tags are created in Mailchimp that do not exist in NetSuite this script will sync those tags over to NetSuite so that you do not have to create them in Mailchimp and NetSuite. This script will not update tags on specific customers.
Unscheduled Scripts
Remove All MC Products Script: The Remove All MC Products script is an unscheduled script that removes all of the previously synced items from Mailchimp when manually deployed, items can be synced again following this removal. One reason that this script might be used is if there is a problem with the item sync, for example: items do not display images after being synced to Mailchimp. Items that are synced to Mailchimp need to have a Mailchimp Item Image and a Web Store Item URL in NetSuite, these fields can be found on the item record under the Mailchimp Integration sub-tab. Once all the items have these fields filled out, the items can once again be synced to Mailchimp and will display with images.
Sync Customer Group Categories: This is an unscheduled script that syncs the group categories from Mailchimp to NetSuite. Groups created in NetSuite automatically sync to Mailchimp without the deployment of a script.
Sync Customer Group Child: This is an unscheduled script that syncs group child from Mailchimp to NetSuite. Groups created in NetSuite automatically sync to Mailchimp without the deployment of a script.
Note: Scheduled scripts also usually have an unscheduled option that will allow you to run the script manually for more immediate uses or testing purposes.
Manually Deploying Scripts
The Mailchimp integration comes with a number of scripts that can be deployed manually. We will use the example of syncing groups and tags to demonstrate this. You can create tags and groups from within Mailchimp and sync them to NetSuite by manually deploying the Sync Customer Group Categories and the Sync Customer Tag from Mailchimp. To access any of the Mailchimp scripts go to CUSTOMIZATION>SCRIPTING>SCRIPTS, you can search for the Mailchimp scripts by selecting the bundle ID 383460 in the filter tab.
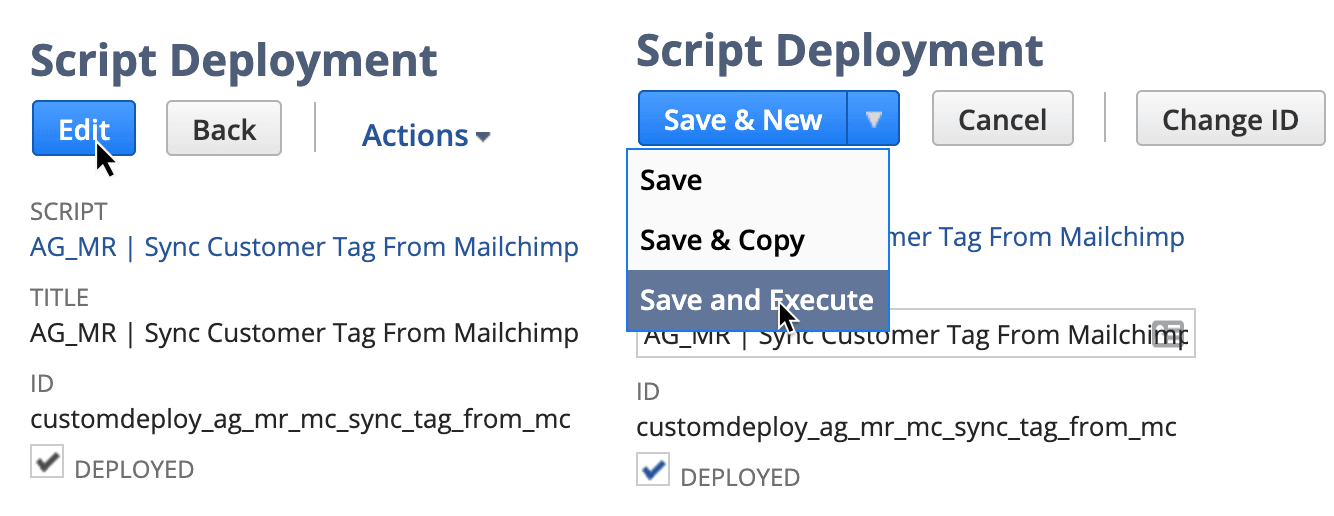
Find the script you wish to deploy and select View. Go to the Deployments sub-tab and select the script that has Status: Not Scheduled, and click on the title of that script. Then click Edit>Save and Execute.
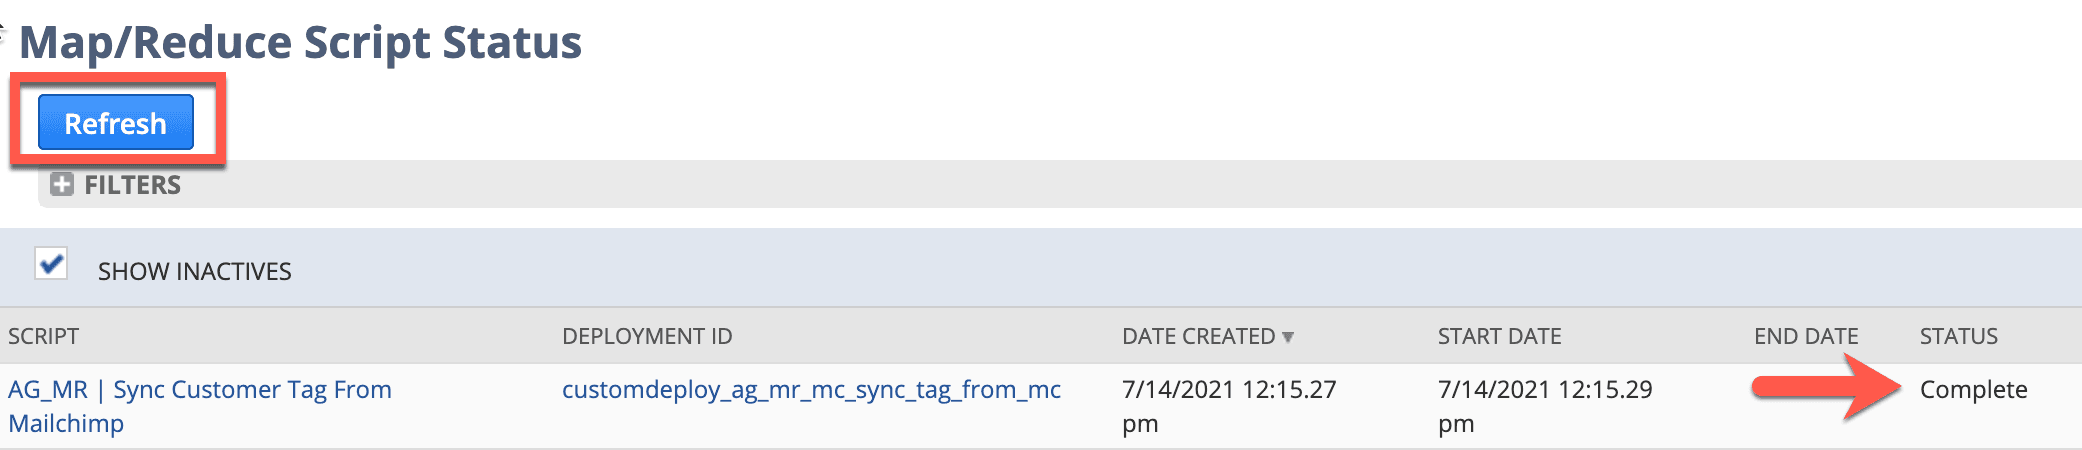
On the script status page, hit Refresh until the Status shows Complete.
You can check the execution log to see validate the script's effectiveness and check Mailchimp for the data that you have synced. We will go over sync validation more in a bit.
Note: If you have multiple configurations you will need to create separate deployments for manually deployed scripts, instructions on how to create a script deployment are in the Multiple Audiences section.
Validating Script Syncs
There are a few ways to confirm that the syncs that are being performed have actually worked. You can check to see if the information is in Mailchimp, however, it is still good to check the execution log for errors.
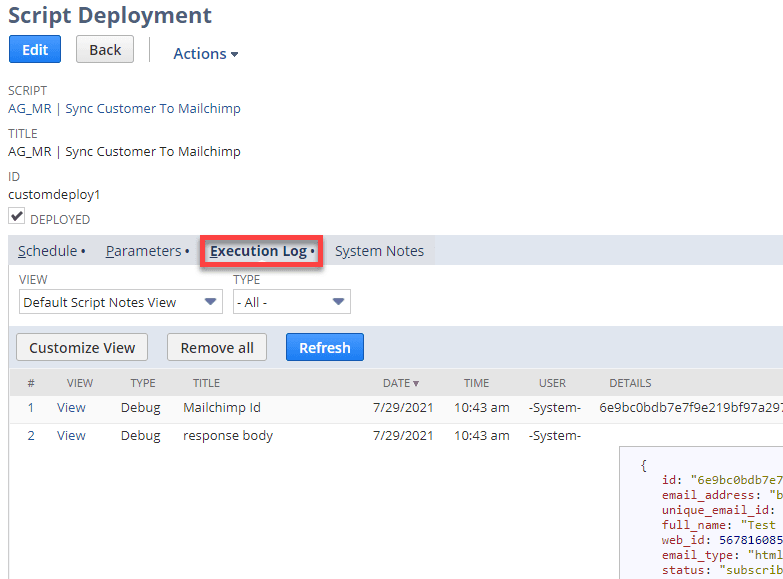
Checking a Script's Execution Log: To check for errors in the script's sync, go to the Mailchimp scripts (described above), select View on the script you wish to check, and go to the Deployments sub-tab. Select the deployment you wish to check, scheduled or not scheduled, and click the Execution Log sub-tab.
Check the log for errors, some scripts will have a note saying something like "Cart abandonment data synced", others will not, if a note like this does not appear that does not mean that the sync did not work, just check for errors and to see if the data that was synced looks like the data you expected.
If you have just manually deployed a script and are on the Script Status page, once the Status shows Complete, click on the Deployment ID and select the Execution Log sub-tab

Checking Mailchimp for Synced Data: There are a couple of ways to confirm that data has made it to Mailchimp from within Mailchimp. This will be done depending on the type of data that was synced.
Reports:
Automations have reports that will tell you things like, the number of emails sent, the number of contacts who have completed the automation, revenue, clicks, orders, recovered carts, and other useful information. You can confirm that your data has synced to a certain extent if you see changes in the reports or queues of automations that coincide with the data you have synced. To view an automation's report, go to automations and click on the name of the automation.
Journey Summaries:
Journeys have journey summaries that tell you the number of contacts that have begun, completed, and are currently in the journey, these contacts can also be viewed in queues. You can check to see if the data has synced by looking to see if new contacts have been added to the journey as planned. To view a journey Summary, go to automations and view the journey map either by clicking on the name of the journey or by clicking View Journey, the summary will be visible on the left side of the journey map.
Products:
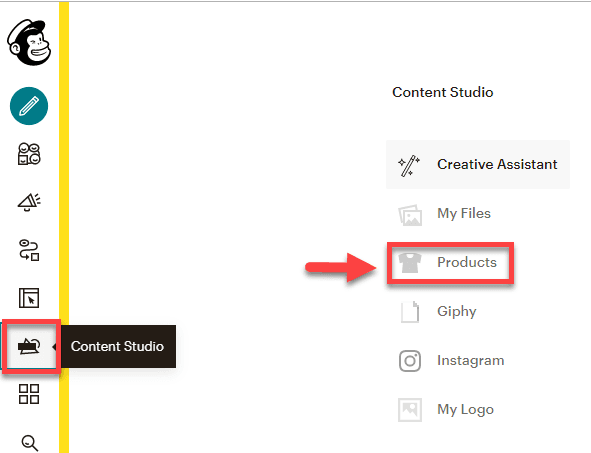
Products will show up in Mailchimp in the Content Studio. Once there, click on Products.
Your items should appear with images, if they do not, they will need to be removed and resynced with a Mailchimp image and web page url (see instructions for the Remove All MC Products) script).
Manage sites:
In the Integrations section, there is an option to click Manage Sites.
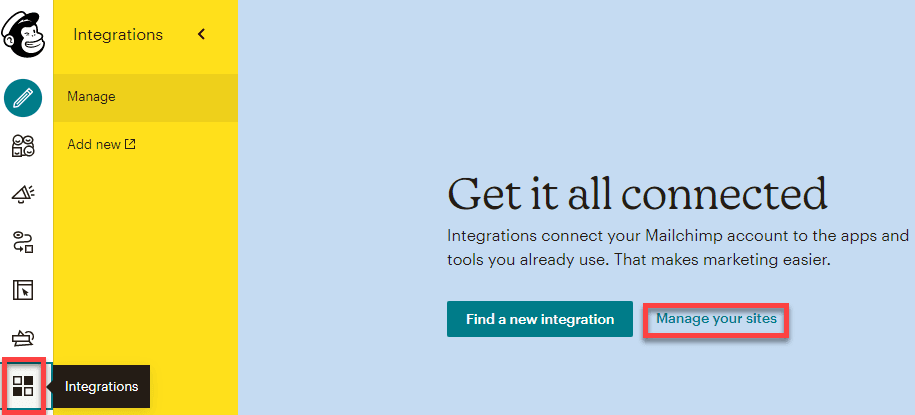
This section may - usually only before the custom site has been integrated - display the number of abandoned carts your store has and the number of orders, this is another place in which certain data syncs can be confirmed.
Setting Up Automations
Shopping Cart Abandonment
One of the most useful functions of this integration is the Shopping Cart Abandonment email series or journey. There are a number of ways to set up cart abandonment emails in Mailchimp, the best practice is to use the cart abandonment automation email series.
Note: Abandoned carts are synced from NetSuite, if there is an update in the cart, NetSuite removes the old cart and sends the new, updated cart. ****how are carts removed if they are purchased while still in the automation****
Shopping Cart Abandonment Automation
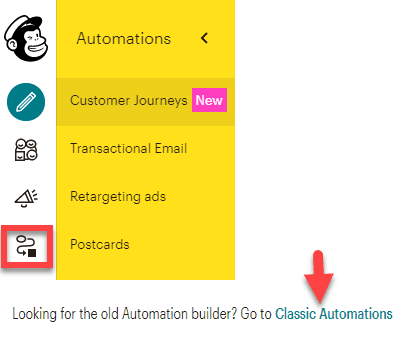
The best way to set up a cart abandonment email is to use the classic automation builder. Go to Automations in Mailchimp and, at the top of the screen, click Classic Automations on the top right of the screen.
Next, select the type of email you want to create, cart abandonment is located in the featured tab and the E-Commerce tab.
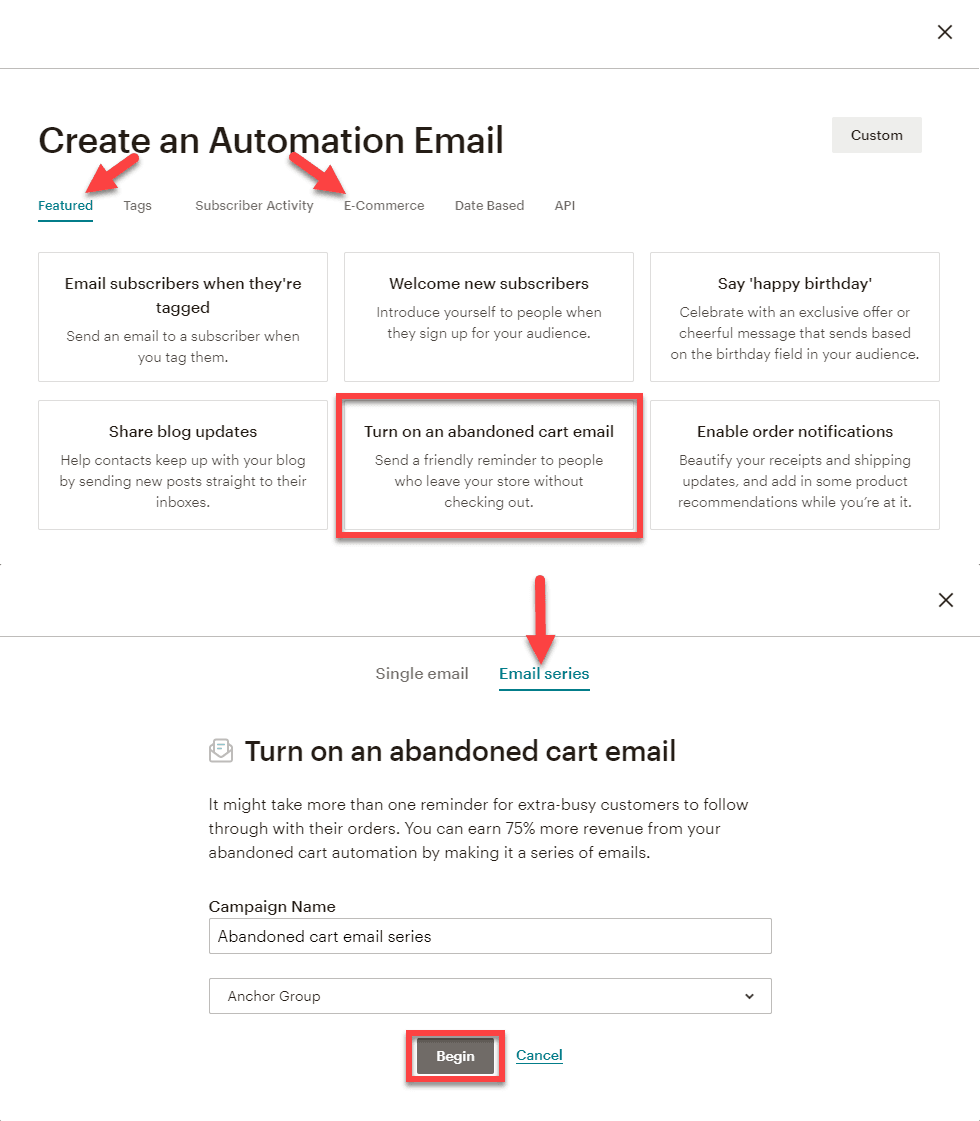
You can then design all three of the default emails and even add additional emails to the automation. You can also edit the schedule, filter, and post send action, as well as the trigger. The trigger will change the time delay between consecutive emails, usually this is something like, 1hr, 1 day, and 3-4days. Design your emails and start sending!
Note: Only subscribers can receive all of the emails from your automations, if a customer is a transactional contact (does not have a visible subscription status) or is unsubscribed and abandons their cart, they will only receive the first email in the series. If their subscription status changes while they are in the automation queue they will be removed from the queue.
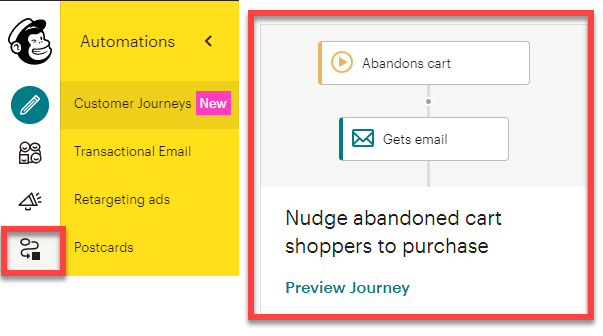
Shopping Cart Abandonment Customer Journey
Another method of utilizing cart abandonment data is through customer journeys. Customer Journeys allow for a bit of extra customization in some ways, but have some serious limitations when compared to the automation as they are not built for e-commerce functions. Journeys resemble NetSuite workflows in their setup much more than automations, you can use conditions to add tags, group, or unsubscribe contacts, there can be multiple branches and paths that contacts can take.
To create a Customer Journey go to Automations>Explore and scroll down until you see the Looking for Inspiration? section. You can create a journey from scratch or you can customize the suggested Nudge Abandoned Cart Shoppers to Purchase map, or any other suggested journey map.
Set up your journey path, the suggested journey will already have the trigger set up, so the bare minimum is setting up the emails and the time delays between them. For cart abandonment, there is not much more that is needed than that. When you have completed your journey map, click Turn On at the top right of the screen.
Note: For e-commerce emails like cart abandonment or order notifications, automations are by far the best choice. While journeys allow for some useful customizations with regard to the paths a customer can take, they lack a number of important elements. Automations have reports that allow you to see crucial e-commerce data and can use cart details in all emails. Journeys can only use cart details in the first email of the series and only has a journey summary that tells you the number of contacts who have completed or are completing the journey, they are simply not designed for e-commerce data.
Another Way to Create Cart Abandonment Automations
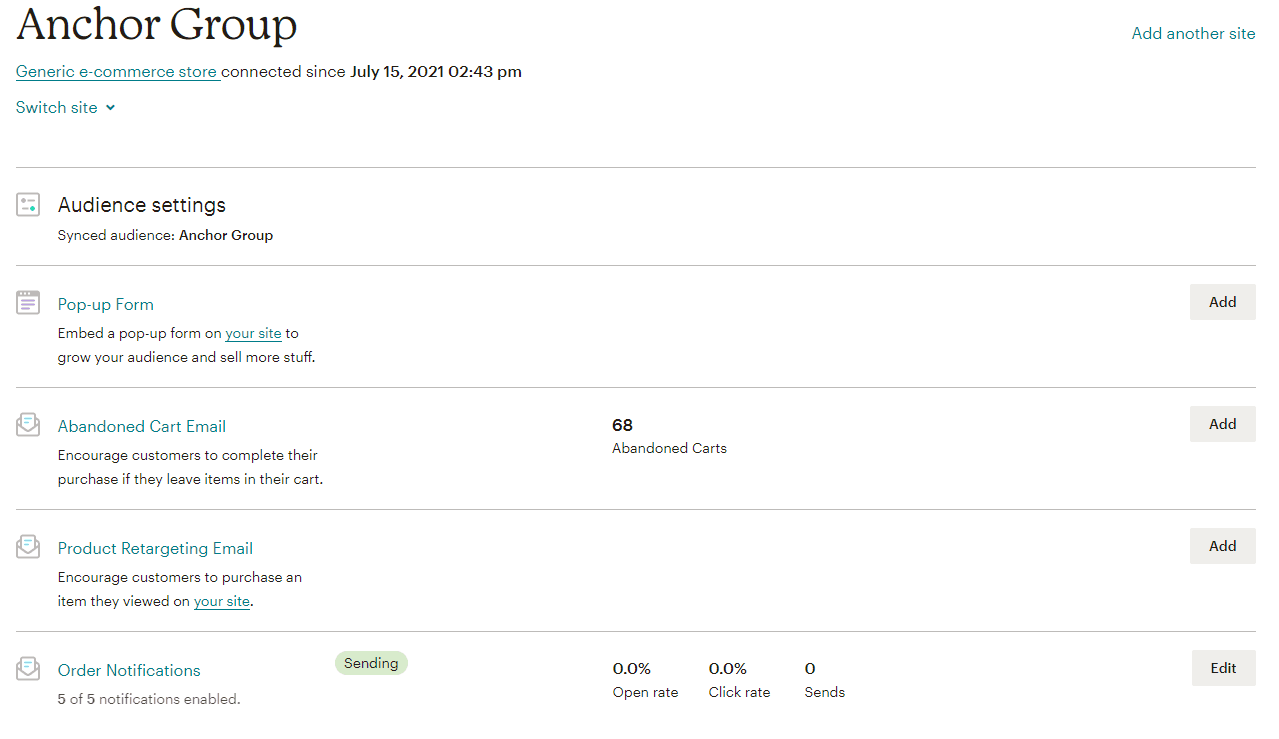
Another way to create a cart abandonment automation is through the integrations page, this may also be the first way that people encounter when exploring their new Mailchimp Account. In the integrations tab under manage sites, Mailchimp will often have a section that lists the number of abandoned carts that your site currently has and prompts you to set up a cart abandonment email through that section. The rest of the automation building is the same as above.
If you chose this method, the section that had previously shown your number of abandoned carts (potentially a nice thing to have access to) will be replaced with the report of the automation you just set up. Another drawback is that if you have added the Mailchimp coding to the head of your website, the section that lists abandoned cart numbers and suggests the automation may disappear altogether.
Viewing Queues
For automations:
Go to your automations, find the automation whose queue you wish to view, and select Edit. Then find the email whose queue you wish to view and select View Queue, you will then be able to view all contacts who have abandoned their carts and are scheduled to receive a cart abandonment email.
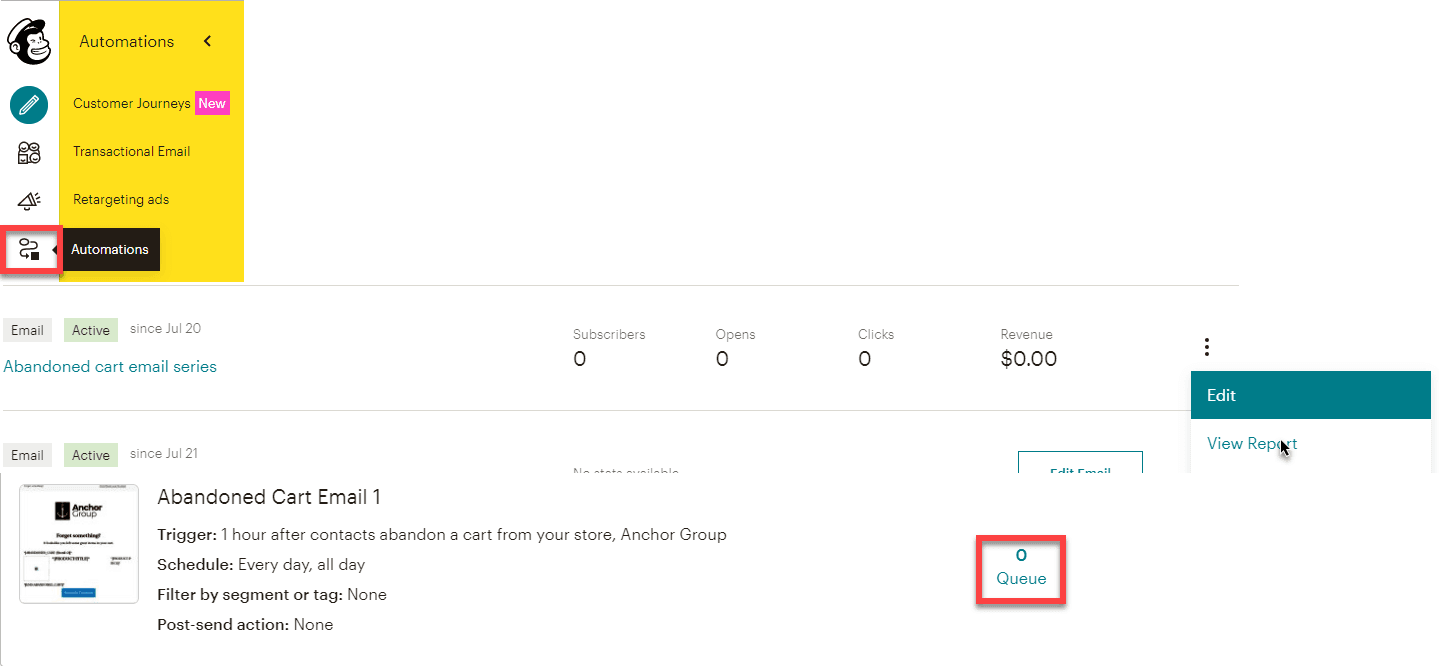
Note: When you have clicked edit, after a short amount of time the View Queue option may change to Queue with the number of contacts in the queue listed (shown above) you can still click on this to view the contacts in that queue.
For Journeys:
Go to your automations, find the journey whose queue you wish to view click on it or select View Journey. On the journey map, click the three-dots icon next to the stage in the journey whose queue you wish to view, then click View Contact Queue.

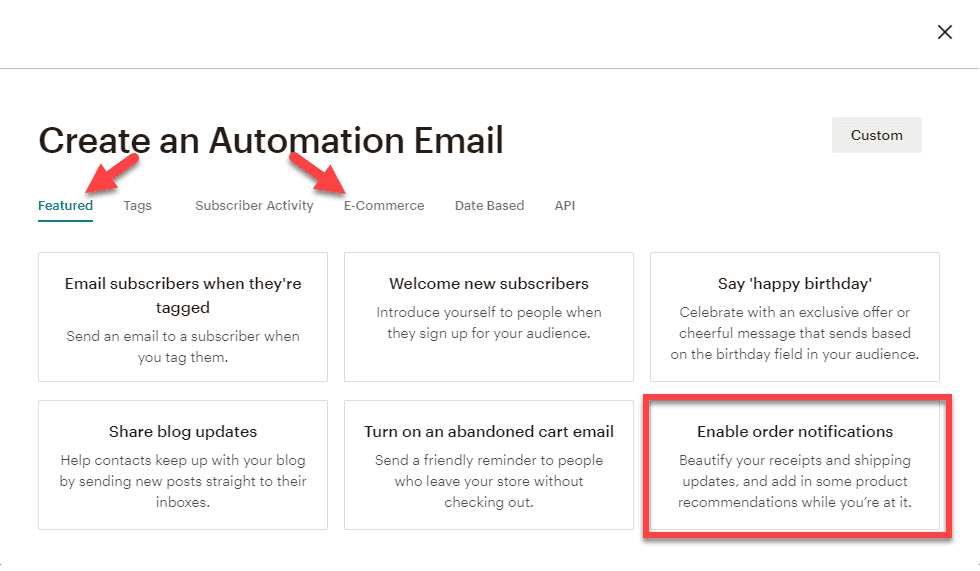
Order Notifications
You can create an order notification in a number of ways as well, it can be done as a journey or as an automation. The best practice is to set order notifications up using the automations, again, journeys were not made for e-commerce. This automation allows for a number of customizations that are very easy to access. Go to the automation builder in the same way as described for the cart abandonment automation. Once the automation builder has popped up, under the Featured or E-Commerce tabs, select Enable Order Notifications.
Customize your email and start sending. Once you have started sending you can click Edit on your automation and turn on different order notification emails, there are a lot of options and not all of them need to be turned on, but they can be.
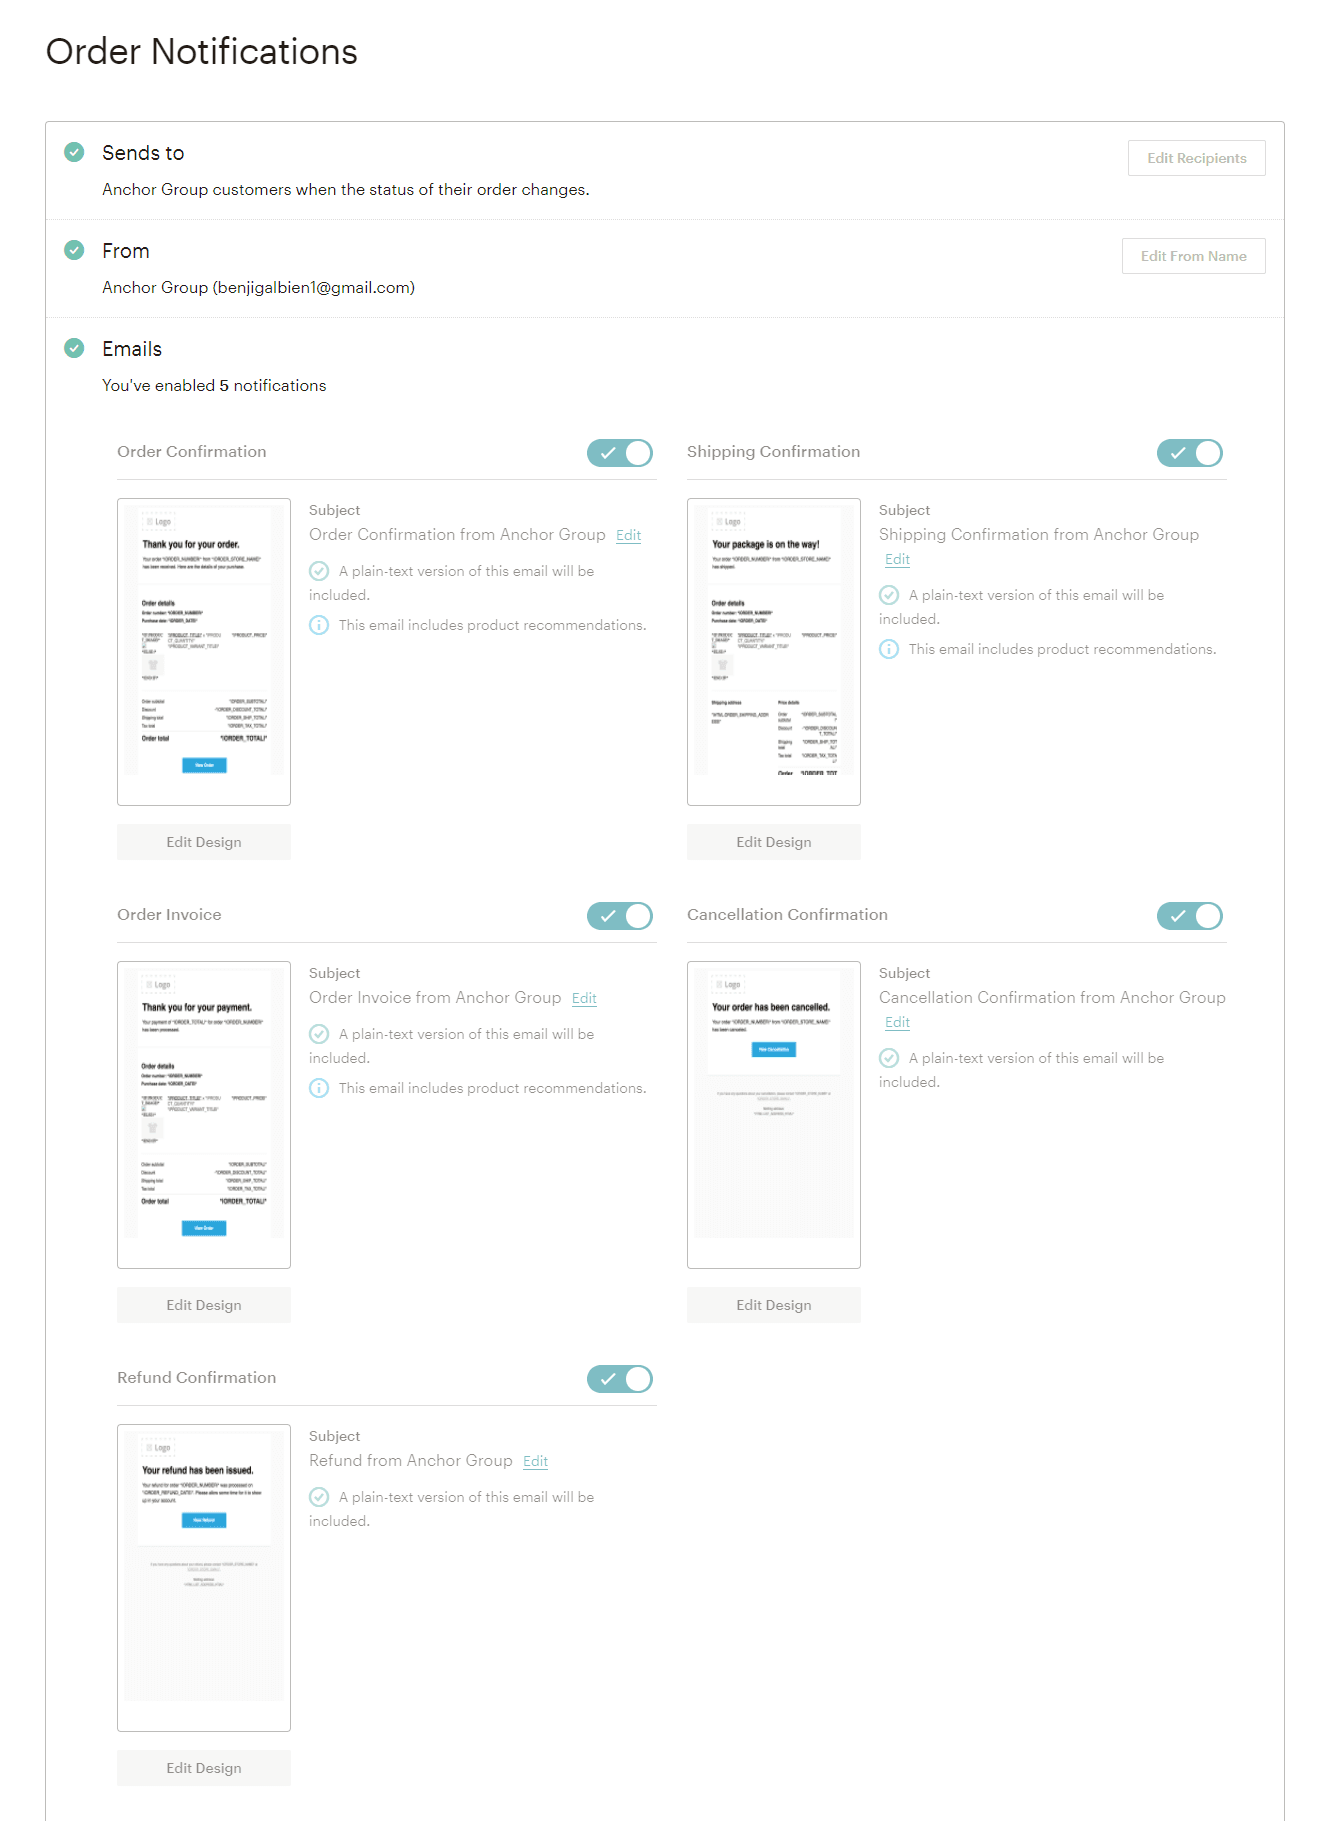
Note: If you desire to continue using NetSuite's order confirmation emails then do not set up order notifications in Mailchimp. Not setting up order notifications will not prevent any other functions from running in Mailchimp such as product recommendations, so long as the correct data is being synced to Mailchimp.
Product Recommendations
Product recommendations can be set up with a wide variety of triggers, one way to use them is to reengage customers who have recently made a purchase, or maybe to reach out to inactive customers, or even based on another campaign that is running.
To create a product recommendation email, go to the automation builder as described above and under the E-Commerce tab select Follow Up on Purchases. Here, you can choose a variety of methods for suggesting products, you can suggest products if a certain product is purchased, this might be good for items that come with accessories or items that belong to a specific category of products. The most general option is to recommend products if any product is purchased.
When customizing the email, if you click on the spot for the recommended products you will see a number of recommendation settings.
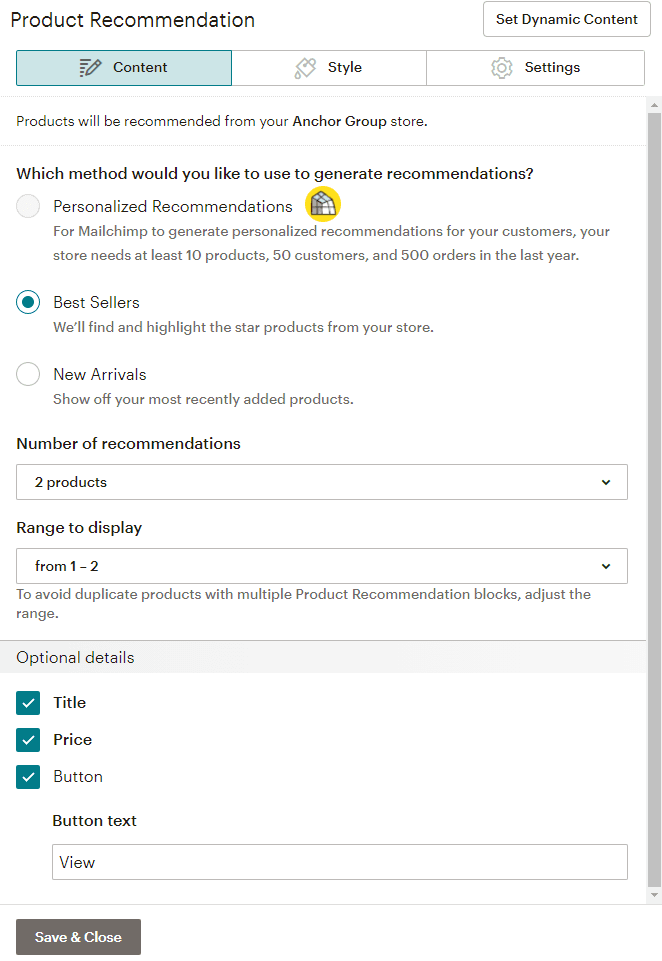
Here you can select which product details are visible in your email as well as how they are laid out, the number shown, etc. You can also specify how you want your products recommended, either by new arrival (which could be useful for a campaign relating to such a thing), best sellers, or by personalized recommendations. Personalized recommendations will probably be the best one for any company that meets the requirements to use it if the recommendation is based on the purchase of any product. You can also use the Set Dynamic Content button at the top of the screen to create filters and further filter your automation.
Note: You can add product recommendations to any kind of email by adding a product recommendation block to the email.
Campaigns
Campaigns can be used for a wide variety of things. When you go to create a campaign you can send an email, create a customer journey, use a template, create a survey or an ad. To create a campaign, go to Campaigns and click Create Campaign at the top right of the screen. Select the kind of campaign you wish to create and customize your campaign. Campaigns are useful for scheduled single emails that contain things like promotional materials or holiday sales.
Creating Multiple Mailchimp Audiences
If you are creating multiple audiences in Mailchimp, perhaps you have more than one subsidiary that you want to have separate audiences for. Usually, if you have a new store that you want added to Mailchimp it is best to sync a separate audience to that store, even if the contacts are the same, this prevents e-commerce data overlap and confusion within Mailchimp. You will need to create a new configuration for each store you integrate and connect a new audience to that configuration, do not use the same audience for multiple configuration records.
Note: Currently, Anchor Group does not support more than one configuration at a time, until further notice, please connect only one Mailchimp audience to NetSuite.
Before Saving Your New Configuration
Create new Configuration for a Second Audience
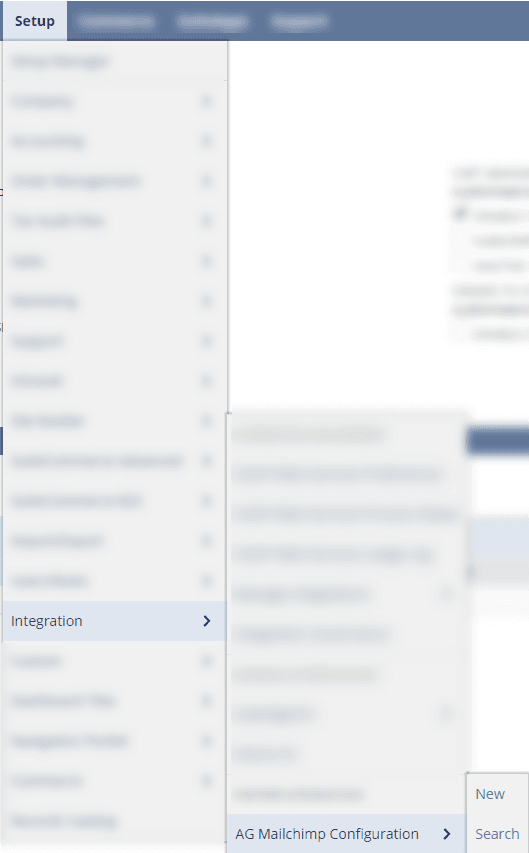
To create a new Mailchimp configuration, go to Setup>Integration>AG Mailchimp Configuration>New.
You will then need to create a new audience in Mailchimp and find the Audience ID and create a new API Key.
Create New Audience
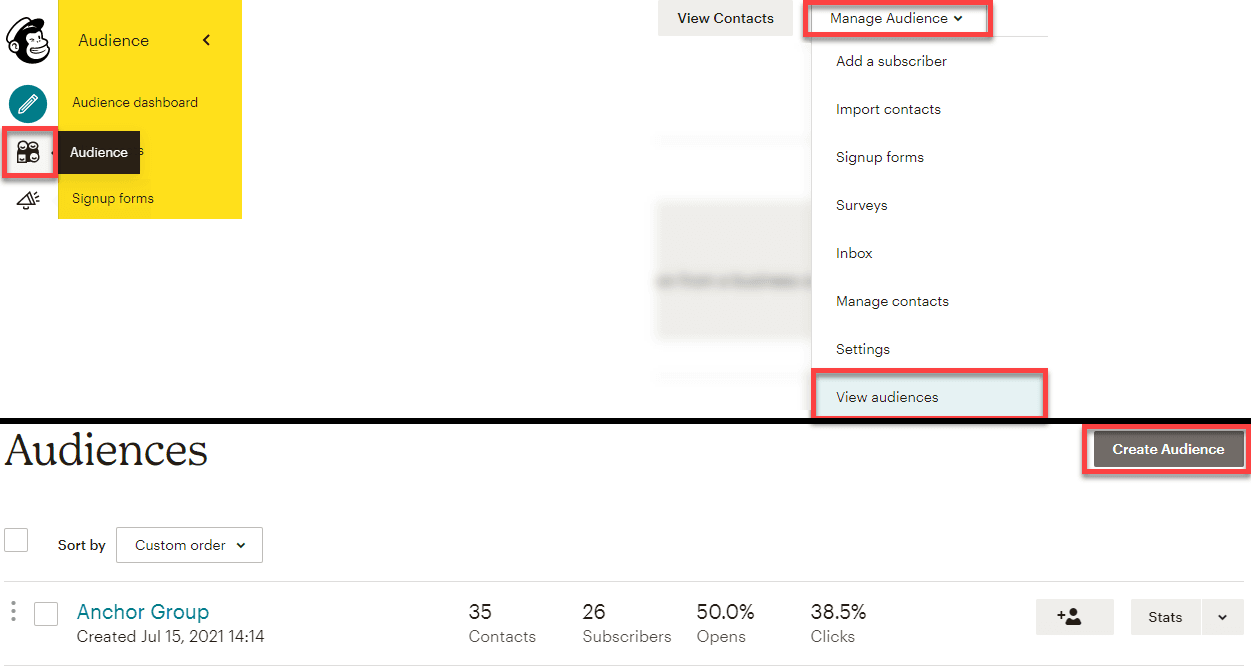
Before saving your new store's configuration, create a new audience in Mailchimp by going to Audience>Manage Audience>View Audience>Create Audience:
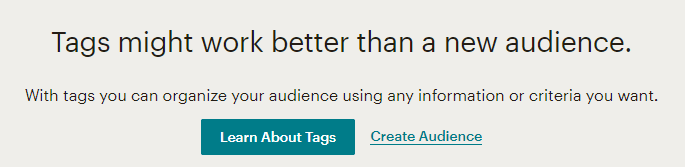
A popup may appear suggesting tags instead of a new audience, click on Create Audience.
Fill out the Audience Details page and click save. You can then find the Audience ID for your new configuration in the same way that you found the ID for your first Audience (see instructions in the Integration Installation Guide).
Create New API Key
You will need to create a new API Key for the new configuration as well, best practice is to label all of your API Keys. Do this in the same way you created your first key (see instructions in the Integration Installation Guide).
Finishing the Configuration
Select your default subscriber status, name your store and create a Web Store ID.
Note: Ensure that the Web Store ID does not contain any spaces.
Enter the Web Store URL (not required) but do not check the Store Already Created box. You can enter custom saved searches into the configuration as long as the results are the same as the default search results from the bundle, double-check to ensure that they are correct. Select Save and you have integrated your second audience to NetSuite.
You will also need to create new tags and groups for each new audience, you can either create them in Mailchimp and sync them to NetSuite but the best practice is to create them on the bottom of the configuration and they will automatically sync to Mailchimp. You will also need to add Set Default Customer/Lead Values for this new audience as well. We have the Record Type set to Customer, the Field ID to leadsource, and the Default Value to Web. This means that every Customer that comes over from Mailchimp will have the leadsource field automatically populated with the value Web.
Switching between Audiences and Stores
View Audiences
To view your audiences use the instructions above for creating a new audience, go to Audience>Manage Audience>View Audiences. Here you can view all of your audiences, see a few quick facts about those audiences, and select any of them to view more closely.
Switching Between Stores
Another way to view your audiences is to switch between stores. Go to Integrations>Manage Sites, here you can view which store you are currently viewing, which audience that store is connected to and change the audience that your store is connected to(it is not recommended that you change the connected audience). Here, you can also switch between stores.
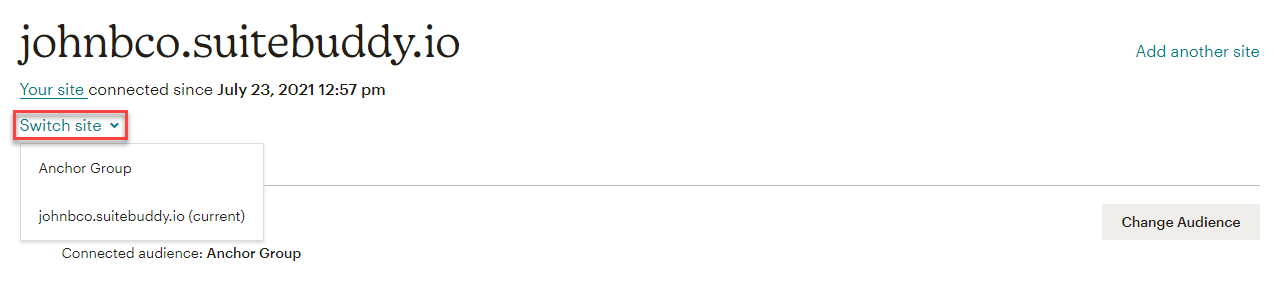
If you go to Audience in Mailchimp, the audience you see will be the audience connected to the store that you are currently using. If you switch stores then, and click Audience, you will see the audience connected to the store that you clicked on. So you can either use the View Audiences option or simply switch between stores.
Note: Automations are visible no matter what store you are viewing but will only send to the audience and store that was specified on the creation of that automation, journey or campaign.
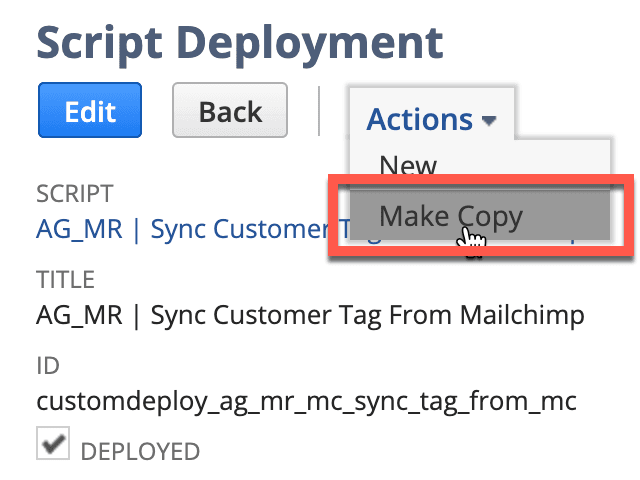
Script Deployments and Parameters
The scripts that come in the bundle apply specifically to the first configuration that is created, so if you have multiple configurations you will need to create new script deployments that apply to those other configurations. When you go to deploy the script (to find the scripts, see Mailchimp Scripts, above), go to the sub-tab Deployments and select the deployment that has a status of Not Scheduled. Then go to the Actions drop-down and select Make a Copy.
Click the sub-tab Parameters and in the Configuration field enter the internal ID of the configuration to which you want the script to apply. The configuration's internal ID can be found on the page AG Mailchimp Configuration. The internal ID for your first configuration will be 1, and your second will be 2, etc..
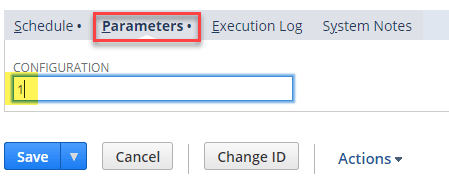
Once you have entered the Internal ID, click Save and Execute and refresh the script status page until the status shows Complete.
Note: You will need to complete this process for scheduled and unscheduled scripts.
Tagged with Solutions, Training, Troubleshooting