SuiteCommerce Website Setup Record Showing Warning About Addresses Not Digitally Signed
When modifying the email settings within a SuiteCommerce website setup record to specify an email address that various order emails come from, a warning appears at the top of the screen saying “one or more addresses are not digitally signed and will be rewritten…” with a link to a help center topic and reference to DomainKeys Identified Mail (DKIM).
- Date
- April 6, 2026
- Read
- 4 min


What is it?
If you click on the help center link, you get a fair amount of detail about what this is, how it works, and why it’s needed.
Simply explained: any email being sent out of NetSuite needs to be considered authenticated so the person receiving the email’s email platform will not consider it spam.
What needs to be done?
The steps that you need to take are outlined nicely in the help center, but require you to jump between multiple help center articles. Below are all the steps you should take.
- Enter email domains in NetSuite.
- Go to Setup > Company > Email > Email Preferences
- Click on the “Email Domains (DKIM)” subtab
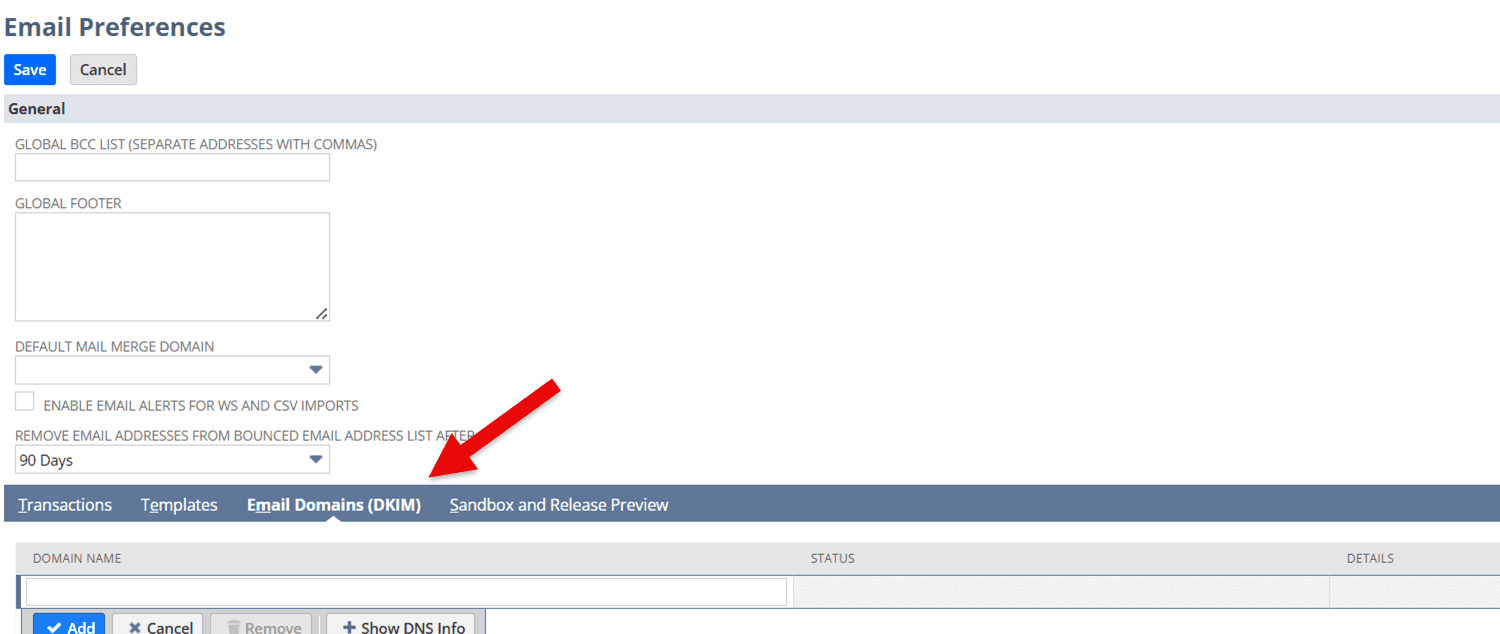
- In the “domain name” field, enter the domain (or subdomain name) you are using to send an email from NetSuite
- Click save.
- Review the value displayed in the “Status” column for the domain.
- Statuses are & mean:
- Pending verification = the DNS records you added to your domain provider are being verified.
- Requires action = you have a saved domain in the subtab, but your DNS records require attention.
- Ready = the email domain is verified, and email messages from NetSuite are authenticated.
- Statuses are & mean:
- Set up 2 CNAME records in DNS for each email domain
- Go to your domain provider and log in.
- Start the process to add a DNS record of type CNAME
- Copy the information needed from NetSuite and paste it into the record you are adding with your domain provider.
- To find the information needed to copy, do the following:
- Go to Setup > Company > Email > Email Preferences
- Click the “Email Domain (DKIM)” subtab
- Click the domain name you are adding the DNS record for
- Click the “Show DNS Info” button
- Copy the information in the first row of the pop-up for the first DNS CNAME record
- Repeat the process for the second row of the pop-up for the second DNS CNAME record
- To find the information needed to copy, do the following:
- Save the CNAME record(s)
- Check the status column of the email domain in the “Email Domain (DKIM)" subtab of email preferences to make sure the status is “ready” and there are no messages.
Pro Tip: CNAME records can sometimes take a while to propagate through the internet. If the status does not update immediately, try again after an hour or more.
Possible Issues / CNAMEs for Existing Email Domains
After completing the above steps, you may see a message in the “details” column of the Email Domains (DKIM) subtab. Two common messages are:
- Please ensure that DNS records are correctly configured.
- This email domain is currently configured with a TXT record in DNS. Do not delete the TXT record, but please create additional CNAME records for this domain with your domain provider
The cause of these messages is different, but the solution should be the same. To resolve, do the following:
- Go to Setup > Company > Email > Email Preferences
- Click the “Email Domains (DKIM)” subtab
- Click the row of the domain that has the message in the details column.
- Click “Show DNS Info” to display the information needed for the CNAME records.
- Use the information displayed in the pop-up to add 2 CNAME records in your domain provider.
Got stuck on a step in this article?
We like to update our blogs and articles to make sure they help resolve any troubleshooting difficulties you are having. Sometimes, there is a related feature to enable or a field to fill out that we miss during the instructions. If this article didn't resolve the issue, please use the chat and let us know so that we can update this article.
Oracle NetSuite Alliance Partner & Commerce Partner
If you have general questions about SuiteCommerce or more specific questions about how our team can support your business as you implement NetSuite or SuiteCommerce, feel free to contact us anytime. Anchor Group is a certified Oracle NetSuite Alliance Partner and Commerce Partner equipped to handle all kinds of NetSuite and SuiteCommerce projects, large or small.
![]()
Tagged with Troubleshooting