This article provides instructions and clarity around setting up the OAuth 2.0 flow for integrations into NetSuite and seeks to provide the steps in a logical and easily repeatable manner.
Set Up a Web Services/Integration Role
Step 1: Create the role at Setup > Users/Roles > Manage Roles > New.
Step 2: Give the following permissions at a minimum:
Reports
- SuiteAnalytics Workbook
Setup
- Log in using Access Tokens
- Rest Web Services
- Records Catalog
- SuiteAnalytics Connect
- Log in Using OAuth 2.0 Tokens
Step 3: Give any other required permissions per the demands of integration.
Step 4: Assign the role to the user account associated with the integration.
Create an Integration Record in NetSuite
Step 1: Setup > Integration > Manage Integration > New

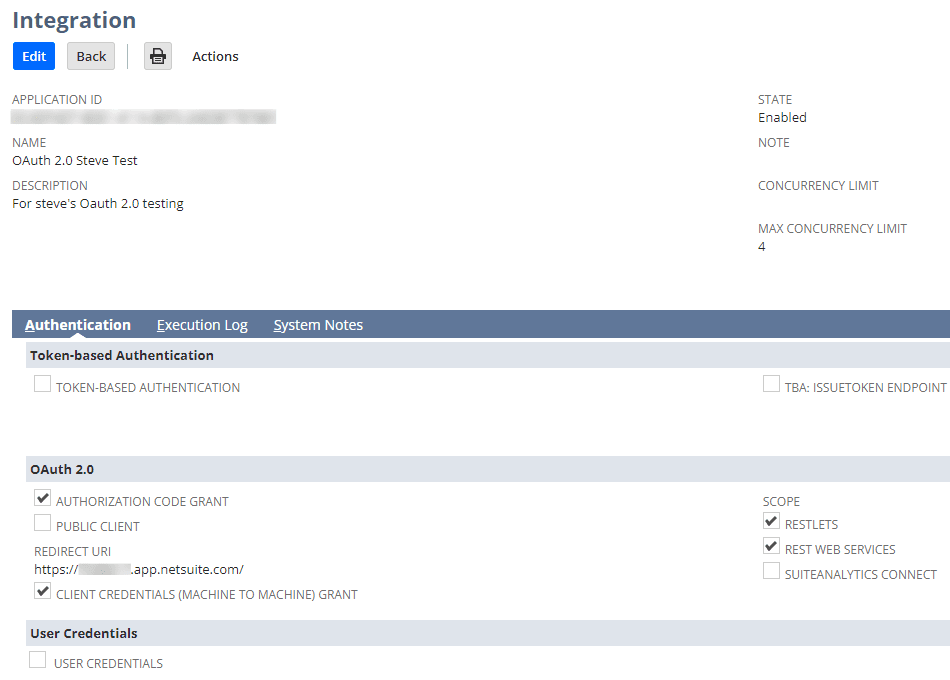
Step 2: You will want to check the following
- Authorization Code Grant
- Client Credentials (Machine to Machine) Grant
- RESTLets and Rest Web Services as appropriate
Step 3: Provide a redirect URL (the NS account URL works)
Step 4: After saving, store the client ID and secret (you’ll need the ID later)
Generate a Key Pair
Step 1: You can use openssl or an equivalent tool for generating said keypair. The command that NetSuite provides is openssl req -new -x509 -newkey ec -pkeyopt ec_paramgen_curve:prime256v1 -nodes -days 365 -out public.pem -keyout private.pem
Step 2: Note the expiration of 365 days. You can expand this to a maximum of 2 years.
Create a Mapping for the Client Credentials Flow
Step 1: Go to Setup > Integration > Manage Authentication > OAuth 2.0 Client Credentials (M2M) Setup
Step 2: Create new mapping, choosing the entity, role, and application to be mapped (user, role, and integrations from above). You will then upload the public.pem file created in step 4
At this point you have everything you need to ping the token endpoint for the bearer token needed to successfully send RWS/RESTlet requests.
POST to the Token Endpoint
The URL for the token endpoint is https://<accountID>.suitetalk.api.netsuite.com/services/rest/auth/oauth2/v1/token
Encode headers in application/x-www-form-urlendcoded
The three parameters for this endpoint are:
- grant_type: client_credentials
- client_assertion_type: urn:ietf:params:oauth:client-assertion-type:jwt-bearer
- client_assertion: <JWT token>
More Details on client_assertion: <JWT token>
This must be done programmatically. JWT.IO can be used or another library. For details on generating this within NetSuite, contact our team!
The header includes:
{
  "alg": "ES256",
  "typ": "JWT",
  "kid": "<certificate id="">"
}</certificate>
Where kid is the certificate ID generated in the mapping.
The body includes:
{
    "iss": "<client id="">",
    "scope": "restlets",
    "aud": "https://<accountid>.suitetalk.api.netsuite.com/services/rest/auth/oauth2/v1/token",
    "exp": 1714071326,
    "iat": 1714068326
}</accountid></client>
Where iss is the client ID from you generated above, iat is the time in seconds since Jan 1 1970 and the exp is less than 60 minutes from iat.
You will also need the private and public keys.
Final Notes on this Setup
- The response will include a bearer token that can be used as Authentication for the Restlets and Rest Web Services.
- Remember that the key pair generated in step 4 must be regenerated and re-added every 2 years.
Related Article: Add Addresses in SuiteCommerce 2.x | SuiteScript
Got stuck on a step in this article?
We like to update our blogs and articles to make sure they help resolve any troubleshooting difficulties you are having. Sometimes, there is a related feature to enable or a field to fill out that we miss during the instructions. If this article didn't resolve the issue, please use the chat and let us know so that we can update this article!
