Intro to NetSuite Advanced PDF Source Code Mode
Discover the power of editing Advanced PDF/HTML Templates using the Source Code mode.
- Date
- August 13, 2025
- Read
- 8 min

NetSuite Tutorial | Advanced PDF/HTML Templates | Source Code
This blog will cover using Source Code mode to make and edit Advanced PDF/HTML Templates.
Switching from WYSIWYG Mode to Source Code Mode
To start, we will need to open a template in Source Code mode.
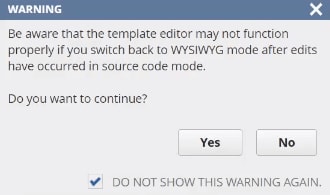
Warning: Transitioning from Source Code mode to WYSIWYG mode can cause formatting issues in your template. So, if you don't know much about coding, but you want to take advantage of some of the benefits exclusive to the Source Code mode, make most of your edits in WYSIWYG mode and then transition into Source Code mode.
To open a template in Source Code mode, use the toggle button to switch from WYSIWYG mode to Source Code mode.
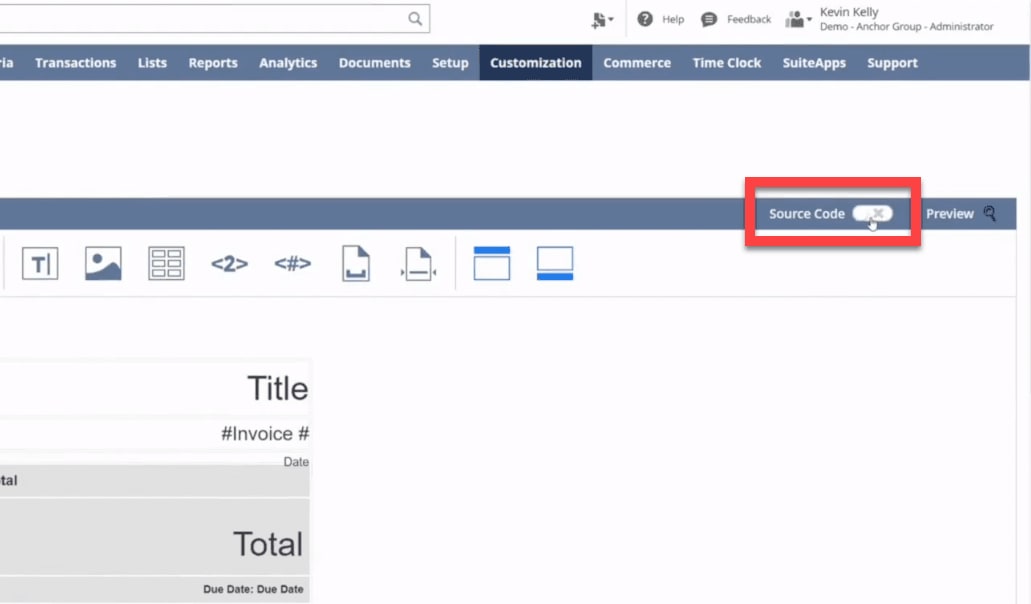
When toggling to Source Code mode, an alert pop-up will show. This is to inform you about the formatting issue that we discussed above.
Formatting the Source Code
Before we start editing the code, we want to use a code formatter to reformat the code for the sake of readability. A convenient option is Pretty Diff, though Visual Studio Code is a better option if you have access to it and/or have the time to download it and learn how to use it.
First, select all the code text and copy it. Next, open up Pretty Diff or whichever code formatter you prefer. Inside Pretty Diff, paste your code in the left-side text field.

Then, select the Beautify button in the upper left-hand corner of the screen.

Then click the Execute button below the text boxes.

In the right-hand side text box, you will find your reformatted code. Copy this code, return to your Source Code interface in NetSuite, and paste it in.
The one con of using Pretty Diff is that it can throw some of the code off, but we will go over how to fix that next.
Troubleshooting Errors
From time to time, you may encounter errors in your template that you want to debug. For example, when we use Pretty Diff's formatter, it can sometimes remove spaces in our code that we want to keep. So when we click preview or save, an error alert will pop up, like in this example:
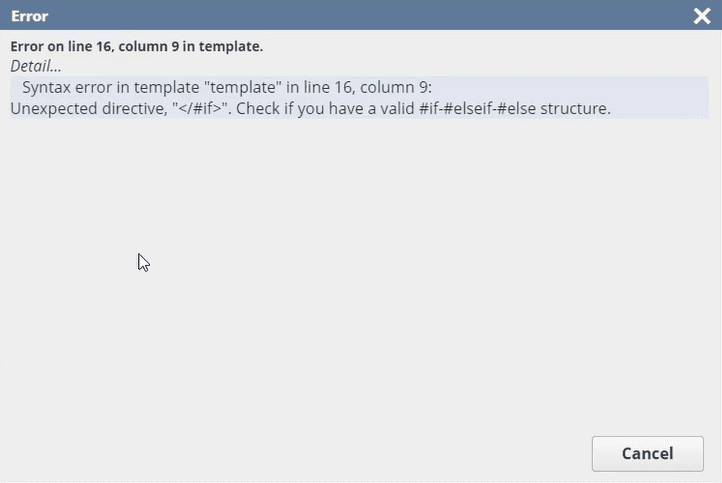
For this scenario, we want to review the template, looking for instances where the spaces we want in the template have been removed by the Pretty Diff formatter. The best way to do this is to do a search. For this scenario, we will do 4 word searches, one for "if", one for "esleif", one for "item", and one for "list." These four words will be tied to the code that has the spacing error. To start a search hit the F3 button or Ctrl+F/Command+F, then type in the word you want to search for on the page.
Be sure to open any closed tabs of code...
Closed tab:

Open tab:

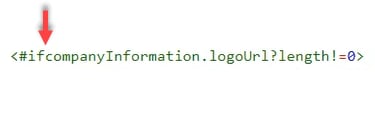
In the examples below, we want to put a space after every "if", "elseif", and "list":
In the example below, we want to put a space after "list", the first instance of "item", and a space after "as":
Great, you just debugged your template's code. This experience will serve you well when you run into template code bugs/errors in the future.
Coding Text Overview
Two of the most important things in the Source Code mode are HTML and CSS.
- HTML (Hyper Text Markup Language) is a standard markup language for documents designed to be displayed in a web browser.
- CSS (Cascading Style Sheets) is a styling language used for designing the presentation of a document written in a markup language such as HTML.
HTML & BFO
As we begin to edit the template code, you're going to notice a lot of tags, such a header tag (<head>). Tags denote data contained within a particular section of the template. The <head> tag denotes a section of data that is contained within the template's header. In Advanced PDF/HTML Templates, there are both HTML tags and BFO (Big Faceless Organization) tags, and they function very similarly.
Want to learn more about BFO? Check out this BFO User Guide.
CSS: Cascading Style Sheets
The CSS of the template is found within the <style> tag. Tags like <th> (table header) or <td> (table data) will be used throughout the source code document, and they can refer back to the CSS section for their styling.
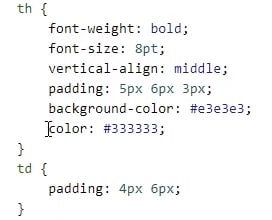
You can edit pretty much any part of the styling that you'd like; for example, in the <th> styling (see image above), you can edit the font weight, font size, vertical alignment, padding, background color, and color. There are numerous styling options available besides the ones mentioned here.
Check out this full CSS Reference list from W3 Schools for a complete list of options.
Inline Styling
Furthermore, inline styling (see image below) can be used.

With inline styling, you can add styling directly to a specific line of code without making changes to the main style section, as changing the main style section could affect other parts of the code that are referring to it.
FreeMarker
Next, we will cover FreeMarker elements in the template. Below is an example.

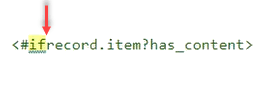
Lets break down this expression. "record" refers to the record that this template is being printed from. "billaddress" is a field ID that has some value within it. "@label" references the label that is on the field in the record. Refer to the images below for visual guidance.

On a given record, you can click on the field label to display the Field Help, which has the Copy Field Id button that you can use to view the Field Id.

Expressions like this are typically paired together in sequential <tr> (table row) tags (see image below).
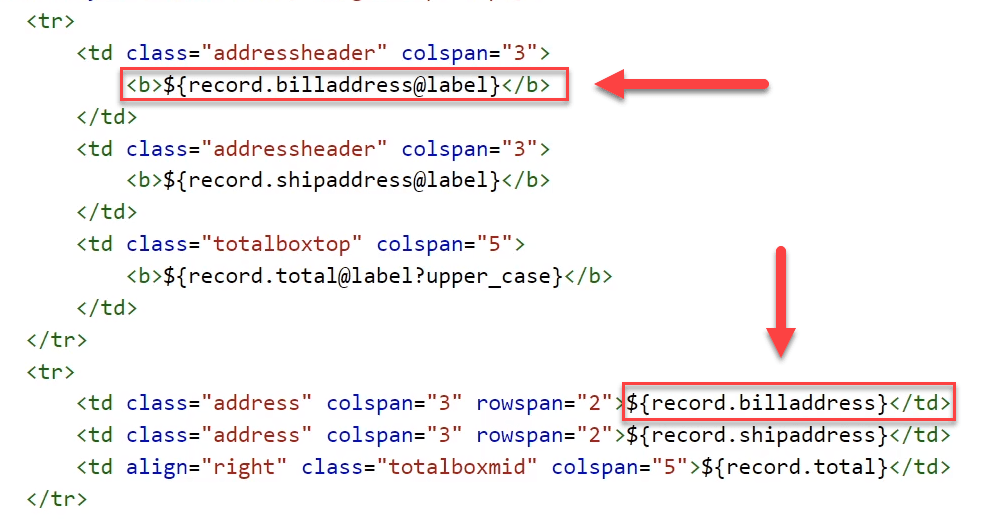
FreeMarker also allows logic and customizations to be implemented into the template. For instance, in this expression ${record.total@label?upper_case}, we have another FreeMarker expression tied to the end of a label expression. This expression is grabbing the field label from the field on the record that has the field id of total. Then we add on the expression ?upper_case, which will turn the field label text all uppercase.
Learn more about FreeMarker and how to leverage it in your template.
Making a Template More Dynamic
To make a template more dynamic, you can use if statements and loops/lists.
If Statements
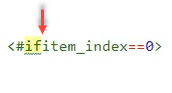
When using if statements, you are telling the template to do/display something if a condition is met. For example,

in the code block above, we are telling the template to run the code between the <#if> tag and the </#if> closing tag if item_index equals 0.
Loops/Lists
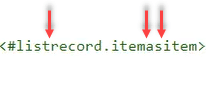
Loops/lists, denoted by the <#list> tag, are helpful when you need to iterate over a list of items. For example, we can find every instance an item in the items list on a record and get those items' cost, description, etc. Here is an example of code with a loop/list of record items:
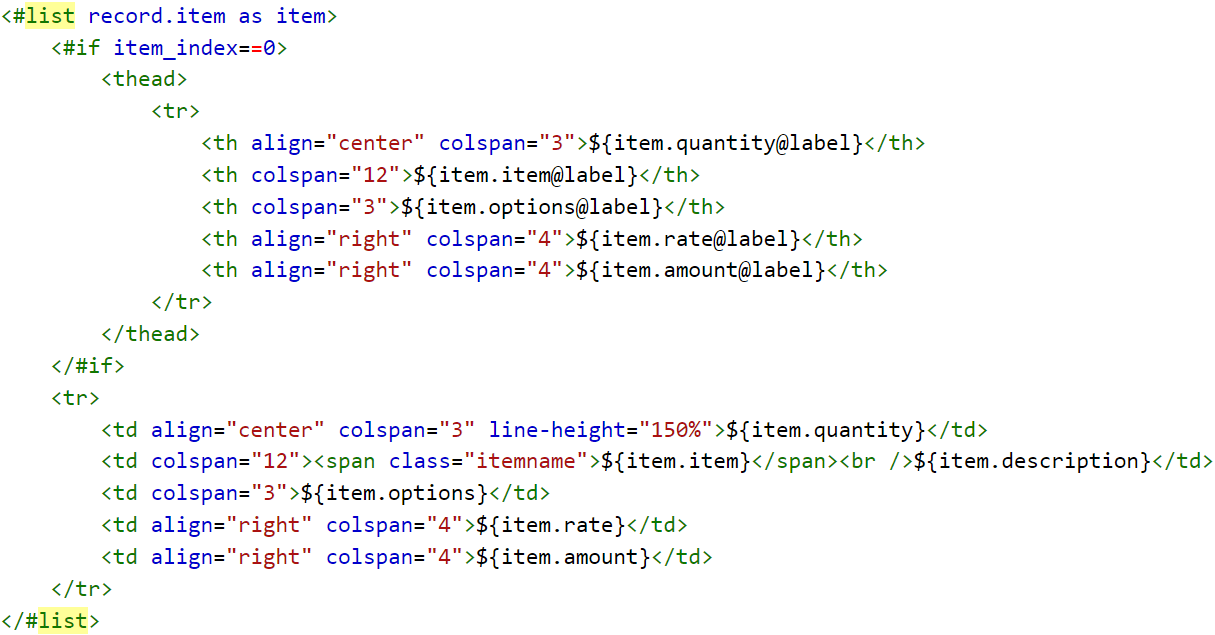
In this example, the code is saying loop over the list of items and if the index of the item is equal to 0, run the code in between the <#if> tags.
Code Editor
I want to point out that though NetSuite has its own built-in code editor, it is preferable to use an external editor, like Visual Studio Code, which will be more user-friendly.
Got stuck in a step during this article?
We like to update our blogs and articles to make sure they help resolve any troubleshooting difficulties you are having. Sometimes there is a related feature to enable or a field to fill out that we miss during the instructions. If this article didn't resolve the issue, please use the chat and let us know so that we can update this article.
Tagged with Training