NetSuite Navigation Tutorial | NetSuite User Training
Shortcuts are a great way to navigate back and forth to all the different tabs and pages you often go through for your role. To add a page to your NetSuite shortcuts, navigate to the page you want to add, click on the Star icon in the top left of the NetSuite Navigation Menu, and select "Add to Shortcuts".
- Date
- November 25, 2025
- Read
- 16 min
So you just got NetSuite, and now you're getting ready to learn a little bit more about what it can do and customize it to meet some of the more specific needs of your business. The NetSuite user interface can be a bit overwhelming at first because there's so much information available to you! So, we want to help you get started with a few NetSuite Navigation tricks. Once you understand the basics of NetSuite Navigation, you'll be ready to take on several end-user tasks and even manage some basic account administration within NetSuite.
To become a master at Navigating NetSuite you can continue reading this article and find detailed explanations of different tips and tricks. Or, for a more condensed version of this information, you can watch this short video where Caleb explains some of our favorite NetSuite Navigation Tricks:
NetSuite Tutorial | Navigation Tricks
NetSuite uses basic browser functionality, so the overall structure is somewhat intuitive once you start to get oriented. The complexity comes from NetSuite offering multiple navigation paths that are highly effective in different use cases among the various user roles available. But don't worry, you won't need to have all of them memorized. NetSuite offers various help resources you can turn to if you get stuck, and of course, you can always check out our training blog articles or our Free NetSuite Beginner Course for more NetSuite tips and tricks.
Login and NetSuite Center Basics
To log in to NetSuite, go to the NetSuite login page, enter your login information for your customer account, and click 'Log In'.
At the top of the screen, you will be able to see a few things that are important to note. First, you may notice your company logo on the screen's top left near the Oracle NetSuite logo.
![]()
In the top right of the screen, you can see three things:
- The name of the NetSuite User you are logged in as
- The name of the NetSuite Account that you are logged into
- The NetSuite User Role you are currently working from

NetSuite User Name
In your company's NetSuite account, the name of the NetSuite User will almost always be your name. But, if you are working from a NetSuite training account, NetSuite's generic NetSuite User name for all training accounts (Kathryn Glass) will be displayed.
NetSuite Account
If you click on your NetSuite User name/account/role, a menu will display the different NetSuite Accounts to which you have access. For example, you may have access to your own company's NetSuite Account, A Sandbox version of your company's NetSuite Account, and your own NetSuite training account.
NetSuite User Roles
Suppose you have several roles in a single NetSuite Account (like an administrator or deployer role). In that case, those roles will show up in the same dropdown menu on the top right of your screen, and you can toggle between each of the roles depending on what tasks you are completing in NetSuite at a given time.
NetSuite Navigation Tabs & NetSuite Centers
One of the main tools you will use to navigate to different pages in NetSuite is the main Navigation Bar, which has several Navigation tabs pre-established based on your role. NetSuite refers to these pre-established views (essentially just different configurations of tabbed page navigation) as "NetSuite Centers". So, for example, someone working from the Administrator role will be working in the "Classic Center" by default. So, in general, if you have an Administrator role, your navigation inside NetSuite should look quite similar to this:

Note: Some things in our demo screen throughout this article may differ from what you see in your own account. You might need different roles and permissions to view certain features. We also have a few customizations we built on displayed here in our demo account that will not be visible to you, such as the "Trade Show" tab.
These role-specific NetSuite Centers provide each NetSuite user easy access to the pages inside of NetSuite that they will be using regularly.
Each tabbed page in the main NetSuite Navigation bar links to an overview or "Dashboard", providing users with a visual workspace highlighting critical information relevant to the user's role in the NetSuite Account. You can personalize Dashboards by adding, removing, rearranging, or editing different Portlets (dashboard sections). Portlets dynamically display essential information such as recently viewed pages/records/reports/hyperlinks that the user may need to access frequently or even custom searches built to surface KPI metrics.
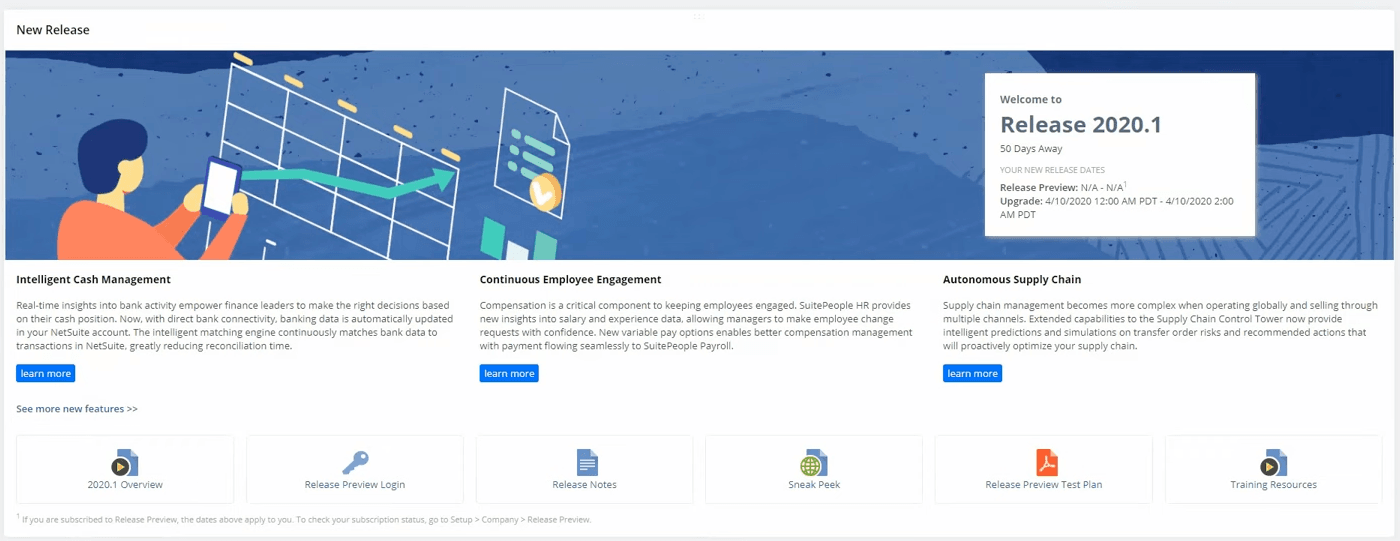
NetSuite New Release Portlet
One example of a portlet is the "New Release" portlet, which is included by default as a standard portlet on the home dashboards for the different NetSuite Centers. This portlet allows NetSuite Users to easily view new release information, such as an overview of the new release, training resources on related changes in NetSuite, a new release preview login, and other relevant information.
To learn more about what dashboards are and how to customize them, check out our tutorial video on NetSuite Dashboard Customization.
NetSuite Global Search Bar & Quick Search Dashboard Portlet
The Global Search Bar is the main search bar in the NetSuite user interface and is a common way to search for a record or page quickly. It is located at the top center of the screen, displayed in the NetSuite header, and is always visible from any page in the NetSuite User Interface.

The global search bar is a powerful search tool, but knowing the best ways to enter search information to surface the details and results you want in the search results is helpful. Accepted characters in the global search bar include letters, numbers, dashes, and the "OR" separator.
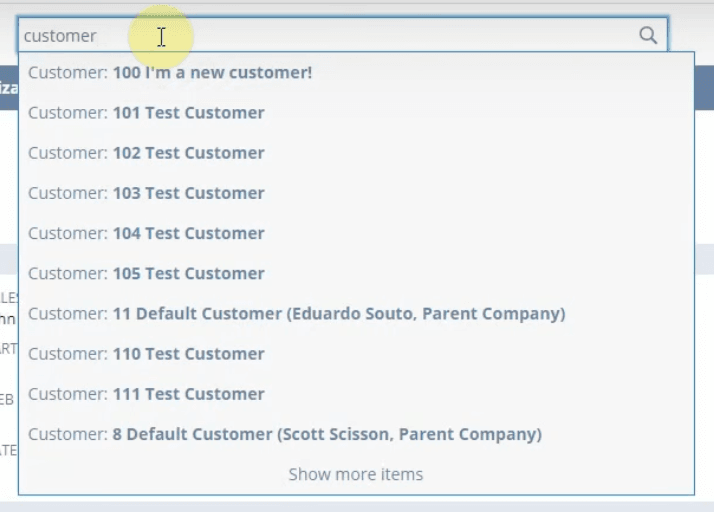
If you just put in "customer" it'll show every result related to "customer" which includes every individual customer record. The global search bar allows you to include up to three keywords per search. Still, with the incredible amount of information you have housed in NetSuite, that might not narrow things down enough depending on how specific your search keywords are and how many things in NetSuite are named similarly. You can use prefixes to restrict the results to particular record types to narrow your search results beyond your three keywords.
NetSuite has many useful prefix abbreviations that help with global search, for example, "cus:" is the prefix abbreviation for "customer:"
Let's say that you want to look up a particular customer. You can include part of the customer name in your search, but you must be specific with your spelling or use wildcard keys like % to fill in for unknown characters. Or, you could find an individual customer by using the search "page: customers" which will take you to the customer list page. Then you can search for the customer in this list rather than trying to bring up individual results with their name.
As you begin typing in the Global search bar, you will notice that it begins to auto-suggest search results. In most cases, when your search is specific enough, the search bar will auto-suggest the result you are trying to find. However, if your search is not specific enough, you will have to select "show more items" or press Enter/Return key on your keyboard or click on the search icon in the search bar to pull up the complete list of search results.
You may have several action options available to you in the search suggestions. To View any search result, click on the name of the search result returned in the search suggestions. Some search results, like individual records or saved searches, may also have an "Edit" option in the search suggestion when you hover over the particular result. Other search results, such as customers, may have dashboards associated with them and display a "Dash" link alongside "Edit" in the search suggestions.
Employee Records in NetSuite
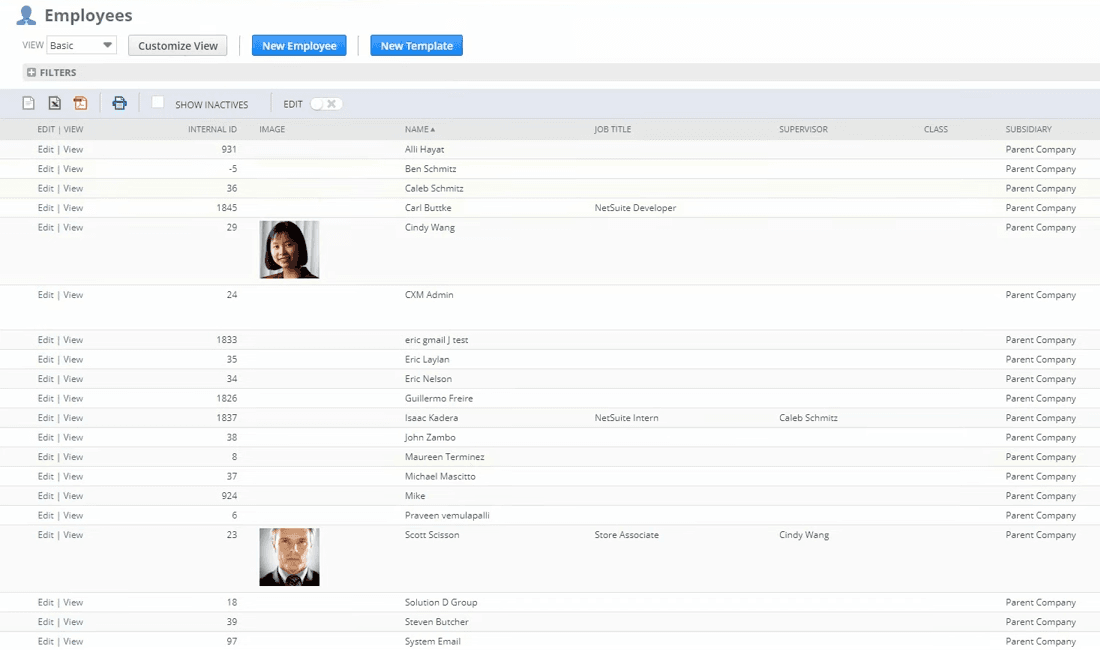
Now, let's take a look at an Employee Record in NetSuite. You can navigate to an individual employee record in a few different ways. If you would like to select the individual Employee record from the Employee List page in NetSuite, you can navigate to Lists > Employees > Employees, or, in the global search bar, you can type page: employees. Then, on the list page, you can locate the individual employee record that you were looking for and open it up either in edit mode or view mode.
Alternatively, suppose you would like to jump straight to a particular employee record and bypass the Employee List page entirely. In that case, you can type the prefix empl: in the global search bar, followed by the Employee's name. As you type, a link to the customer record will show up in the automatic suggestions under the global search bar. From there, you can open the record in either view or edit mode.
When you open up an employee record, you can see a great deal of information. Still, unless you work in HR, you won't need to know much more than how to access the employee's contact information and give them access to different areas of NetSuite. Employee contact information displays on the main tab of the Employee record. Employee Access Permissions and Roles can be viewed or edited from the Access tab. For an employee to have access to your NetSuite Account, you will need to ensure the Access checkbox is checked and that the employee has at least one appropriate role assigned to them within the NetSuite Account.
Learn More: For detailed step-by-step instructions on how to provide someone with access to your NetSuite Account, check out our article How to Give Someone Access to NetSuite.
How to Change Your NetSuite Password
When you create a new employee and give them access to your account, they will use their email address for their login. You can manually assign them a password, or NetSuite can make the user set a password themselves when they log in for the first time. Users can change their password anytime by going to their NetSuite home page, navigating to the Settings portal, and selecting the "Change Password" option. At this point, the user will be prompted to enter their current NetSuite password to confirm their identity before entering a new password that meets NetSuite's current password strength criteria.
How to Update Your Security Questions in NetSuite
NetSuite uses security questions to confirm a user's identity if they forget their password or get timed out of a session due to inactivity. To update your NetSuite security questions, from the NetSuite home page, go to the Settings portlet and select the "Update Security Questions" option. You can then choose your security questions from a list provided by NetSuite and fill in your answers.
Note: Be sure to save your NetSuite password and your security question answers in a secure place so that you don't loose them. Depending on the settings in your NetSuite Account, anyone with access to that account will be notified via email if you have 6 failed login attempts... and that's just embarrassing..
How to Add a Role in NetSuite
Let's say you want to add a different role for an employee in NetSuite. Click on 'Edit' on an employee record and go to the Access subtab. First, make sure the "Give Access" checkbox is checked.
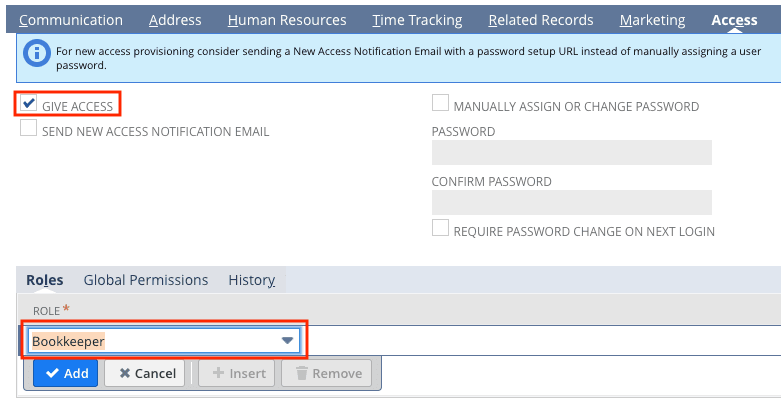
Next, on the Roles subtab, click inside the open role field, and it will open a dropdown menu where you can select an available role, in this case "Bookkeeper", and click 'Save'.
Learn More: For detailed step-by-step instructions on how to provide someone with access to a specific role in your NetSuite Account, check out our article How to Give Someone Access to NetSuite...
How to Set User-Level (role) Preferences in NetSuite
In NetSuite, user-level preferences can be set by each user. You can define different preferences for each of your roles in NetSuite. However, it's important to note that Administrators in your NetSuite instance can define company-wide preferences (such as formatting preferences) that may override any user-level preferences that you set for yourself.
Let's say you want to adjust the color theme preferences for your role on the user level. To do this, navigate to Home > Set Preferences > Appearance subtab > Color section > Color Theme, and adjust the color theme preferences using the options displayed on the page. If you have multiple roles assigned to you, a best practice we recommend is to define a different color theme for each of your assigned roles to easily tell them apart while you are working.
For more information on NetSuite Roles & Permissions check out our NetSuite Roles & Permissions tutorial.
System Information Subtab
The system information sub-tab is available in most records. It helps you see what changes have been made to that specific record.

Let's say you wanted to see if someone had changed their password. From their employee record, go into this System Information tab.
Expand Subtab Search
You can expand the entire sub-list to search all the fields on a particular record.
For example, the "Give Access" button is under this access sub-tab, but if you are in the System Information subtab and use a Ctrl+F search for "Access", it doesn't come up with that field. However, if you go into the Access tab and rerun the search, it finds it. So, to ensure that you are searching the whole record, click the button on the far right of the subtab header area, and it's going to expand all these subtabs so that you can search all the subtabs at once.

When all the views are expanded out and you press Ctrl+F, it will bring up any matches across all the expanded subtabs. Then, when you are done searching in the expanded view, you can click the button on the far right again, and it collapses everything back to the individual subtab tab view.
How to Add Shortcuts in NetSuite
Shortcuts are a great way to navigate back and forth to all the different tabs and pages you often go through for your role. To add a page to your NetSuite shortcuts, navigate to the page you want to add, click on the Star icon in the top left of the NetSuite Navigation Menu, and select "Add to Shortcuts".
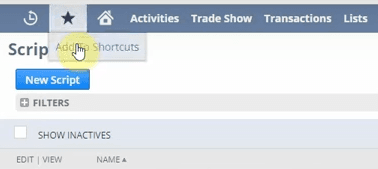
This will open a popup window where you can name your shortcut and click "Save".
Recent Tab
Another helpful feature for quick navigation in NetSuite is the Recent tab. Notice that the records displayed here are all the recent pages that we accessed throughout this tutorial:
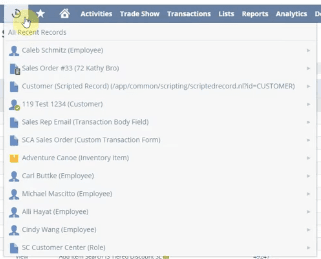
Let's say that I want to go back to my employee record. I can go to the Recents tab and click on my employee record in this list. This is a really easy way to navigate between your everyday tasks and those you're working on in the more immediate timeframe.
More Navigation & Other Tutorials
1. Support & Help Resources
If you're having trouble with a given task in NetSuite and want to see what documentation NetSuite has that can help you, go to Support > SuiteAnswers in the main navigation menu in NetSuite. Or you can go to the Help icon on the top right of your screen, which takes you to NetSuite Help. We explain the differences between those and how to navigate them in our SuiteAnswers Tutorial.
2. Workflows & SuiteScript
Something you might hear a lot if you work with NetSuite customizations is "workflows". Workflows are used to automate some processes in NetSuite. Workflows are a little less powerful than scripting, but it's more of a visual way to set up automation.
Scripting requires a little more coding, and you may hear words like "scheduled scripts" and "user event scripts". Those are more advanced customizations, so you'll need to work with a NetSuite developer familiar with SuiteScript to get these types of customizations in place.
3. Basic NetSuite Account Setup
A couple of other important things you'll see under Setup > Company are Company Information and Enable Features. These are pretty common places you'll need to go to to ensure your NetSuite account is set up properly when you first begin using it.
4. NetSuite Bundles Installation
Another option under Customization is Suite Bundler, which is where you will go to search and install bundles or see a bundle audit trail for different bundles you have installed. You'll probably be completing many SuiteBundler Installations in the beginning as you're getting your account set up with all the different bundles you purchased.
5. NetSuite CSV Imports
Finally, the last critical piece is that when you're trying to set up your account for the first time, you're importing a ton of data, and often, it's best to use a CSV upload. To import data to your NetSuite account, go to Setup > Import/Export CSV Records, where you can use the NetSuite Import Assistant to map the data to the correct fields in NetSuite.
Related Article: Resolved - Error When Navigating to a Transaction List Page
Get stuck in a step during this article?
We like to update our blogs and articles to make sure they help resolve any troubleshooting difficulties you are having. Sometimes there is a related feature to enable or a field to fill out that we miss during the instructions. If this article didn't resolve the issue, please use the chat and let us know so that we can update this article!
That's all for now! Hopefully, this post gives you something to work with while trying to understand NetSuite and what it can do for your business. If you have any questions, feel free to contact our team at Anchor Group.
Tagged with Training