Importing Data to NetSuite: NetSuite CSV Import Tutorial
CSV imports are a great way to bring a lot of data into NetSuite without much work. All you need is a CSV file with the required information, and you can work through the NetSuite Import Assistant steps to upload your data.
- Date
- April 6, 2026
- Read
- 10 min

NetSuite Tutorial | CSV Upload
CSV imports are a great way to bring a lot of data into NetSuite without much work. Here, we will show you how to import a customer record to your NetSuite environment through a CSV file import using the NetSuite Import Assistant.
Understanding the Data You Need to Import to NetSuite
Before you can prepare your CSV file for import, you need to understand what type of information you will need to set up in the CSV file to get the data you need into NetSuite.
In this tutorial, we will look at an example of importing new Customer Records. If we go to Lists > Relationships > Customers and open a customer record in View mode, we can see that there's a lot of information on there.

Red stars indicate required fields, so those would be the fields we need to import at a minimum to create new customer records in NetSuite. You can see that some fields on this test customer record are dropdowns. This means that information already exists in another location in NetSuite. You want to ensure all the options you need in a dropdown are available to select from before running your customer import.
There are also different types of fields, like boolean values, which typically would be a checkbox. If you know that a field requires a true/false value, you might have to set it up like that in your Excel sheet before importing it. Check out the video above to learn more about what information you need for a NetSuite import and how to prepare your CSV file!
If you are working with multi-select fields, check out this separate tutorial on completing a NetSuite CSV Import with Multi-Select Fields.
NetSuite Import Type & File Mapping
Since we are importing Customer records, which are a type of relationship in NetSuite, here, for the Import Type, you would select 'Relationships'. Then, you will notice a Record Type option for 'Customers Only' that we can select in the next field.
You generally won't need to edit the Character Encoding or CSV Column Delimiter fields, but they are there if you need them.
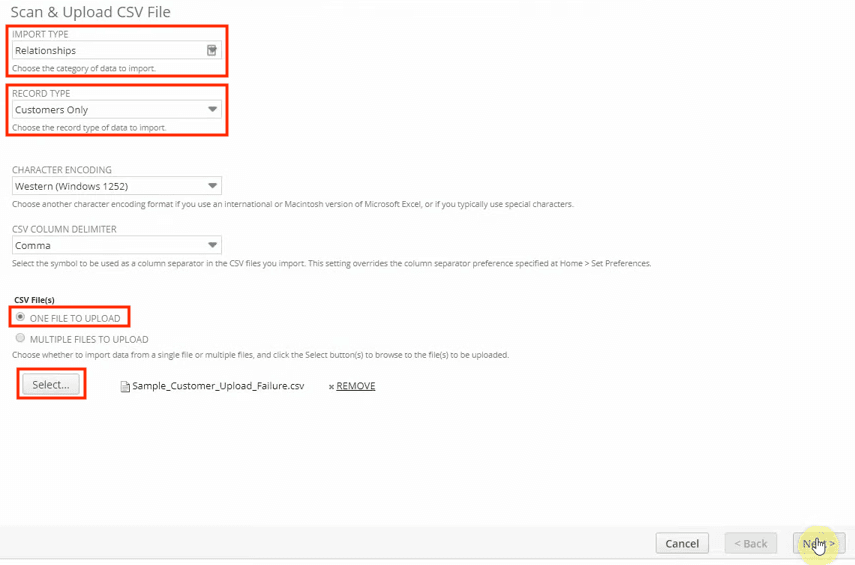
As a general rule of thumb for beginners, we recommend selecting just a single file to import to NetSuite at a time. So, for our example, we are going to select the One File to Upload option and then select the CSV file that we prepared for this import.
When you have completed these fields and are ready to move on, click 'Next' at the bottom of the screen.
NetSuite Import Options in the Import Assistant
The second step in the NetSuite Import Assistant is definitely the simplest. Here you can determine the behavior of the importer using the options 'Add', 'Update', or 'Add or Update'.

'Add' adds more data to NetSuite and doesn't override any existing data; 'Update' will update existing NetSuite records with the data you are importing, and 'Add or Update' will do a combination of both, depending on whether the record data being imported to NetSuite is brand new or whether the records you are importing already exist in NetSuite and need updates. In this example, we know we are importing brand-new customer information, so we are using the 'Add' function.
Note on File Mapping with the NetSuite Import Assistant
In this tutorial, we uploaded only one file in the first step of the import. Because of this, the Import Assistant will automatically skip its third step, File Mapping. As mentioned above, we recommend uploading one file at a time in most cases. But be aware that you will encounter a file mapping step if you upload multiple files to import to NetSuite simultaneously.
Need help with NetSuite Import File Mapping? Contact us!
NetSuite Import Assistant Field Mapping
Here's where we start mapping the fields within the NetSuite Import Assistant.

Notice that the Import Assistant already prepopulated some mapping that it recognized, for example, "Job Title" on my Excel sheet. The NetSuite Import Assistant recognized it as data likely meant to populate the job title field on the customer record and pre-populated the field mapping accordingly.

On the left-hand side of the page, you can see all the fields in your CSV file that are available to be mapped to fields in NetSuite.
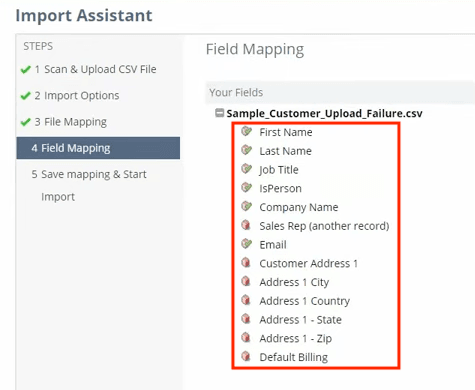
The green check mark by your CSV field means it's already in the center mapping area, so you can see we've got a couple more things to add.
On the right-hand side of the page, you can see all the fields on the customer record in NetSuite that your CSV file data can be mapped to.
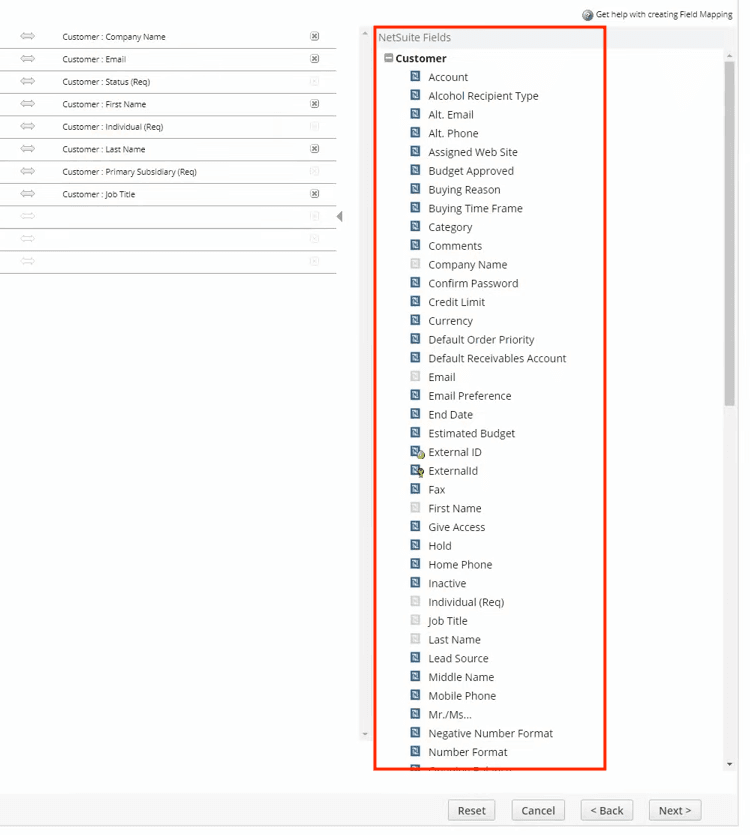
At this point, we must drag in all the unmapped CSV file fields and complete the mapping to fields in NetSuite. Here is our completed field mapping for this tutorial example:

Missing a Custom Field? If a custom field is missing from one of the selectable options to map, making the field mapping impossible to update, check out this troubleshooting article: Missing Custom Field for NetSuite CSV Import.
Troubleshooting NetSuite CSV Import Errors
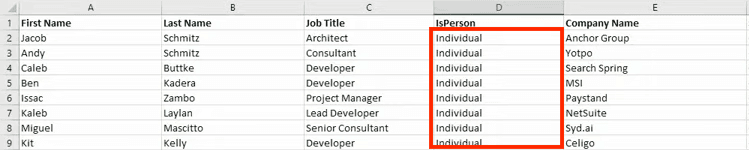
Let's go back and review our Excel file real quick. You'll see that I've got "Individual" in each cell of the 'IsPerson' column:
We set this up as a troubleshooting example, so when we click 'Next' we will get a Field Mapping error:
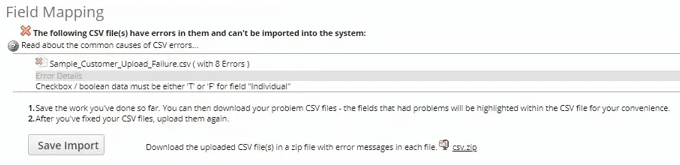
The error message tells me what we need to fix. In this case, it says checkbox/boolean data must be T or F for the NetSuite field 'Individual'. So essentially, this is just a true or false button labeled differently, so it's a little harder to tell what it is.
To resolve this, return to the Excel file and change those cells from "Individual" to a "T" value. After saving the CSV file, click the 'Back' option to get back to the first step in the NetSuite import assistant, Scan & Upload CSV File. Select your newly corrected CSV file, and click next. You'll notice that your settings and field mapping are still in place because we just clicked 'Back' instead of canceling our import and starting over.
Note: If you don't have time to fix an error in your CSV file right away but still want to save your settings and field mapping, you are given the option to save your import from the screen with the error message.
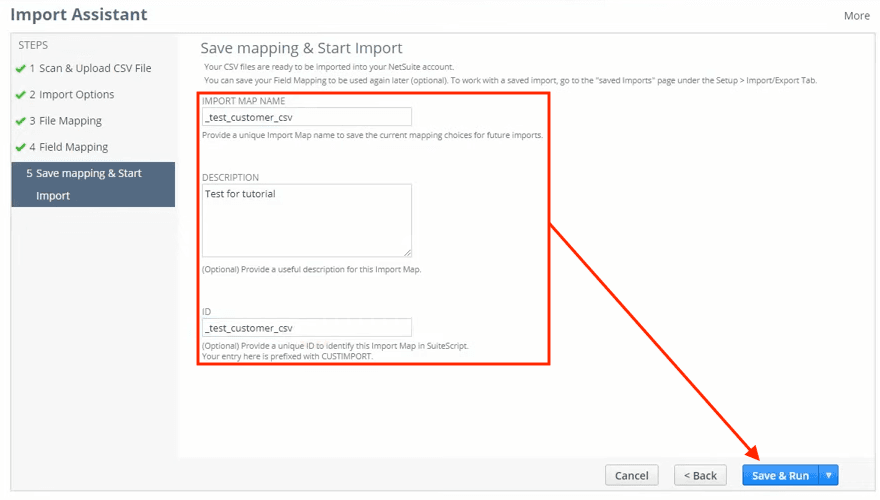
Saving and Running a NetSuite CSV Import
The final step in the Import Assistant is to save the mapping and start the import to NetSuite. Be sure to assign the import a Name and provide a Description so other NetSuite users in your account can easily re-use it in the future if needed. If you suspect that you may want to reference your import in SuiteScripts in the future, you can also assign it a unique ID, which will be prefaced by CUSTIMPORT. When you have entered the desired information, click 'Save and Run'.
Reviewing a NetSuite CSV Import
Now that you've run your import, you will see a confirmation message indicating that the import is in progress. This message includes a link to the Job Status page, where you can review the progress of your import.
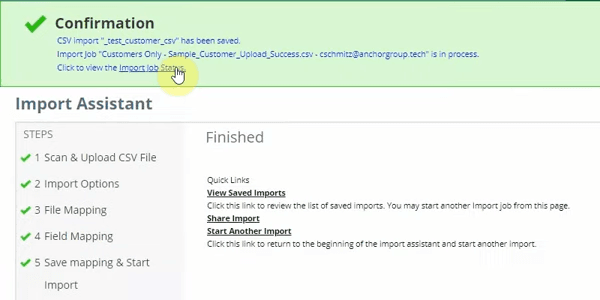
Remember, all this confirmation message means is that the NetSuite import is running. It is not necessarily complete at this point. When the import has been completed, you will receive an email notifying you that it is finished. If you have a lot of information you are importing to NetSuite, it may take a while (anywhere from just a few minutes to upwards of a couple of hours, depending on how many thousands of lines you import). But you can check the import job status anytime to see how far it's come.
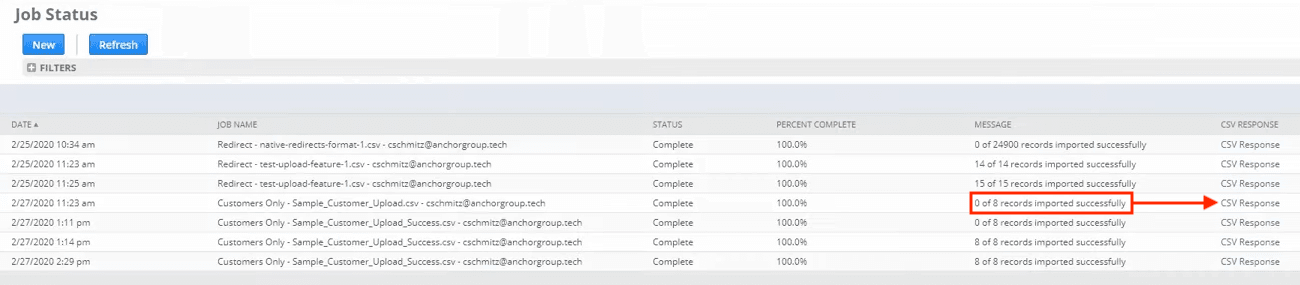
While NetSuite imports are pending, they will have a Status of "In Progress". You can see how far along an import is by the value in the Percent Complete column.
Remember that your import may not have brought all the records into NetSuite even once the status is Complete, so you have to double-check how many of your records were imported by looking at the Message column. You can check why a specific record wasn't imported to NetSuite by looking at the CSV response file and then making the necessary changes to the import.
Scheduling CSV Imports in NetSuite
In this tutorial, we successfully imported a CSV file into NetSuite. We also looked at a troubleshooting example to help you understand what to do when a NetSuite import doesn't go as planned.
One limitation of the Import Assistant is that NetSuite's native CSV import functionality only allows you to run imports when you create them. There is no native functionality available to schedule imports in NetSuite. However, Anchor Group developed a CSV Import Scheduler that enables you to schedule CSV file imports via email or from within the NetSuite UI!
That's all for now! Hopefully, this post gives you something to work with while trying to understand NetSuite and what it can do for your business. If you have any questions, please contact our team at Anchor Group!
Related Articles
- Commerce Category CSV Import Between SuiteCommerce Sites
- Resolved - NetSuite Transaction CSV Import Error “Could not find matching record...”
- NetSuite Data Migration 101
Get stuck in a step during this article?
We like to update our blogs and articles to make sure they help resolve any troubleshooting difficulties you are having. Sometimes, there is a related feature to enable or a field to fill out that we missed during the instructions. If this article didn't resolve the issue, please use the chat and let us know so that we can update this article!
Oracle NetSuite Alliance Partner & Commerce Partner
If you have questions about how our team can support your business as you implement NetSuite or SuiteCommerce, feel free to contact us anytime. Anchor Group is a certified Oracle NetSuite Alliance Partner and Commerce Partner equipped to handle all kinds of NetSuite and SuiteCommerce projects, large or small!
![]()
Tagged with Training, Troubleshooting