SensePass Self-Service Installation Guide
Welcome to the SensePass SuiteCommerce payments bundle. This guide will show you how to install and configure the bundle.
- Date
- April 7, 2026
- Read
- 9 min

Welcome to the SensePass SuiteCommerce payments bundle. This guide will show you how to install and configure the bundle.
Prerequisites
Before beginning this self-install process, please check that the following have been completed:
- Company has purchased the ‘SensePass SuiteCommerce Payments Bundle’ from Anchor Group.
- Company has a merchant account with SensePass that can be linked to NetSuite configuration. Anchor Group can connect you with the right person at Sensepass after you have received access to the payments bundle.
If you have any questions about the above steps, please use our website contact page to get in touch with our support team.
Install 1st Bundle (ERP Components)
Once you receive your PayTrace API information from SensePass, the bundle will be ready to install.
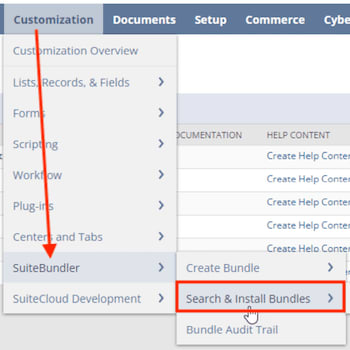
In your NetSuite account, navigate to Customization > SuiteBuilder > Search & Install Bundles.
On the following page, search for the following bundle: SensePass Payments or the bundle ID 491400.
Select the hyperlink for the SensePass Payments which will bring you to the bundle overview page to prepare for an installation.
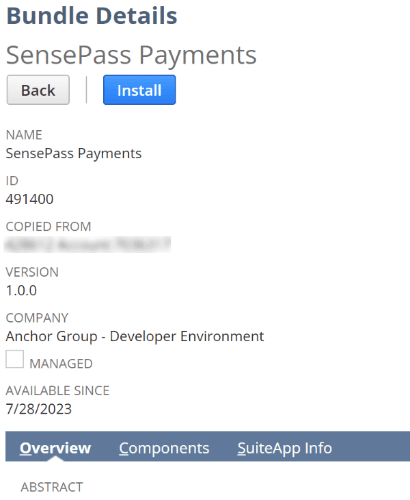
Click the Install Button.
This will bring you to the Bundle Preview where you can click on the Install Bundle button.
Click Okay on the confirmation popup to install the bundle into your account. At this point, the SensePass Payments bundle will begin installing into your NetSuite environment. You will be brought to a list of your installed bundles that will show the status of the bundle installation. This may take up to 15 minutes to complete. Click refresh at the top of the page to see the updated status.
This bundle contains the ERP components of the solution.

You have now successfully installed the bundle.
Install 2nd Bundle (SuiteCommerce Components)
Repeat the process for the 2nd bundle.
Install the 2nd bundle that contains the SuiteCommerce extension for payments in the checkout.
Search for Sensepass Payments for SC or the bundle ID of 532433.
Install. The installation process can take a few minutes to finish processing. Confirm it is 100% complete before completing the configuration in NetSuite.
Connect API (Sensepass and NetSuite)
Before you can start to capture payments, there is some configuration that needs to be done to connect SensePass to NetSuite.
In your NetSuite account, in the Global Search type ‘SensePass Credentials’ into the search bar and click ‘New SensePass Credentials’.

On the following record, enter the values into the following fields:
- API URL: https://api.sensepass.com/api
- API KEY: Found in SensePass Merchant Account

Go ahead and save the record.
Payments Logo URL
The SensePass Payments Bundle uploads some images into your NetSuite File Cabinet. You will need to download an image from the bundle and upload it into the Live Hosting Files of your File Cabinet. Navigate to Documents > Files > Live Hosting Files. In the search bar type ‘SensePass’ and click Search.
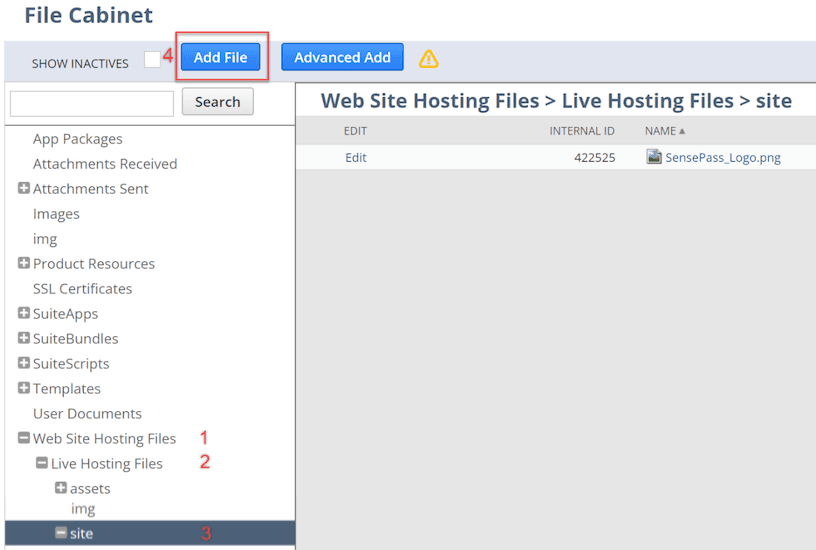
Once you have downloaded the image onto your computer, you will need to upload it into a different place in the file cabinet. Click Website Hosting Files > Live Hosting Files > Site, and click Add File. Now locate the image that you just downloaded, and select it for upload. (Note: If the ‘site’ folder does not exist, go ahead and create one).
Once the image has been uploaded, copy and paste the link into the SensePass LOGO URL field on the SensePass Credentials record. You can click on the image file to find the URL.
Activating the SensePass Extension
You'll now need to activate the SensePass Payments extension. Go to Commerce > Extensions > Extension Manager, and click New Activation. Select the website and domain in which you want to use SensePass for and click Next.
Under the Extensions tab, click the checkbox next to SensePass Payments Integration, then click Activate.

Refresh the page until you see the status of the activation show Complete, you should also see the SensePass extension under Active Extensions. You cannot proceed to the next step until this is fully complete.
Note: If you see an error at this stage it might be because of a Sass Compilation error. This has occurred for all activations with a SuiteCommerce update that occurred in early 2024. This is unrelated to this extension and requires your SuiteCommerce developer to make an update. It normally takes less than 4 hours to perform this update.

Modify Website Configuration Records
Next, we will go through the webstore configuration record and enter a couple of pieces of information.
In your NetSuite account go to Commerce > Websites > Configuration. Select the website and the domain in which you will be using SensePass and click Configure.

Here you will see a handful of fields:
SENSEPASS CAPTURE TYPE: Authorize or Manual Capture
- ‘Authorize’ delays capture until the creation of a Cash Sale (Beta - may not be available)
- ‘Manual Capture’ captures payment immediately upon checkout (Default)
SENSEPASS CLIENT ID: Found in SensePass Merchant Account (Sensepass Support can provide this)
SENSEPASS PAYMENT METHOD GRID: This sets the arrangements of payment options in the SensePass SDK.
- Horizontal displays the payment options as a selection bar across the top of the SensePass SDK.
- Vertical displays the payment options as a list, with each payment method’s options displayed within the list entry if selected.
TRUE ONE PAGE CHECKOUT: This is an Anchor Group feature that, if checked, puts all the steps of the checkout process into one single page, speeding up the process of checking out for the customer. Depending on your payment methods you choose with Sensepass, this may be required for them to function. By default, check this as true.
SENSEPASS MODAL ON PAGE: If checked, this will put the SensePass SDK in its own box on the checkout page integrated into the site (this will only happen if TRUE ONE PAGE CHECKOUT is checked). If unchecked, the SensePass SDK will appear in a pop-up modal before completion of checkout.
HIDE NON-SENSEPASS PAYMENT METHODS: If checked, this option will hide the other tabs that may be in the payment method box, such as invoice or the default credit card payment option and will set the SensePass SDK to display immediately.
This is useful if you don't have any customers on terms that need to pay by invoice AND if you don't plan to offer any credit card options outside of what you have through Sensepass. You can have a NetSuite/SuiteCommerce credit card option operational in addition to Sensepass when this is not checked, but you may want to see rates of solutions through Sensepass since they are agnostic and have low rates.
SHOW DEVELOPER LOGS: Leave this unchecked, though a developer may come in and check it if the SensePass extension begins malfunctioning.
CHECKOUT WITH AFFIRM URL: This will provide to the extension the base URL for the custom payment method checkout buttons.
Important: This must be filled if SENSEPASS MODAL ON PAGE is checked.
Here is how to fill this field:
- Search for ‘sensepass_affirm.png’ in your NetSuite environment. There may be multiple results, but use the result where one of its image URLs contains your SuiteCommerce page’s URL. For example. If your SuiteCommerce URL is “https://www.suitecommercesite.com”, use the image file whose URL starts with that base.
- Copy the entire image URL from the image file record to the field. This will provide the image URL for the “Check Out with Affirm” image to the extension, and the extension will be able to use this entry to get the images for the other checkout buttons.
Click Save on the configuration when complete and perform a cache invalidation request for the domain..
Website Setup Record Configuration
After you have saved the configuration record, go to Commerce > Websites > Website List, click Edit next to the correct website. Under the Shopping tab, check the following boxes:
- Display Purchase Order Field on Payment Info Page
- Allow Non-Credit Card Payment Methods during Checkout
Save the website setup record.
Important Note: This website record change will impact all domains attached to this configuration record.
Creating SensePass Payment Method
The next step is to create a Sensepass payment method to be used in transactions/sales order creation from the web store. Go to Set Up > Accounting > Accounting Lists > New > Payment Method.

Enter 'SensePass' in the NAME field, select 'Offline' for the TYPE, and make sure the DISPLAY IN WEB SITE box is checked.
Under the Payment Visuals tab enter 'Web/Standard' in the FLAGS field and copy the following url into the URL field:
/site/SensePass_Logo.png
Then click Add.
Note: You can add whatever image you want to the file cabinet in NetSuite and add the relative URL. This means that you could upload a single image that contains the logos of the payment options in a single image file similar to the image below.

Go ahead and click Save on the Payment Method.
Congratulations. You have finished the configuration for the SensePass-NetSuite integration.
Got stuck on a step in this article?
We like to update our blogs and articles to make sure they help resolve any troubleshooting difficulties you are having. Sometimes, there is a related feature to enable or a field to fill out that we miss during the instructions. If this article didn't resolve an issue, please use the chat and let us know so that we can update this article.
Tagged with Solutions