Manufacturing with NetSuite: A Complete Run-through
Gain real-time inventory awareness, track manufacturing steps, and manage components effortlessly with NetSuite's manufacturing management tools.
- Date
- March 9, 2026
- Read
- 13 min

The whole process, from sales orders and component purchasing to assembly and inventory adjustment.
Would you like real-time awareness of your inventory? Instant viewing of how many component parts you have on hand, available for commitment, or committed? How about a way to keep track of each step along the manufacturing process? NetSuite’s all-in one manufacturing management tools are worth a look.
Today we’ll be walking our way through the entire manufacturing process, using NetSuite to keep track of everything. The example situation is as follows: We are a manufacturer of dining and conference tables. These tables come in a variety of colors and sizes. We sell these tables to retailers.
The manufacturing process proper will always begin with a work order, which is an internal request to build/assemble a certain number and type of one or several inventory items. These items to-be-built could either be final products or intermediate components. For instance, if our floating table happened to be built out of a top and a bottom, each of which is itself assembled out of several further components, we could set up our manufacturing accounting so that the table top is an intermediate assembly that can be constructed on its own. Work orders can either stand on their own (for when you just want to build up inventory in-stock) or be attached to a specific sales order (for a build-on-demand operation). Here we’ll begin with a sales order so you can see how smoothly a sale can flow into the work order.
Sales Order
One of our retailers wants to order more floating tables. We record this request by creating a sales order (Transactions > Sales > Enter Sales Order). Or SuiteCommerce (NetSuite's flagship ecommerce platform) could be utilized by allowing sales orders to come directly from the webstore. Select the appropriate form; we’ll just use the Standard Sales Order form. Select customer (for us, Tables Inc). If you wish you can select anticipated start date and/or end date of the sale. Enter assembly items (these are the complete products you sell – here, a floating table, not a table top) in the Items subtab. These items need to be previously created for you to be able to add them to the sales order (Lists > Accounting > Items > New). Make sure you enter assembly items rather than another type of item, as assembly items are designed to lead into work orders.
To add multiple item types, hit the Add Multiple button. In the pop-up window, click on an item in the left panel to add it to the order. Notice that it tells you right here the price and available quantity of each item, as well as the item type (here, these are all assembly items).
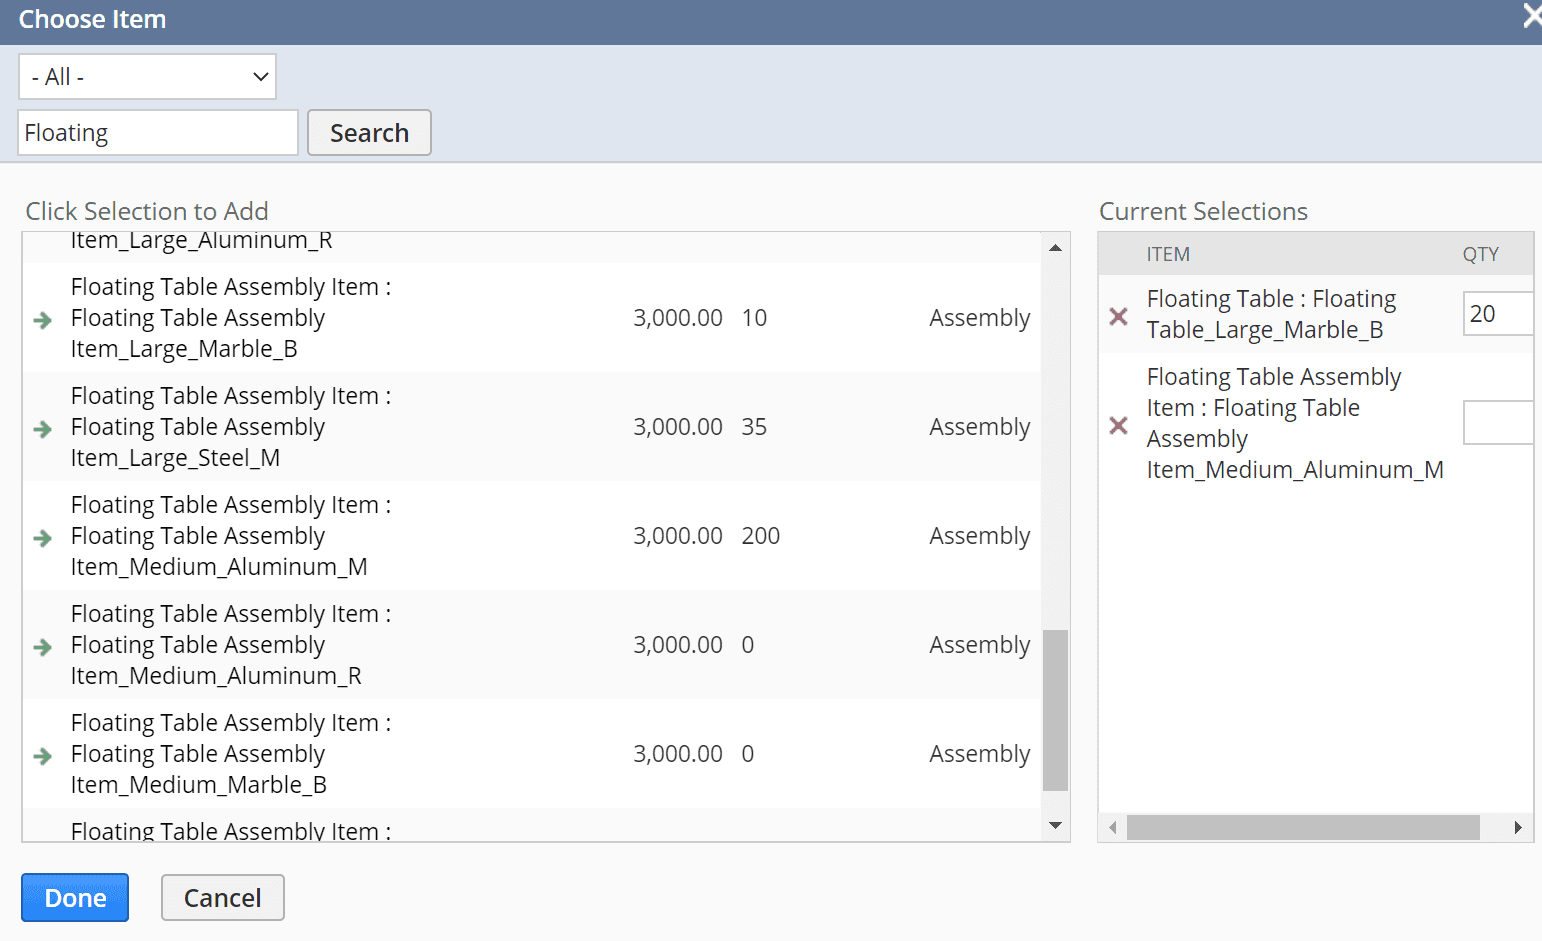
If you have already set the price of your items in the item record, all you have to enter here is the quantity of each item ordered by Tables Inc. Because one of the items we added to the sales order is out of stock, NetSuite gives a warning pop-up alerting us of the discrepancy.
If this sales order needs to be fulfilled immediately, we would have to let the customer know that some of the items are currently unavailable. But in today’s example, the customer is ordering so that we will manufacture these items. That is, at least for the marble floating table, this is a build-on-demand situation.
In the Item subtab, make sure that any of the items that you still need to assemble has a “Yes” in the “Create WO” column, as this will automatically create a work order for that assembly item.
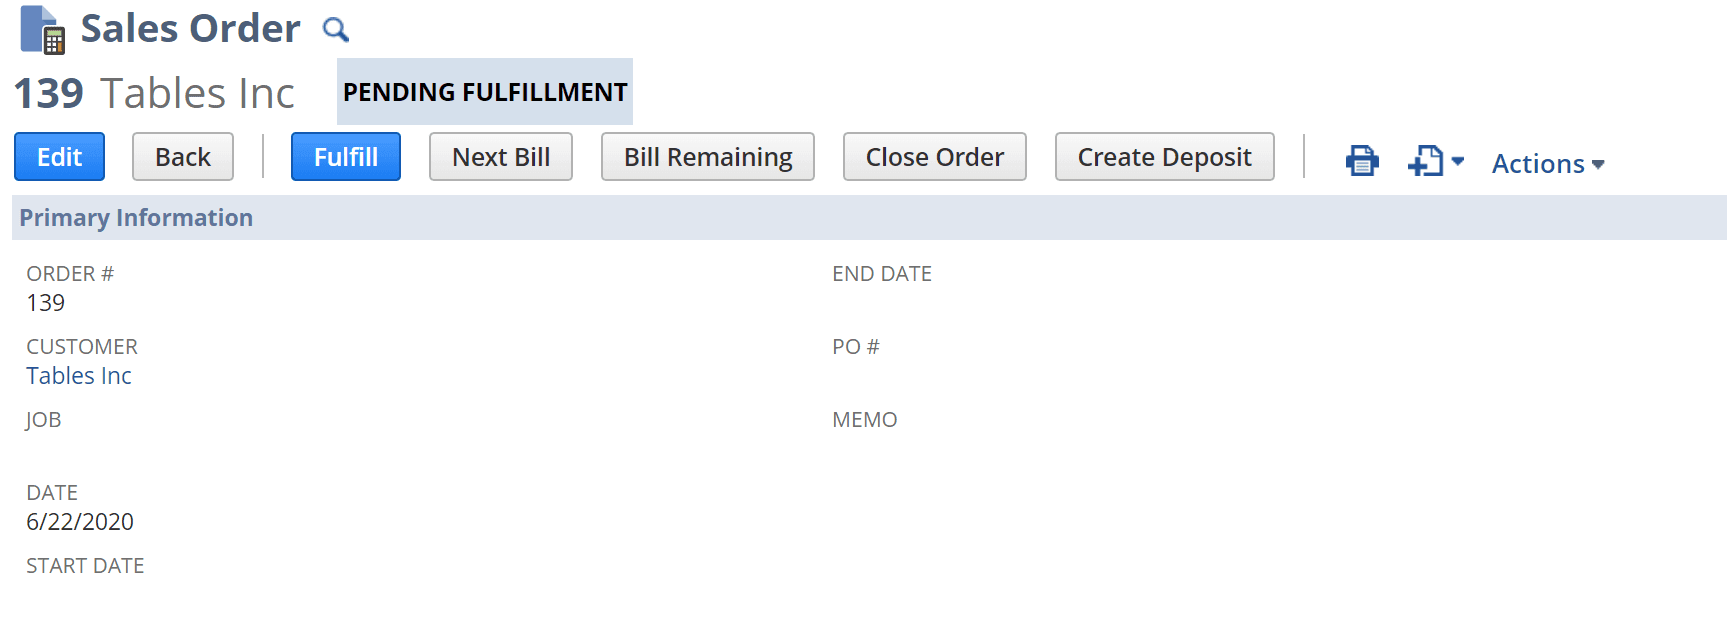
Before you can hit save, you will need to go to the Shipping subtab and enter the “Shipping Cost.” After you save the sales order, you need to get it approved by whoever in your organization has approval permission. (The approver just needs to click the “Approve” button at the top of the sales order record). After approval, the sales order will look like this. Note the “Pending Fulfillment” label at the top. Note also that there are options to enter a deposit or partial payments your customer makes towards the total price of the sale.
Work Orders
Now that the sales order has been submitted, we need to build any assembly items we don’t already have available to ship out. To initiate this manufacturing process we need a new work order. (Again, it is possible to skip the sales order step and go straight to the work order if you just want to build up inventory of assembly items that are not associated with any particular sales order. Go to Transactions > Manufacturing > Build Work Orders). Since we began with a sales order, though, we can just go to the Related Records subtab of the sales order record. You can set your preferences so that a work order for any items that still need to be assembled is automatically created upon approval of the sales order.

Note that our work order says “Released,” which means that it has already been sent to the shop floor. Click on the date to drill down to the work order record. You will see that the work order record has a “Created From” field that links back to the sales order.

There are three numbers to pay special attention to here:
- Buildable. This is how many assembly items (i.e. finished products) you have the necessary components for. This may show zero even if you have all the necessary components on hand if all those components have already been committed (i.e. spoken for) by previous work orders.
- Built. This is the number of completed assembly items, ready to ship to the customer.
- Quantity. This is the number of assembly items the work order is asking be built, a number which comes directly from the sales order that initiated this work order. In our example, we don’t currently have enough uncommitted components to build a single table.
Scrolling down to the bottom of the work order record, in the Items subtab, we see the components that make up each assembly item. NetSuite can even keep track of lot or serial numbers for these components if needed.

In our example, we can quickly see that we have plenty of Table Bottom Parts, as the table shows that all 30 required are already committed to this work order. The culprit item that is holding us up from producing our 30 tables is the Table Top part, because we don’t have any of those in stock (at least in this color and material). If we didn’t have this problem, we could jump straight to building our assembly items, but as it is we need to fix our inventory deficit first.
Purchase Orders
Since we don’t have enough of a certain component to build our assembly items, we need to order those parts. (Or, if the missing component were itself an intermediate assembly item, we would need to order whichever of its own constituent parts are out of stock). The way NetSuite handles purchasing is with a Purchase Order record, which is like the reverse of a sales order. You can create a new purchase order directly (Transactions > Purchases > Enter Purchase Orders), but since NetSuite calculated that we are out of an item we need, it already created the purchase order for us.
Note: you can change your preferences so that it only creates a new purchase order when you have reached a certain deficit (a setting which can help to economize on shipping and take advantage of wholesale costs) or when your inventory levels have dropped below a set minimum quantity (which can help make sure you never run out of stock of essential items).
To find this automatically generated purchase order, go to the work order record. In the Items subtab, on the line of the item that is out of stock, in the Transaction column, you should see “Spec. Ord.”

Click on this hyperlink to be taken to the purchase order. In the purchase order record you can enter the vendor from which you will purchase the missing component. If you already have the purchase price of the component associated with that component’s item record, it should autofill the Rate and Amount fields. You can add or delete items or change the quantity as desired. The Expected Receipt Date defaults to 14 days out unless you change it.
If you click “save and print,” NetSuite generates a pdf purchase order that you can mail or email to the vendor from which you are purchasing.
If we now go back to the work order record, you will see that the “Spec. Ord.” associated with the item you just ordered has changed to the transaction number of the purchase order. Click on that transaction number to be taken back to the purchase order.
Receiving a Purchase Order
When the purchased items arrive at your warehouse, you can update the purchase order record to indicate that they have been received.

Hit the “Receive” button at the top. If quantities delivered were different than quantities ordered, adjust as accordingly and hit “Save.” (Or Save and Bill if you want to pay for the order right now.) The items purchased should now reflect in your inventory records.
Checking Updated Inventory and Item Commitment
In the work order, in the Items subtab, it now shows an updated quantity of committed items; the items you just purchased were automatically committed to this build and will not show as available for any other work orders (they may show up as “on hand, however”). Notice that, because we now have everything we need to build these 30 tables, it now displays “30” in the Buildable field.
Build Assembly Items
Now that you’ve got your components back in stock, it’s time to push that work order into a build. On the shop floor your manufacturing team will see the that the Work Order, which was already released, is now buildable (Optionally, you could set the work order status to “Planned” while you wait for missing components, and only release it when it is fully or partially buildable.)
To keep track of the building progress incrementally in real-time, you will want to check WIP in the work order record, which will enable you to use the Work in Progress functionality. Here we’ll keep it simple and just have the shop floor let us know (or update the record themselves) when the work order is complete. To mark the work order as complete, hit the “Create Build” button at the top of the work order. This will open an Assembly Build record that is associated with the work order:
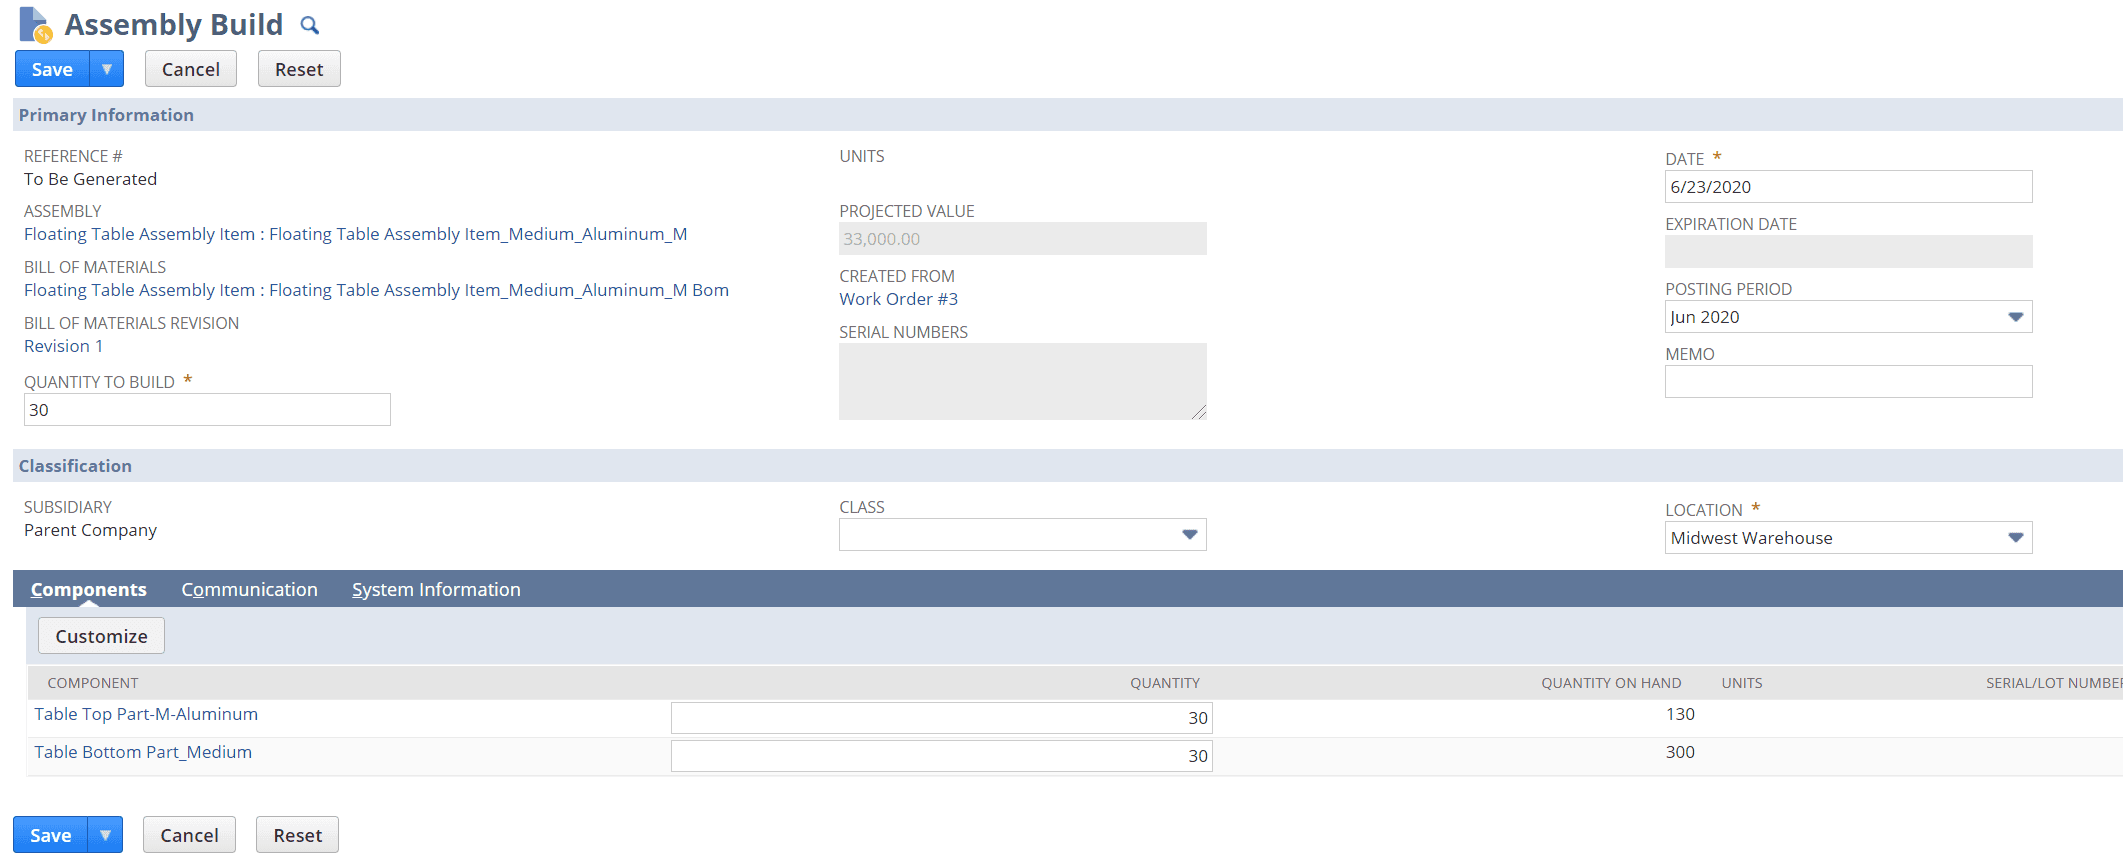
The assembly build record is how you tell NetSuite that you have built the assembly items in the work order. After you save the assembly build, inventory amounts will update to reflect the fact that you have used up the components in the build and that you now have 30 more completed assembly items (i.e. tables).
To see this inventory shift from component parts to assemblies in accounting terms, go to the GL Impact subtab of the Assembly build. The value (in purchase cost to you, not the price you will sell the assembly item for) of each component remains the same whether it is assembled or not.
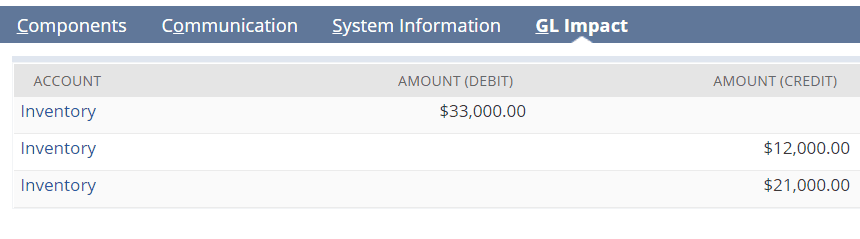
For example, here you can see that before the build there were components worth $12,000 and $21,000. After the build that same amount of $33,000 is not lost, but now shows up under assembly items rather than components.
With the assembly build saved, you can see that the work order record has updated again to display “30” in the Build field. Because the assembly build is associated with this work order, you can always go to the Related Records subtab if you ever want to find it again.
At this point, the manufacturing process proper is complete (i.e. the tables we made are all assembled and ready to ship to customers). You can now re-evaluate your inventory of assembly items and component items in preparation for your next work order or sales order.
Fulfilling Sales Orders
Since we began with a sales order, though, let’s end there too so we can finish the overall sales + manufacturing process. Return to the sales order record that initiated the work order.
In the Related Records subtab, you will find any of the work orders you completed for this sale:
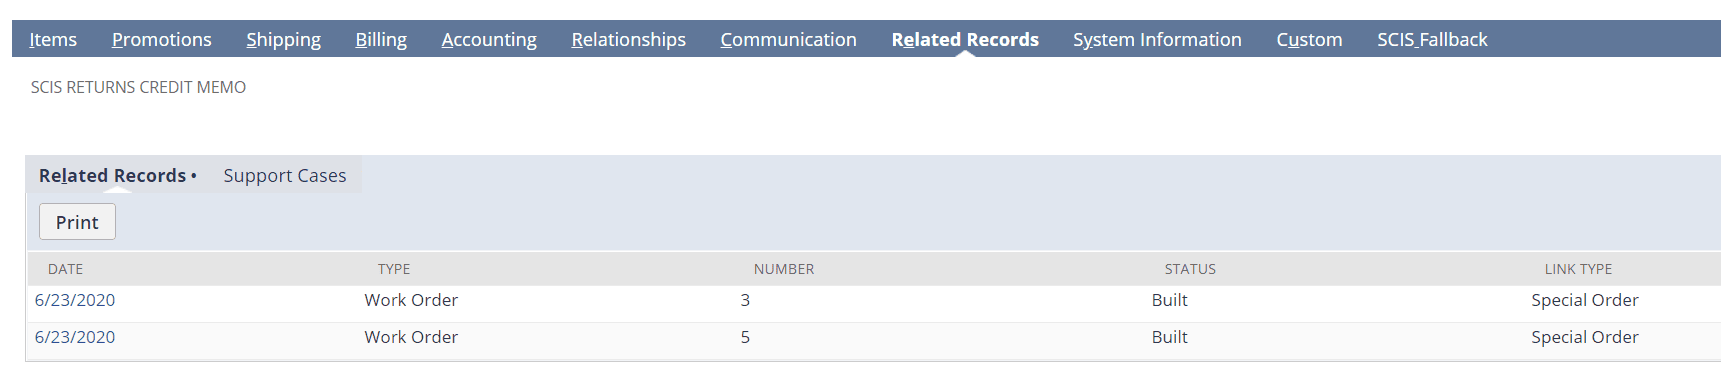
Notice how it says “Built” under “Status.” This is because you made a build assembly for that work order.
In the Items subtab, the table should show the full quantity of ordered items under the “Committed” column. Your order is ready to fulfill. Hit the “Fulfill” button. Save the Item Fulfillment record that comes up. When your order ships you can hit the “Close” button on the sales order record to mark that order completed.
Related Articles
- Enable Multi-Location Inventory in NetSuite Manufacturing
- Define NetSuite Roles & Permissions for Manufacturing
- Configure NetSuite Demand Planning for Manufacturers
- Set Up Standard Costing in NetSuite for Production
- Prepare NetSuite Account for Manufacturing Module
Conclusion
In this run-through, we’ve covered the basic process from sales order and supply procurement to manufacturing and order fulfillment. To learn more about how NetSuite Manufacturing and NetSuite Advanced Manufacturing can be configured to support your production processes - such as with fine-grained Work in Progress (WIP) tracking or a summary dashboard in the Production Manager Role - reach out to us at Anchor Group NetSuite Consultants and Developers.
Hopefully, this post gives you something to work with while trying to understand NetSuite and what it can do for your business. If you have any questions and want some free consulting advice, feel free to contact our team at Anchor Group.
Tagged with Solutions, Training, Manufacturing