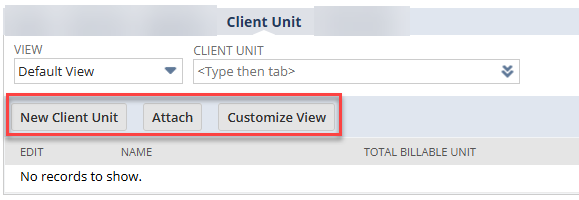
Goal: The NetSuite user wants to add the ability to create new records from a custom record's custom sublist.

This article explains the native setup to achieve the above functionality.
Requirements for This Setup
Step 1: The sublist is comprised of a custom record type
Step 2: The custom record stores information that is specific to the parent record listed on it (the record from which you view the sublist), in our case, the customer record. This means that every time you create an instance of your custom record, the information it stores is specific to the parent record you are associating it with: 1 custom record to 1 parent record.
Sublist setup - Creation of the actual sublist is all done in the custom record setup; you do not need to create a separate custom sublist to store these records (see setup steps below).
Setup Steps: Custom Sublist with Attach and New Buttons
Custom record
Step 1: Create your custom record by navigating to Customization > Lists, Records, & Fields > Record Types > New.
Step 2: Define your custom record as needed and add any required fields. You must create a field that stores the list of the record type on which you want to view your sublist, for example:
We want to view our sublist on the customer record, so we must create a field on our custom record that stores the particular customer that our custom records are associated with - this is what establishes the connection between the custom record and the customer record and allows for the sublist functionality to work.
Linking field on the custom record
You need to create a field that stores the list of records that will be the parent for these custom records. In our example, the parent is the customer record, so we need to create a custom list/record type field that can be used to link the custom record to the customer.
Step 1: On your custom record, click New Field

Step 2: On the custom field definition, enter the following:
- Name: Customer
- Type: List Record
- List/Record: Customer (You must use a list/record field type so that NetSuite can actually associate your custom record with an existing customer record - this is where the link is established for each custom record instance.)
- Store Value: True
- Record Is Parent: True (This field is what tells NetSuite that the customer record can be used to link to + create our custom sublist. This is also what allows us to use the buttons to create or attach new custom records right from the customer record, as shown in the image at the top of this article.)
- Under the Display tab, select a Parent Subtab. This is where your sublist will live on the customer record; you can select a sub-tab or a sub-sub-tab.
- Save your custom field.
At this point, you should be able to go to the subtab you selected on the custom field definition and see your new sublist with the New, Attach, and Customize view buttons at the top.

These buttons allow you to create a new instance of your custom record from the customer record or attach an existing custom record to a customer record. To attach an existing record, you must first select the existing record in the field next to View, then click Attach.
Variations of this Solution
For a slightly different view + functionality, you can enable child record editing on your custom record.

If you do so, you will get the following display changes to your sublist:

This option allows you to set all of the fields contained on your custom record when adding a new instance right from the sublist. There may be certain business processes in which this setup would be more valuable than the standard setup.
Note: This functionality seems to be a bit temperamental - sometimes turning it on makes it available, sometimes, it doesn't change anything. If you are considering using the child record editing option, I would recommend starting with it on, you can turn it off after initial testing if needed.
Got stuck on a step in this article?
We like to update our blogs and articles to make sure they help resolve any troubleshooting difficulties you are having. Sometimes, there is a related feature to enable or a field to fill out that we miss during the instructions. If this article didn't resolve the issue, please use the chat and let us know so that we can update this article!
Oracle NetSuite Alliance Partner & Commerce Partner
If you have general questions about NetSuite or more specific questions about how our team can support your business, contact us! Anchor Group is a certified Oracle NetSuite Alliance Partner and Commerce Partner equipped to handle all kinds of NetSuite and SuiteCommerce projects, large or small.

