NetSuite CSV Import Emailer Installation and User Guide
Before you can begin the installation process, the CSV Import Emailer bundle will need to be provisioned to your NetSuite account.
- Date
- December 19, 2025
- Read
- 19 min

The CSV Import Emailer bundle allows you to schedule imports in NetSuite via email. A sender would simply need to include the desired date and time of the import, the import template they wish to use, and the csv file to import in the body of the email and NetSuite will automatically schedule and execute the import on the specified date and time. Follow the steps outlined below to set up and use the Import Emailer.
Expected Setup Time: 1-2 Hours
Perfect Scenario Integration Setup Time: 30 Minutes
Prerequisite: Bundle Provisioning
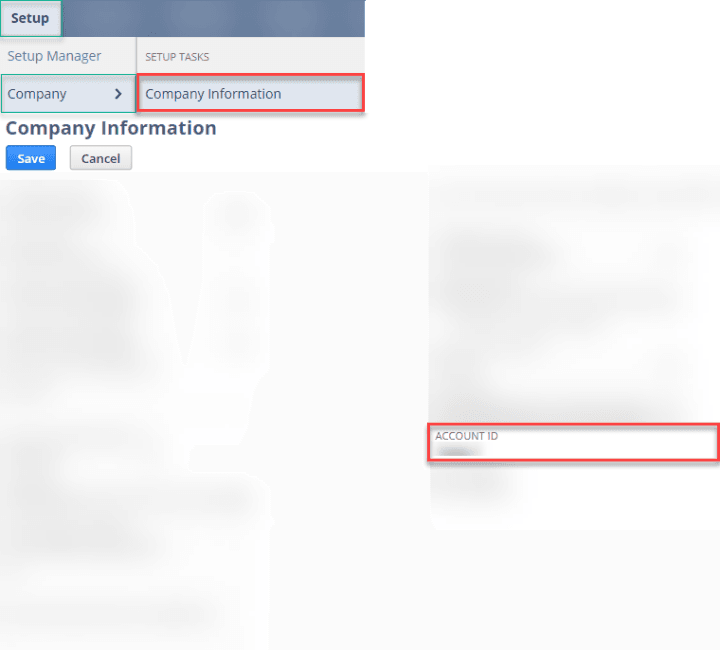
Before you can begin the installation process, the CSV Import Emailer bundle will need to be provisioned to your NetSuite account. In order for the bundle to be provisioned, you will need to provide to Anchor Group your NetSuite Account ID. If you do not know your NetSuite Account ID, you can navigate to SETUP > COMPANY > COMPANY INFORMATION and then find the field on the page labeled ACCOUNT ID. This will be the number you need to provide to Anchor Group. Check your inbox to see if you have already received an email requesting your NetSuite Account ID or contact support now.
Step 1: Search and Install Bundle
The first step after the bundle is provisioned to your NetSuite account will be to install the bundle to your NetSuite account.
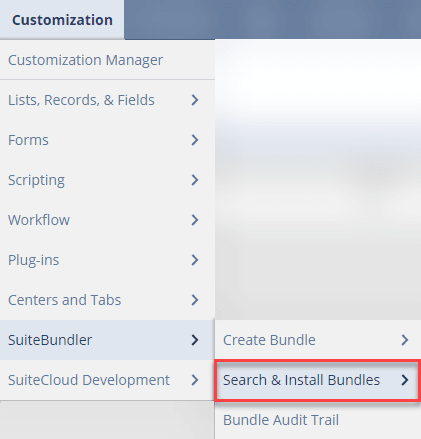
Navigate to CUSTOMIZATION > SUITEBUNDLER > SEARCH & INSTALL BUNDLES
Search for Bundle ID in Keywords Field: 413963 or CSV Import Emailer
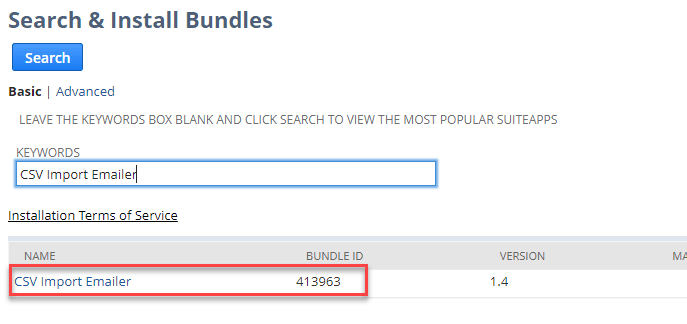
Select the hyperlink for the CSV Import Emailer which will bring you to the bundle overview page to prepare for an installation.
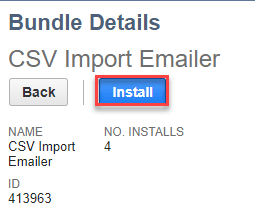
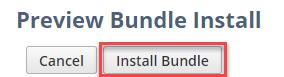
Click on the INSTALL button.
This will bring you to the Bundle Preview and require you to select INSTALL BUNDLE.
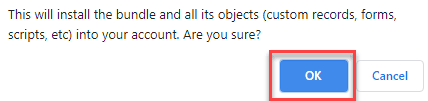
You will likely get a popup asking you to confirm that you want to install the bundle. Click OK.
At this point, the bundle will begin installing into your NetSuite environment. You will be brought to a list of your installed bundles where you can see the status of your bundle installation. Click REFRESH until you see that the STATUS has a checkmark.

If you do not see a checkmark within 10 minutes. Please contact Anchor Group for support.
CONGRATS! Your CSV Import Emailer is now installed in your NetSuite environment. Now it's time to do a short configuration.
Step 2: Set Up the Import Emailer Configuration Wizard
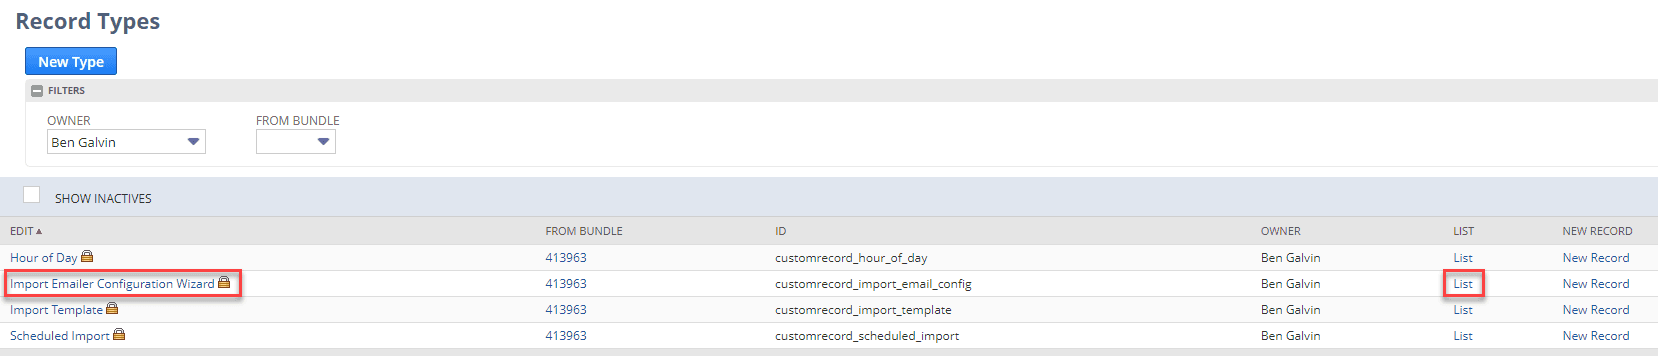
The next step to getting your CSV Import Emailer configured is to setup the Import Emailer Configuration Wizard. You can find the record by searching "page: import emailer configuration wizard" OR navigate to CUSTOMIZATION > LISTS, RECORDS, FIELDS > RECORD TYPES, find the Import Emailer Configuration Wizard and click List.
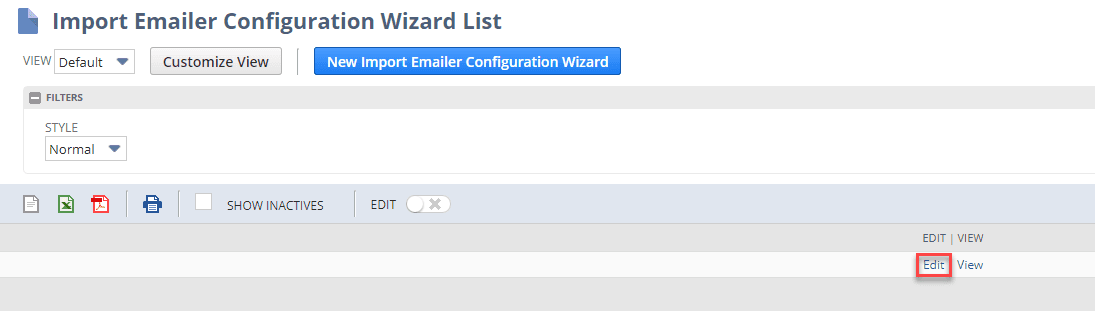
Note: Do not create a new configuration wizard, there is already an existing record that you simply need to edit.

On the configuration wizard list, click Edit.
Configuration Wizard Fields
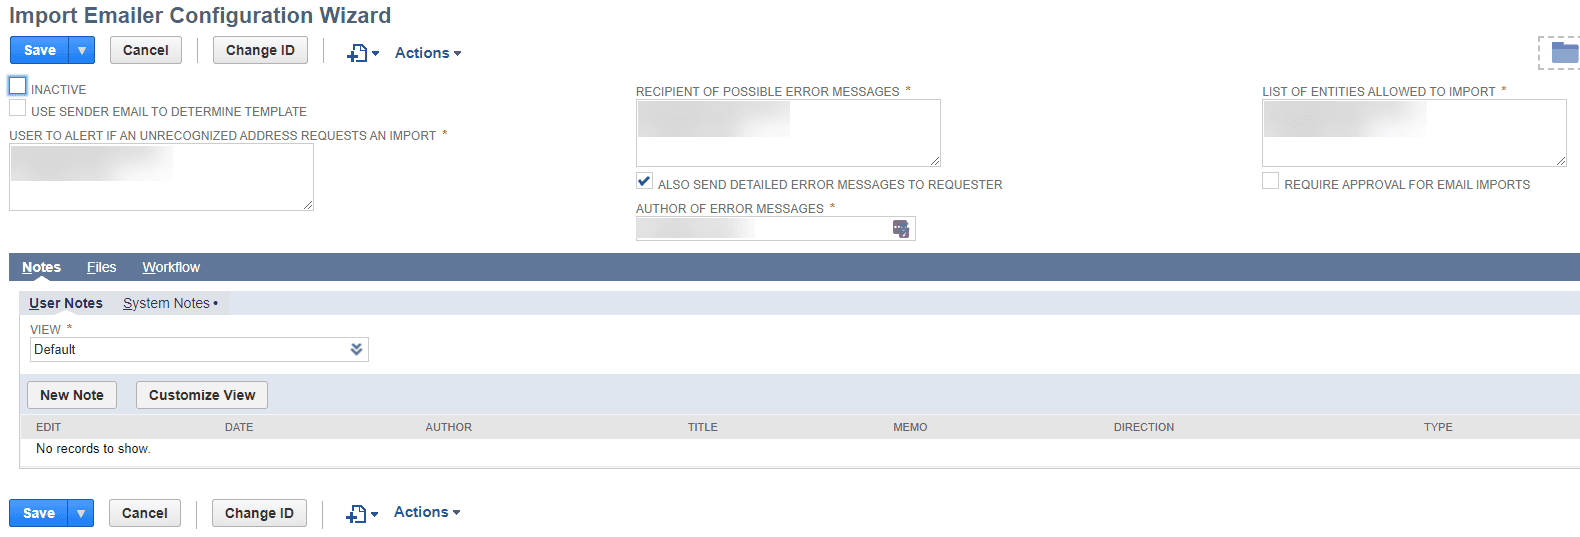
Enter your desired values into the fields on the configuration wizard, each field comes with a description to help you understand its purpose, simply hover your curser of the field display name. For additional information, see the list of fields configuration wizard fields below:
Inactive: Check this box if you wish to make this record inactive – making the record inactive will prohibit the import emailer from being useable.
Use Sender Email To Determine Template: checking this box allows NetSuite to automatically determine the Import Template to be used based on the email address of the sender. You will specify which template an email account uses on the Import Template Record (see Creating an Import Template). Checking this box will cause the body of the import request emails to be ignored and all csv import requests submitted via email will be imported immediately upon reception .
Note: You will also need to check the same field on the Scheduled Imports Today script's parameters (see Scheduled Imports today Script).
User To Alert If An Unknown Address Requests An Import: Select a person to receive emails if an unauthorized email address attempts to submit an import (i.e. if there name is not contained in the List Of Entities Allowed To Import field).
Recipient Of Possible Error Messages: Choose one or more recipients to receive all error messages relating to the bundle. Best practice is to add someone in this field who can read code because the detailed error messages may be written in code.
Also Send Detailed Error Messages To Requester: If checked, the sender of the import request email will also receive any error messages relating to their specific import request.
Author Of Error Messages: Choose the account to be listed as the sender of any error messages that are sent. This field is required because NetSuite's emails require a sender to work.
List of Entities Allowed To Import: This field contains the list of all entities that are allowed to submit scheduled email import requests. List all entities that you want to give this permission to; the email account that is associated with the entity in NetSuite will be the email address that is allowed to submit requests.
Note: Use discretion when adding entities to this list, once added, an entity on this list will be able to create an import of any kind.
Require Approval For Email Imports: If checked, this field will cause all email import requests to require approval before execution. This process will need to be defined by you, you could use a workflow, manually change the records to be approved, etc. To proceed with the import, the Scheduled Import Record needs to display "Approved" in the Approval Status field. If left unchecked, all import requests received from approved email addresses will automatically be marked "Approved".
Finding the NetSuite Generated Email Capture Address
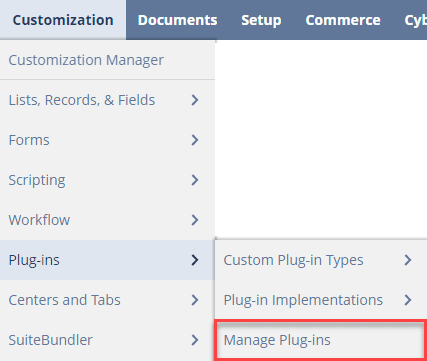
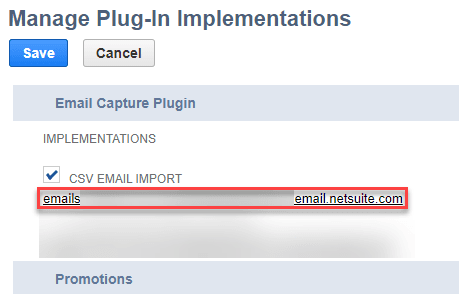
In order to submit import requests via email, you will need to find the email capture address, to do this go to CUSTOMIZATION > PLUG-INS > MANAGE PLUG-INS.
Check the CSV Email Import box and copy the email listed below it; this is the email that you will address your requests to.
Then, save the record.
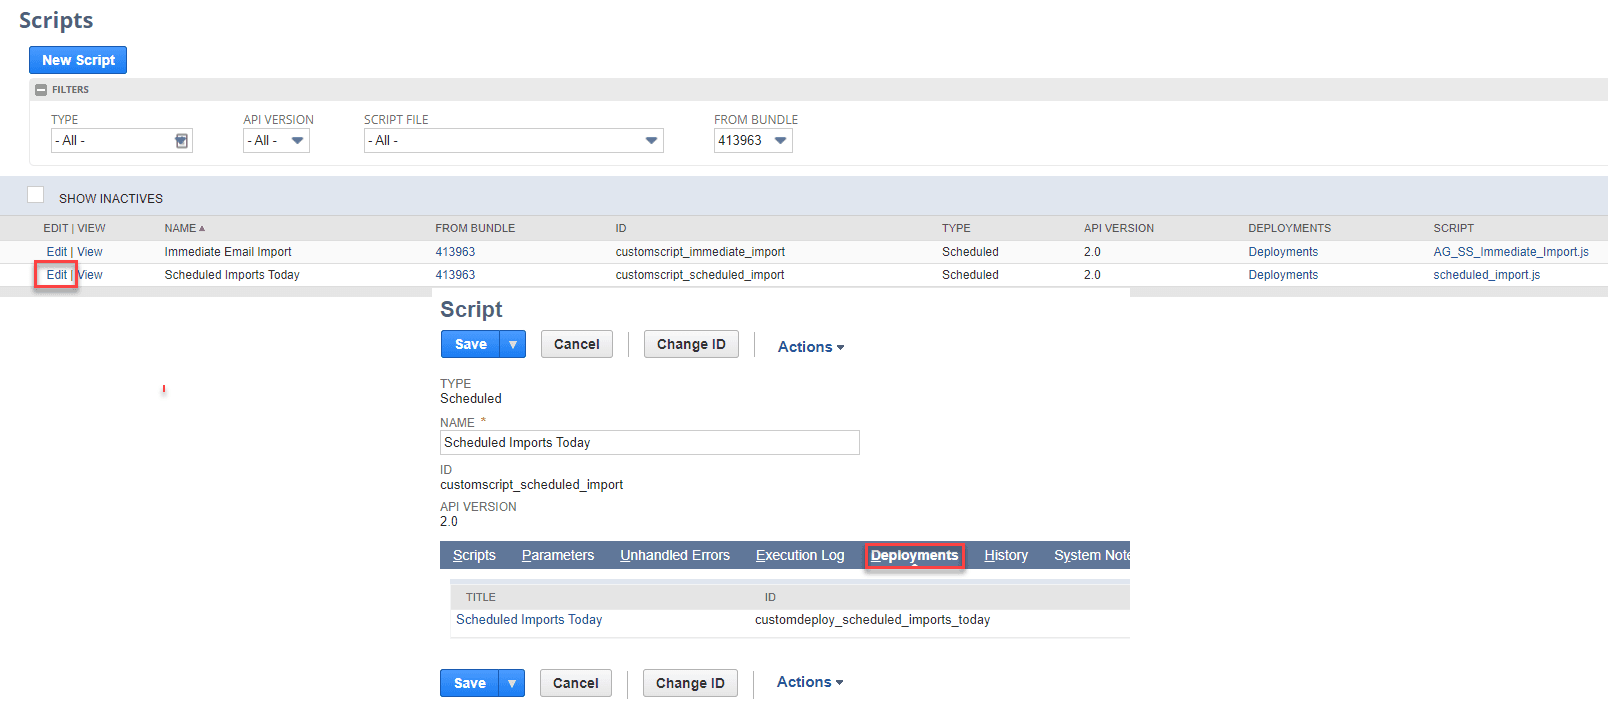
Step 3: Updating the Scheduled Imports Today Scheduled Script
There have been some issues with the scheduling of the script Scheduled Imports Today.
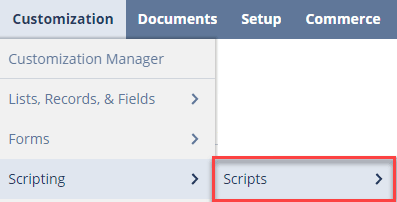
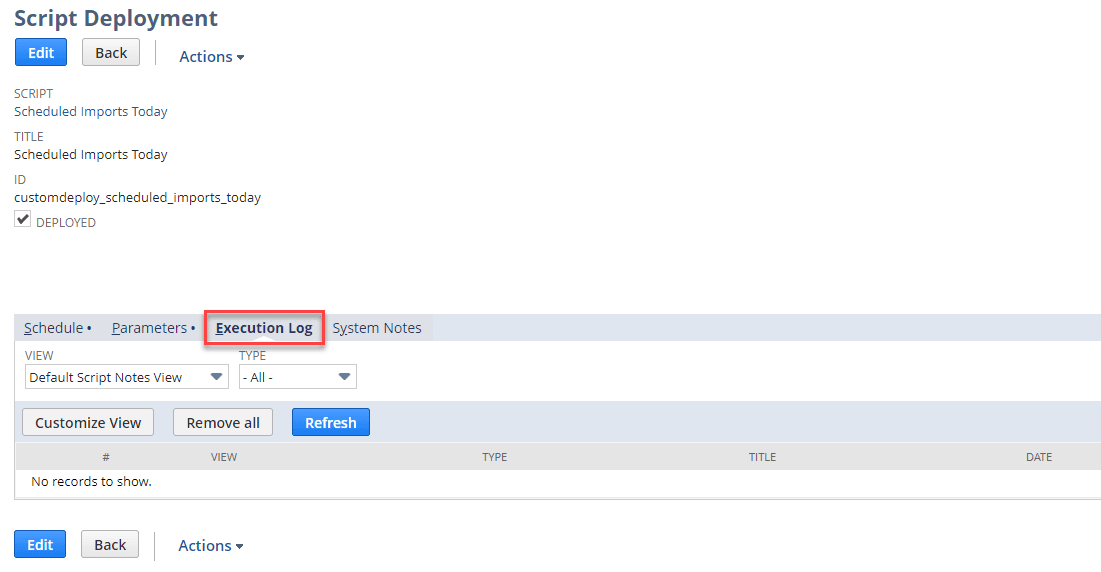
The script deployment customdeploy_scheduled_imports_today may require some changes. To check the script deployment, go to CUSTOMIZATION > SCRIPTING > SCRIPTS, and find the Scheduled Imports Today script and click View.
Under the Deployments tab, click on the deployment Scheduled Imports Today.
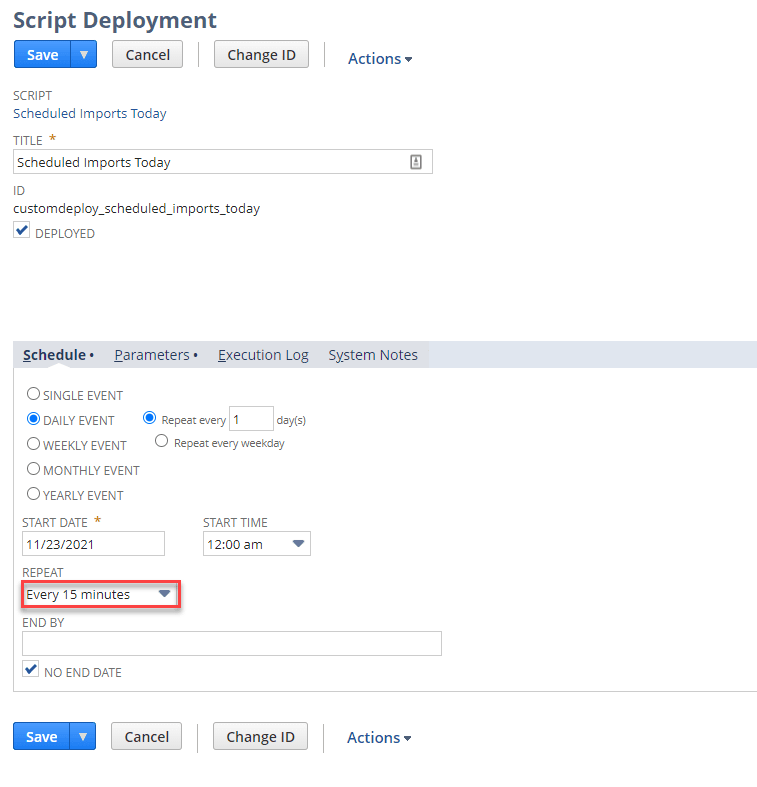
Under the Schedule tab, ensure that the schedule is set to:
- Daily Event: Repeat every 1 days
- Start Date: Any date that is in the past so that the script is set up to run
- Start Time: This can be whatever you time you wish the script to begin running, by default it is set to 12:00am
- Repeat: Every 15 minutes
- No End Date: Checked
Save the script deployment.
Under the Parameters tab, check the User Email To Determine Template if you wish to use this feature. For more information on this feature, see the Configuration Fields and Creating an Import Template sections.
Step 4: Saved CSV Import Records
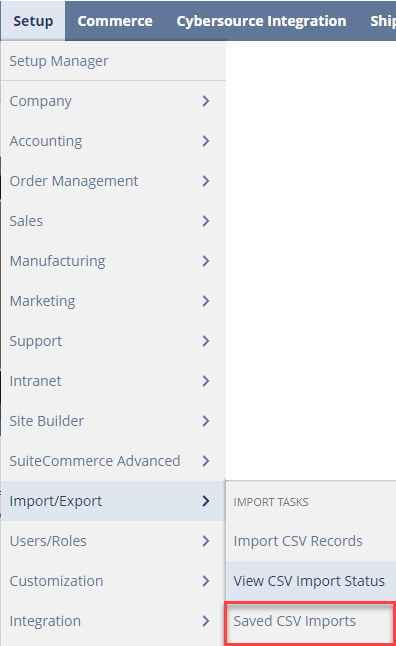
To use the CSV Import Emailer, you will need to use a saved CSV import record that uses the desired mapping for the import that you wish to schedule. To view existing saved CSV imports, navigate to SETUP > IMPORT/EXPORT > SAVED CSV IMPORTS.
Find the saved CSV import you wish to use and take note of the ID of that record, you will need this when you create your Import Template Record.
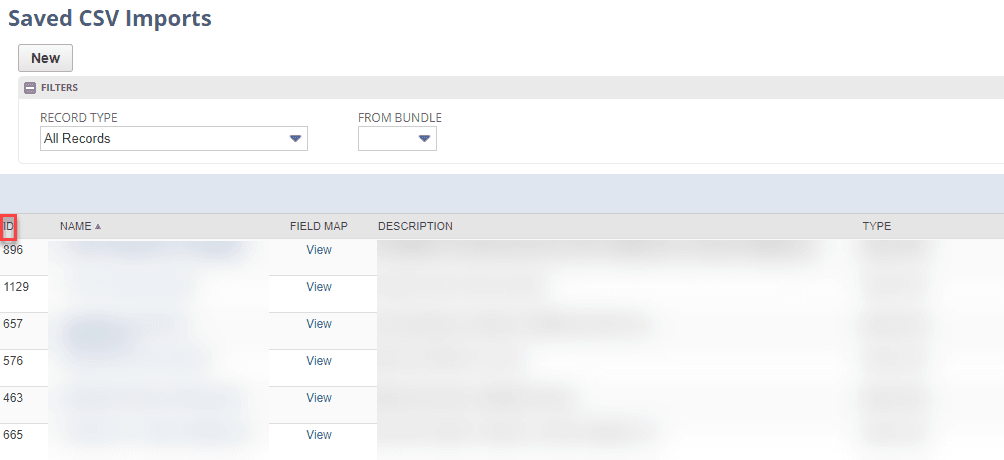
Note: Ensure that the CSV file you will be using contains the mapping required by your saved CSV import record. To view the mapping of a saved CSV import record, find your desired record and under the Field Map column (shown above) click View.
Creating a New CSV Import Record
If you do not already have a saved CSV import record that fits your import needs, you can create a new one by going to SETUP > IMPORT/EXPORT > SAVED CSV IMPORTS. Click New and use the import assistant to create your new saved CSV import record.
Note: When following the import assistant to create a new saved CSV import record, you will need to attach a CSV file to create the record. At step five of the import assistant you can save the record instead of saving and running the import, this method will allow you to use the same CSV file that you wish to schedule for an import to create the record without running the import immediately.
You can also use a CSV file that does not contain the correct mapping, you will not be able to go through with the import but you will still be able to save the saved CSV import record and use it with the correct file in your scheduled import.
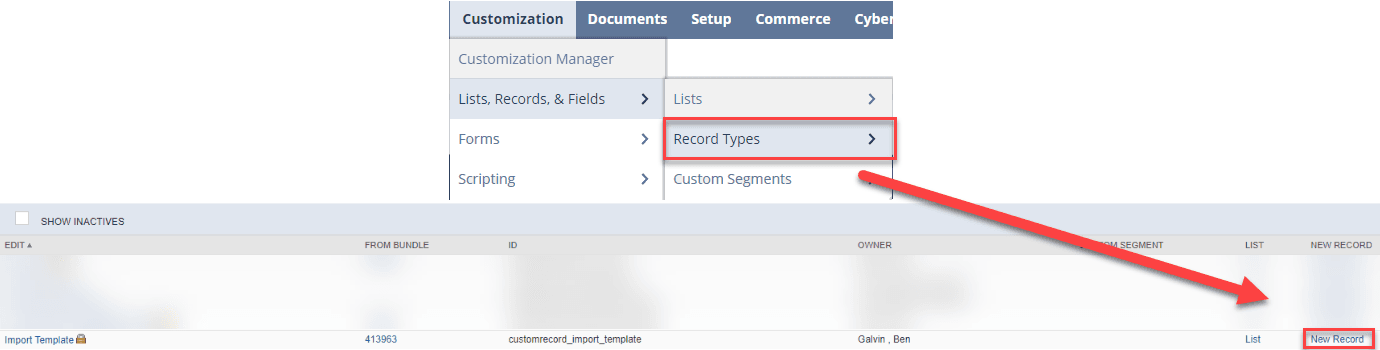
Step 5: Creating an Import Template Record
The last step in the set up process of your CSV import emailer is to create an Import Template Record that you will reference when creating your scheduled CSV import request. Navigate to CUSTOMIZATION > LISTS, RECORDS, FIELDS > RECORD TYPES, find IMPORT TEMPLATE and click New.

- In the Name field: enter the name you wish to use to identify the import Template Record by; this should be a short name that describes the type of import and sets the template apart from other templates.
- In the Saved Import Internal Id field: enter the internal id of your desired Saved CSV Import Record (SETUP > IMPORT/EXPORT > SAVED CSV IMPORTS)
- Check the Inactive box if you wish this import template record to be inactive
- Sender Email field: Only enter an email into this field if you are using the Use Sender To Determine Template function. If you are using this function and you enter an address in this field, only that email address will be able to submit requests for imports using this template. Note that if you are using the Use Sender To Determine Template function, when requests are received, the body of the request email will be ignored by NetSuite and imports will be executed immediately instead of on a schedule. To use this function, check the Use Sender Email to Determine Template box on both the configuration wizard (see Set Up the Import Emailer Configuration Wizard) and on the Scheduled Imports Today script deployment (see Updating the Scheduled Imports Today Scheduled Script). If you are not using this function, leave this field empty.
Save the Import Template Record.
You can now use this template in your email submissions by including the internal id in your email's body. To view all of your import template records, go to CUSTOMIZATION > LISTS, RECORDS, FIELDS > RECORD TYPES, find the record called IMPORT TEMPLATE and click List. The value in the Internal Id column is the value you will include in the body of your request email to associate your CSV file with the desired import type.
Step 6: Creating a Scheduled CSV Import Request
Creating an Import Request Via Email
There are two ways in which you can create a scheduled import request, the first is via email. This method allows users to submit import requests using files that are saved on their computers and without logging into NetSuite.
To begin, you will need to find the NetSuite generated email capture address (see Finding the NetSuite Generated Email Capture Address).
- Login to an email account that is associated with one of the entities in NetSuite that is listed on the Import Emailer Configuration Wizard in the List Of Entities Allowed To Import. Sending an email from an account that is not associated with an entity listed in this field will result in an error response and the request will not be submitted.
- Compose a new email and paste the email capture address (the one obtained previously from the manage plugins page) into the recipients field.
- The subject line of the email does not affect your request; you may set this to whatever you want it to be.
- The body of the email is where all of the information that is required for the creation of your scheduled CSV import will be listed. The formatting of this email is important, see the format below.
- Attach your CSV file to the email. Ensure that the fields in your CSV file match the field mapping required for your saved CSV import record.
- Send the email.
Remember that the maximum number of and size of files that you can include in one submission will vary based on the NetSuite instance and record type. We suggest you include no more than 10 files per scheduled import record. If the file is large (5,000+ lines), we suggest attaching only a single file. When importing multiple large files, we suggest using separate import requests for each one.
Email Body Format
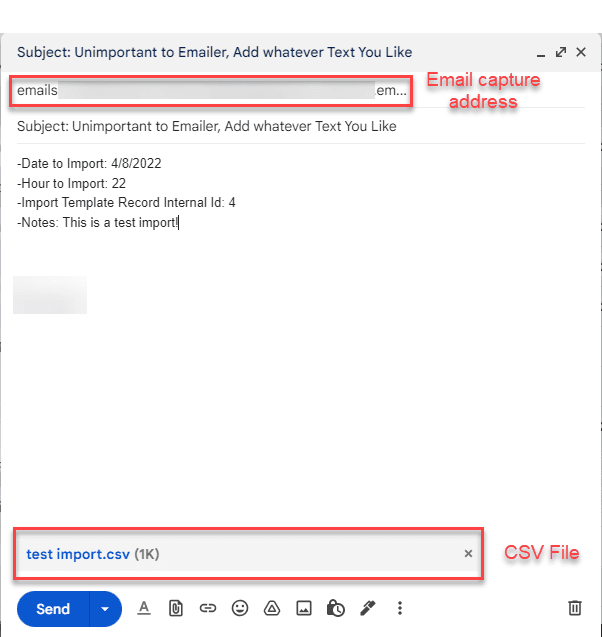
Date to Import: This is the date one which you want the import to be executed. The date must be formatted D/M/Year. The date should contain no leading zeros for single-digit days or months.
Hour to Import: The 24-hour format at which your import should be executed. The time is dependent upon the host NetSuite environment clock, be careful to avoid submitting an import request that is scheduled to occur in the past.
Import Template Record Internal Id: The Id of the import template record that matches the type of import you are attempting to create. This is NOT the Id of the saved csv import that you wish to use, rather, the import template record that you created previously to associate with that saved csv import.
Notes: Any notes you wish to include on the schedule import record, these will be visible in the list view of the scheduled import records as well as on the individual record itself. You may also leave this section blank if you wish.
Creating an Import Request in NetSuite
The second way in which you can create a scheduled import request is by creating a scheduled import in NetSuite. To do this, a user must be able to log into the NetSuite environment in which the import is to take place. Using this method to create scheduled imports allows you to import files directly from your File Cabinet.
In the global search, type page: scheduled import. You can either click page: scheduled import and create a new scheduled import by clicking the New Scheduled Import button at the top of the Scheduled Import List, or by clicking Page: New Scheduled Import in the search results.

On the Scheduled Import record, enter the same information in the prompted fields that you would include in your email body.
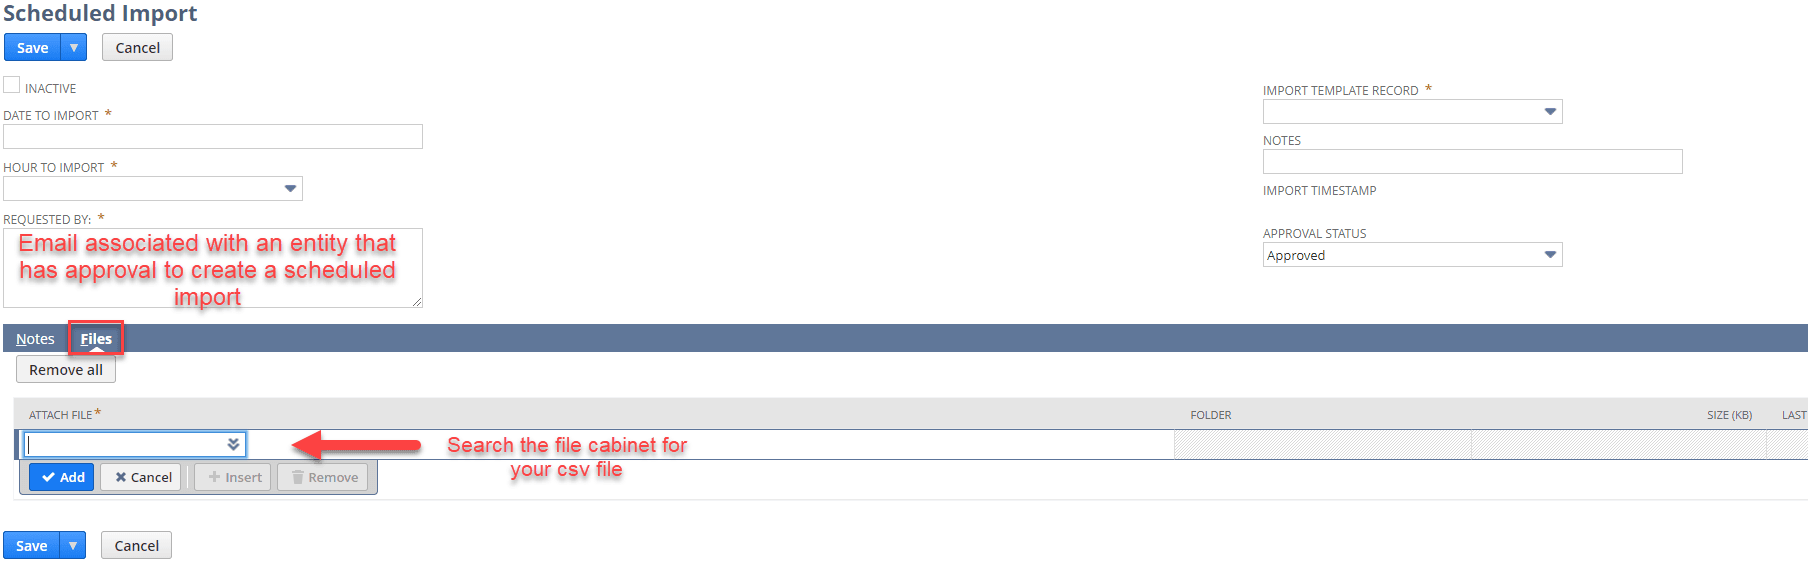
In the Requested By field, enter the email address that is on the record of an entity that has permission to create a scheduled import.
- The list of entities with permission to create scheduled imports can be found on the Import Emailer Configuration Wizard in the field List of Entities Allowed to Import.
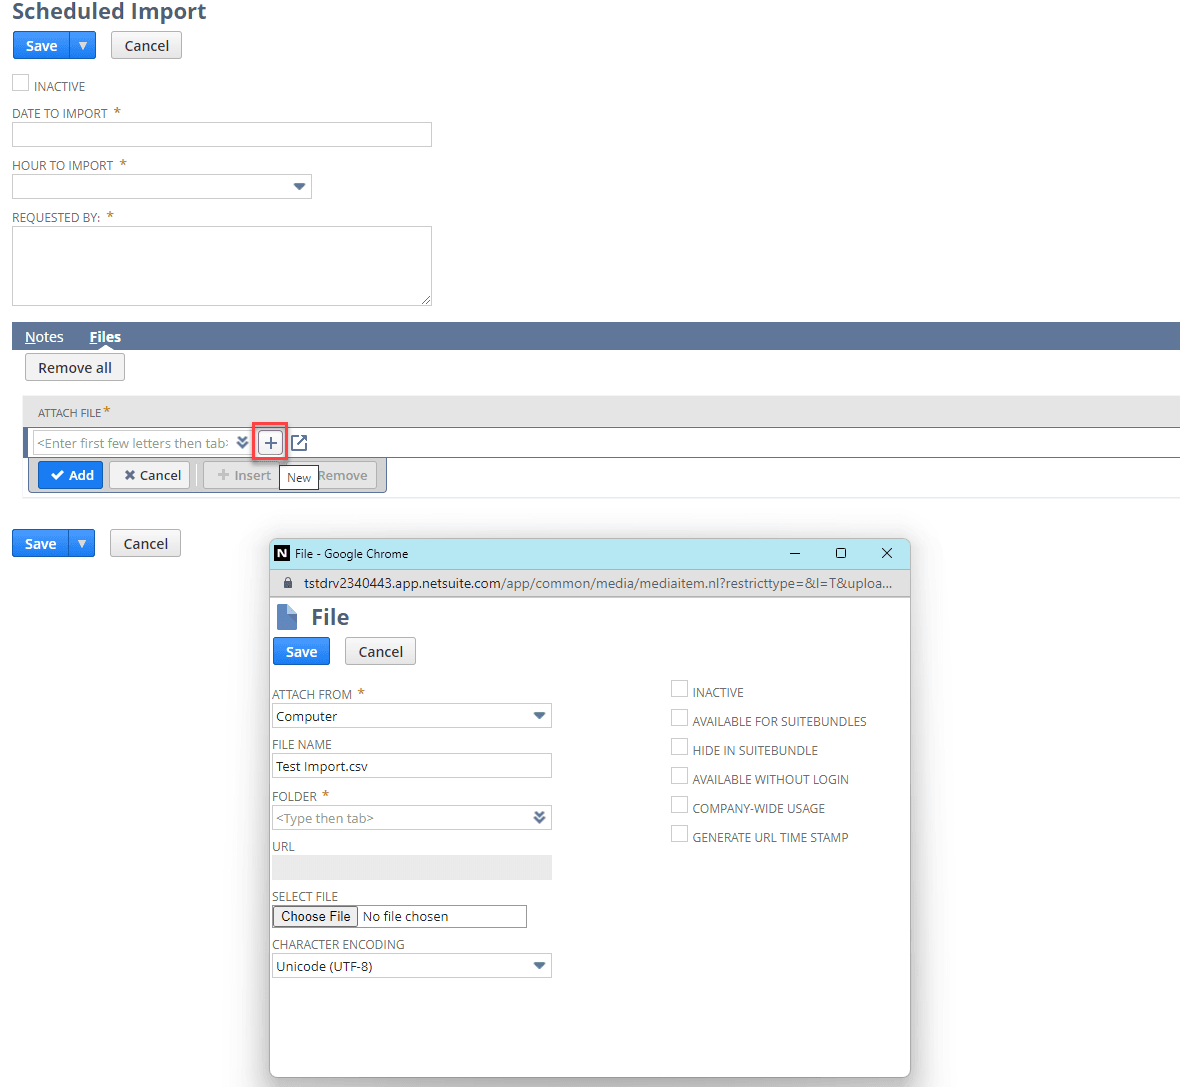
Under the Files tab, attach the csv file that you wish to use in your import. You can either select a file from the File Cabinet or you can choose to upload a file form your computer by clicking the + icon.
Once you have attached your CSV file and filled out the required fields, click Save. Your import should appear in the Scheduled Import List.
Troubleshooting and checking the import results for both the email submission method and the NetSuite submission method are outlined below.
Scheduled Import Requests with Multiple Files
You can attach multiple CSV files to scheduled import request, however, there are a few things to keep in mind.
CSV with Different Import Record Types - Each scheduled import can only use one Import Template Record. If you are attaching multiple files to your scheduled import, ensure that they can all use the same Import Template Record (i.e. they use the same import record type). You must create separate scheduled imports for files that require different Import Template Records.
Limits to Attaching Multiple Files to a Scheduled Import - The importing limits of scheduled imports are the same as the limitations that exist for the native import tool. The exact limitations on your import abilities will depend upon your NetSuite instance, generally, for large files (5,000+ lines) it is best to create one scheduled import for each file. For smaller files, you can attach multiple files to one scheduled import or schedule multiple imports for the same time.
Step 7: Verifying Import Requests
Scheduled Import List
To verify that your import submission has been successfully received, in the global search, type page: scheduled import. This will take you to the scheduled import list where you can see every scheduled import in NetSuite. You can also view imports that have already been completed; these imports will have an Import Timestamp on them.

Scheduled Imports for Today Saved Search
To view upcoming imports, we have built a saved search that will display pending imports. In the global search, type Search: Scheduled Imports for Today. You can change the search criteria to filter for a date range as large or small as you desire. Out of the box, the search filters for "today".
If your submission has gone through successfully, this search will display all of the pending imports that are scheduled to execute within the date range specified on the search criteria tab, check to see that the information is correct. If the import does not appear in this list, check your email for an error message (this assumes you have set the configuration wizard to send error messages to the sender). Once the Import has been executed a time stamp should appear in the Import Timestamp column.
Step 8: Verifying Your Import Job Execution
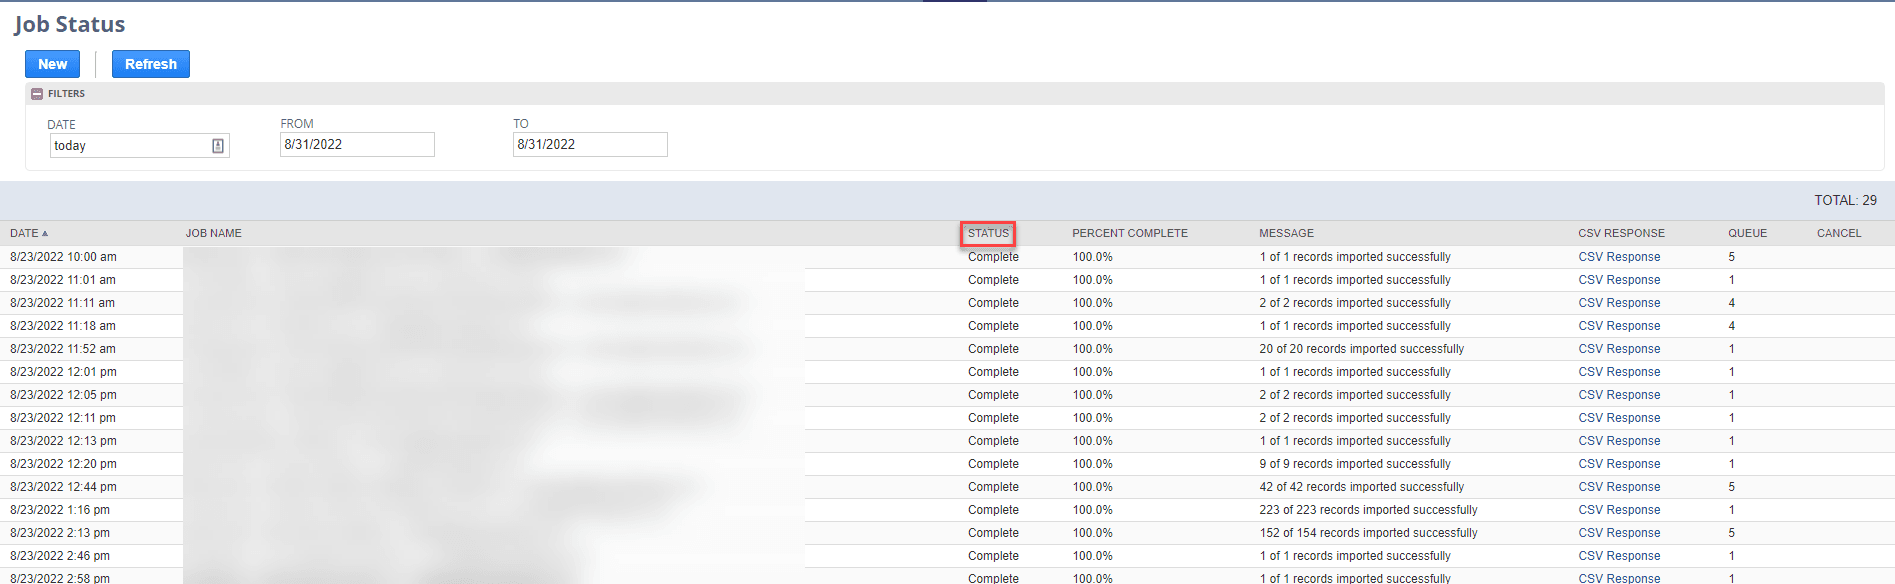
Verify that the import has worked by navigating to Setup > Import/Export > View CSV Import Status.

Locate your import’s job, you can filter by date and find your job’s name, and verify that the import has worked correctly. Additionally, navigate to the records you have updated or added and verify that the changes are as expected.
Not Seeing Your Job in This List?
Scheduled Import List
If you do not see your schedule import in the import jobs list, the first thing to check is the Scheduled Imports List. If the script that submits jobs has run, there will be a timestamp on your scheduled import telling you when the script ran. Check the Scheduled Import List to verify this timestamp by searching for page: scheduled import.
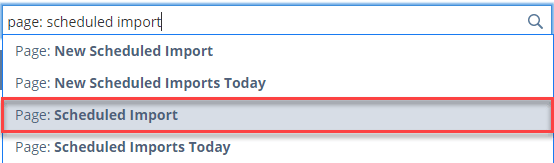

This list will show you all imports that have been scheduled through the CSV Import Emailer. If your import has a timestamp but did not appear in the import jobs list, check the Scheduled Imports Today execution log for any possible error messages. Navigate to CUSTOMIZATION > SCRIPTING > SCRIPTS and find the Scheduled Imports Today script. You can also type in the global search page: scheduled imports today, this would be the last result shown in the image of the global search shown above.
Once you have located the script, click the Deployments tab and select the Scheduled Imports Today deployment. On the deployment record, click the Execution Log. Here you can view the script responses for every time the script has run within the current day. Use these responses to troubleshoot your import jobs. Most of the time, errors that appear here are errors that may also appear in the Import Assistant. Usually this means that there is a discrepancy between the file you have attached and the field mapping required for that import by NetSuite.
If there are no logs visible, this means that the script has not run today. To view script logs from previous days, type page: script execution logs.
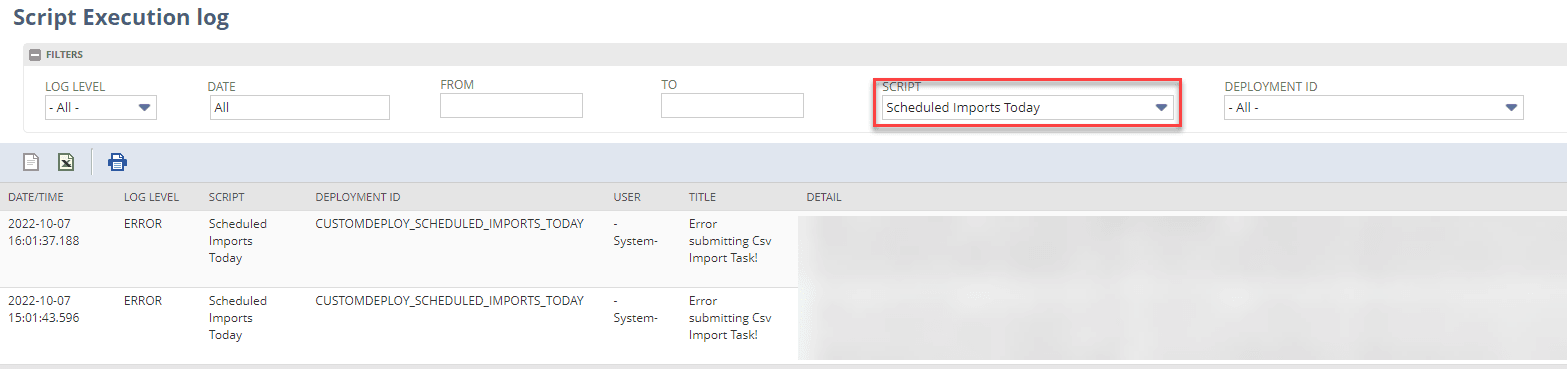
Select the script name, Scheduled Imports Today, you can filter by deployment ID (not necessary in this case), and by date.
These script logs should give you the information you need to troubleshoot your import submissions and update you csv file to successfully submit your import job.
Get stuck in a step during this article?
We like to update our articles to make sure they help resolve any difficulties you are having. If you are having trouble with this self-install process, or if you are experiencing any issues with your CSV Import Emailer, please contact Anchor Group via the website contact page, or call our direct sales team at (608) 575-9053.
Tagged with Solutions